Getting Started with Python
Joe Wu, PhD
NCI/CCR Bioinformatics Training and Education Program
ncibtep@nih.gov
Lesson 1 Learning Objectives
After this class, participants will be able to:
- Describe Python and provide rationale for using Python
- List tools for interacting with Python
- Sign onto Biowulf, start a Jupyter Lab session, and become familiar with the Jupyter Lab interface.
- Describe Python command syntax
- Describe where to get and how to install external packages
- Get help for Python commands
Why use Python?
- General purpose scripting language
- Analyze and visualize large datasets
- Reusability and reproducibility
- Versioning and keeping track of changes is possible when analyzing data using scripts
- Easy to learn
- External packages that enhances functionality
- Large community support
Python enables Elegant Data Visualization
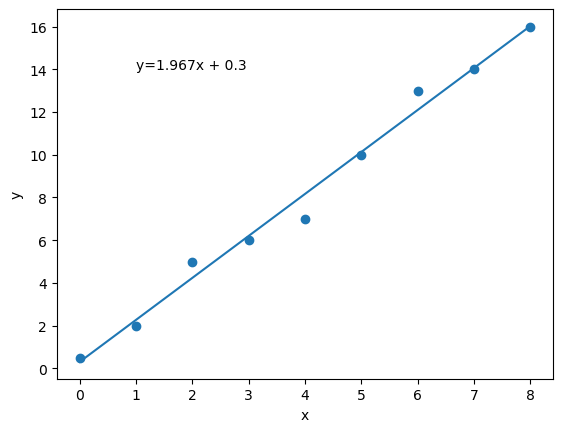
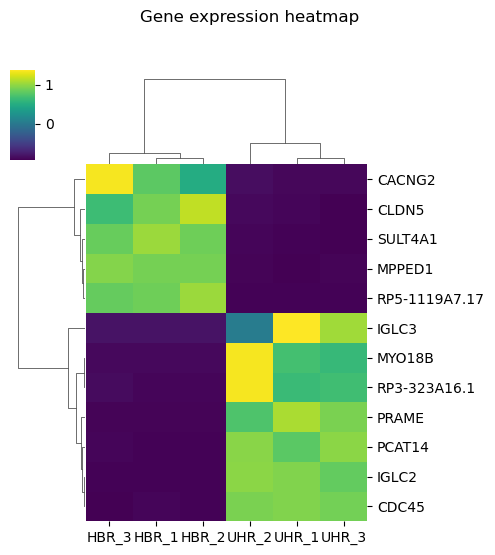
An abundance of external packages make scientific computing and data presentation easy. For instance, the packages matplotlib and seaborn are good tools for generating data visualizations. With a few lines of code, scientists can generate scatter plots to view relationship between variables and/or heatmaps that can reveal distinct clusters in a dataset.
Generating a Scatter Plot using Matplotlib
import matplotlib.pyplot as plt
import numpy

x=numpy.array([0,1,2,3,4,5,6,7,8])
y=numpy.array([0.5,2,5,6,7,10,13,14,16])
plt.scatter(x,y)
slope, intercept=numpy.polyfit(x,y,1)
plt.plot(x,slope*x+intercept)
plt.text(1,14,'y='+str(round(slope,3))+'x' ' + ' + str(round(intercept,3)))
plt.xlabel('x')
plt.ylabel('y')
Generating a Gene Expression Heatmap using Seaborn
import pandas
import seaborn
import matplotlib.pyplot as plt
counts1=pandas.read_csv("./hbr_uhr_top_deg_normalized_counts.csv", index_col=[0])
seaborn.clustermap(counts1,z_score=0,cmap="viridis", figsize=(5,5))
plt.suptitle("Gene expression heatmap",y=1.1)
plt.show()
Tools for Interacting with Python
- Python can be run at the command prompt
- Ipython
- Run python script at the command prompt
- Integrated Development Environments such as:
- Visual Studio Code from Microsoft has extensions that support Python scripting
- R Studio
- Juptyer Lab/Notebook
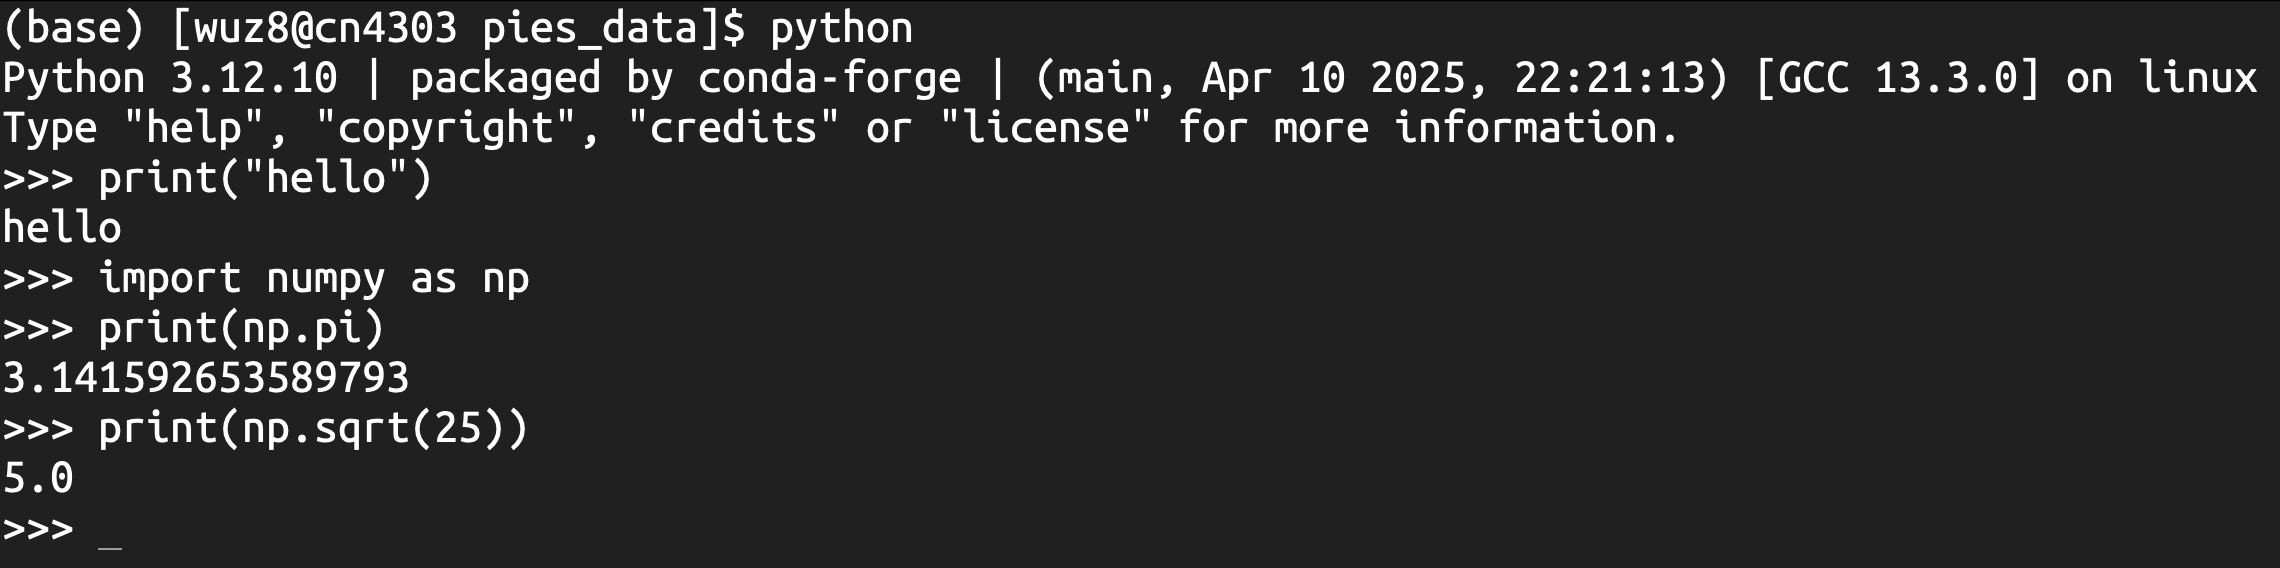
Python at the Command Prompt
Assuming Python is installed, just type python at the command prompt to start using Python. Hit control-d to exit back to the command prompt. The downside to this is that users cannot save the commands into a script.
Ipython
Ipython enables users to run Python commands interactively at the terminal. It features autocomplete of commands and allows for saving of commands to a python script using %save followed by the name of the script.
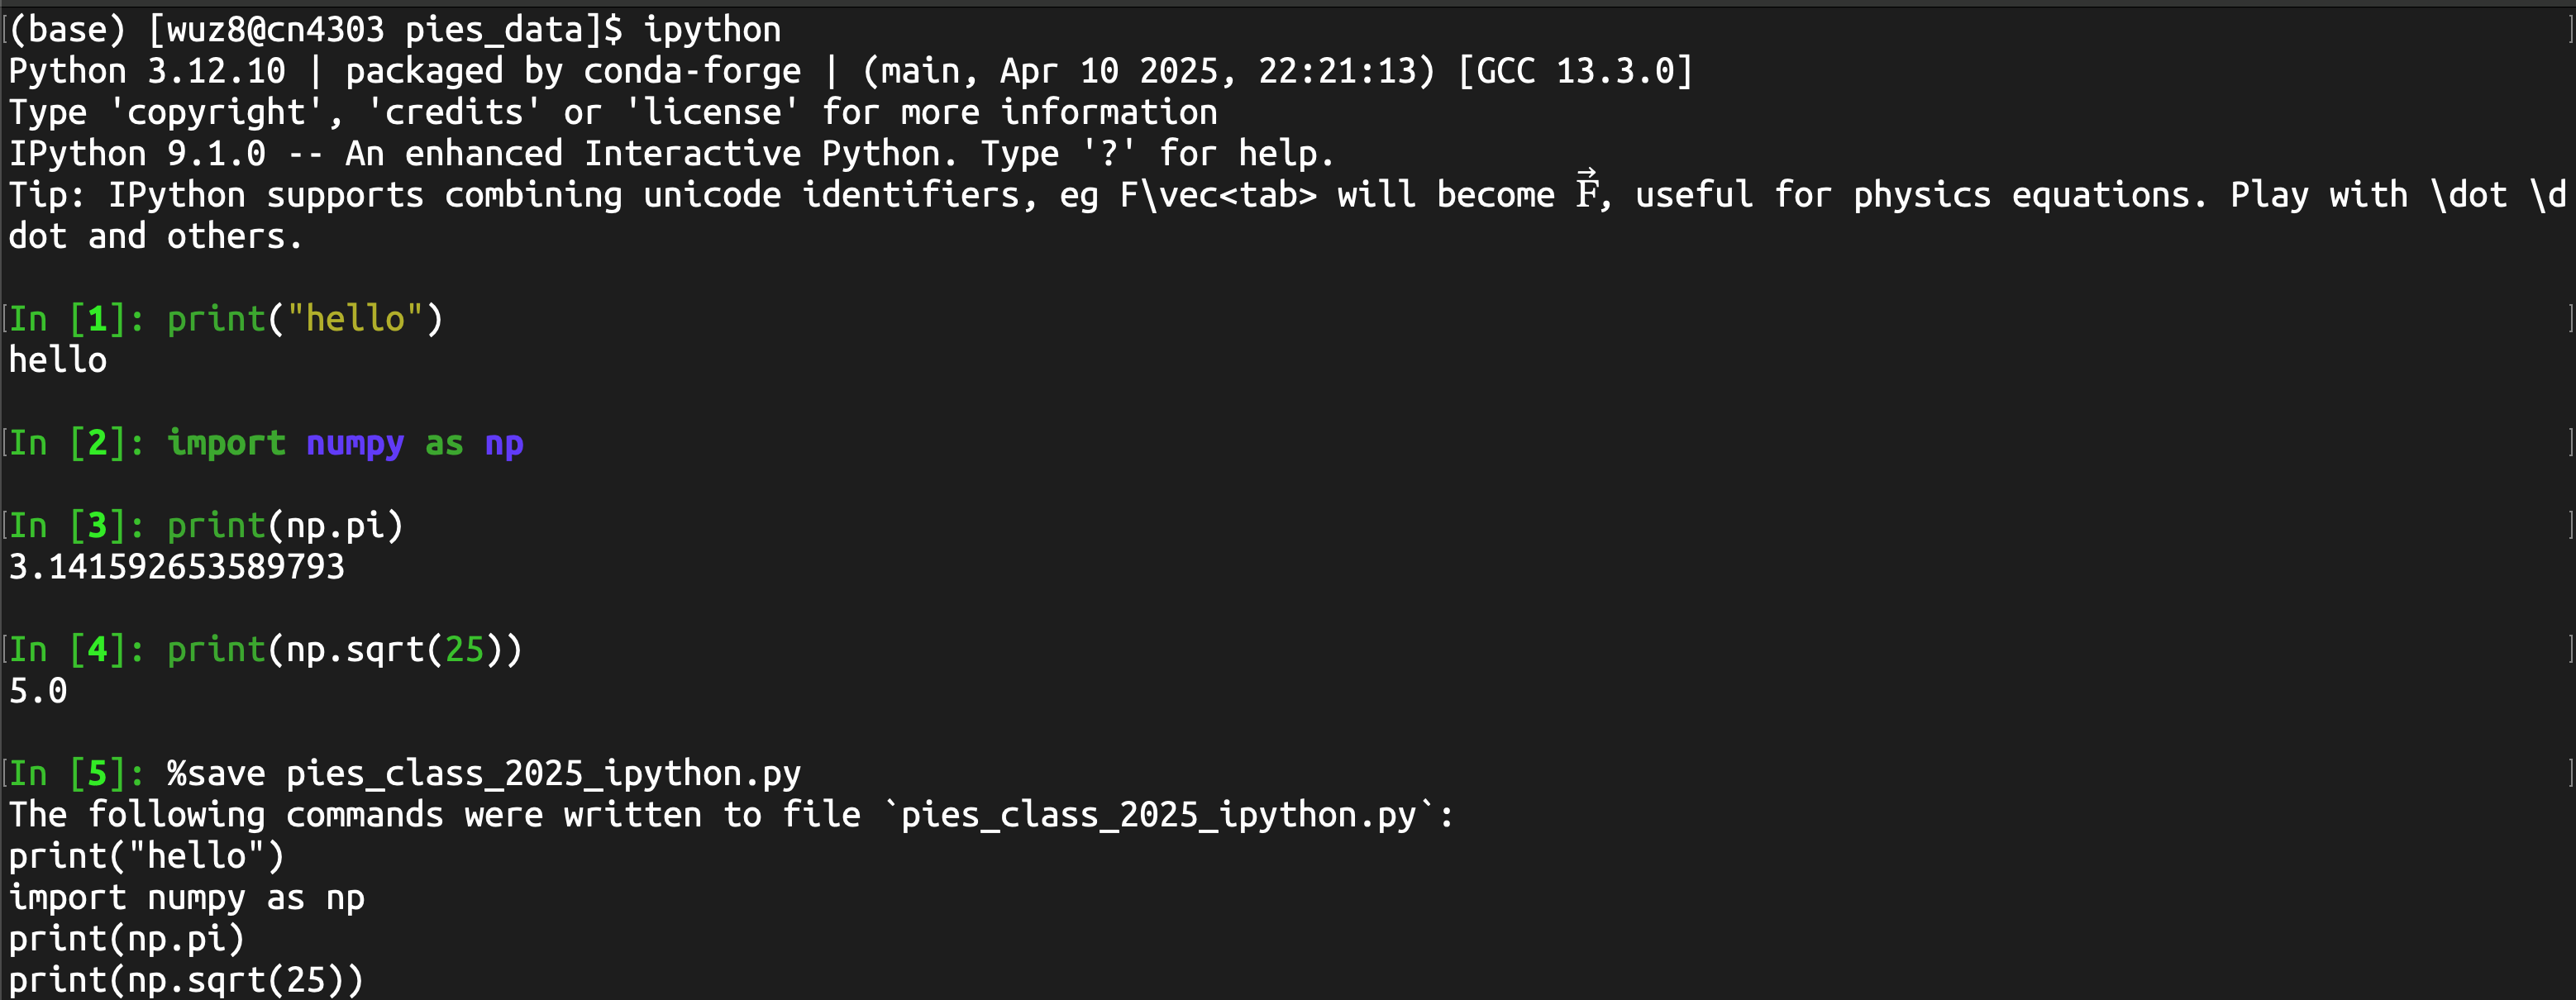
Hit control-d to exit Ipython and return to the command prompt.
While using Ipython is better than just running commands on the terminal, it still is not very efficient in terms of saving work. Also, users will not be able to view plots on HPC systems such as Biowulf since these do not support inspection of graphical outputs.
Note
The pies_class_2026_ipython.py script can be run from the command line. To run a Python script from command line, just do python followed by name of the script. Python scripts can also be submitted as a job to the Biowulf batch system.
python pies_class_2026_ipython.py
hello
3.141592653589793
5.0
Using Python through IDE
Integrated Development Environments or IDEs are ideal for scripting in Python as well as other languages. See https://ritza.co/comparisons/pycharm-vs-spyder-vs-jupyter-vs-visual-studio-vs-anaconda-vs-intellij.html for a breakdown of of common ones such as Spyder, Pycharm, VS Code, R Studio, and Jupyter Lab. Essentially, IDE enable users to write scripts, access as well as view data, and view plots. Some IDEs enable users to generate analysis report that details steps of an analysis as well as the tool and the code use.
Accessing Python at NIH
- Biowulf (HPC OnDemand is recommended).
- Use Python locally on government furnished personal computer.
- Install using package manager Conda Forge. Package managers like Conda Forge makes installation of Python and external packages easier.
- Install as a stand alone at https://www.python.org. Packages can be obtained from the Python Package Index or pypi.org.
Signing onto Biowulf HPC OnDemand
- Open a web browser on local computer (Google Chrome is recommended) and go to https://hpcondemand.nih.gov/, which is the URL for Biowulf's HPC OnDemand.
- Once at HPC OnDemand, sign in with participant's NIH PIV card credentials.
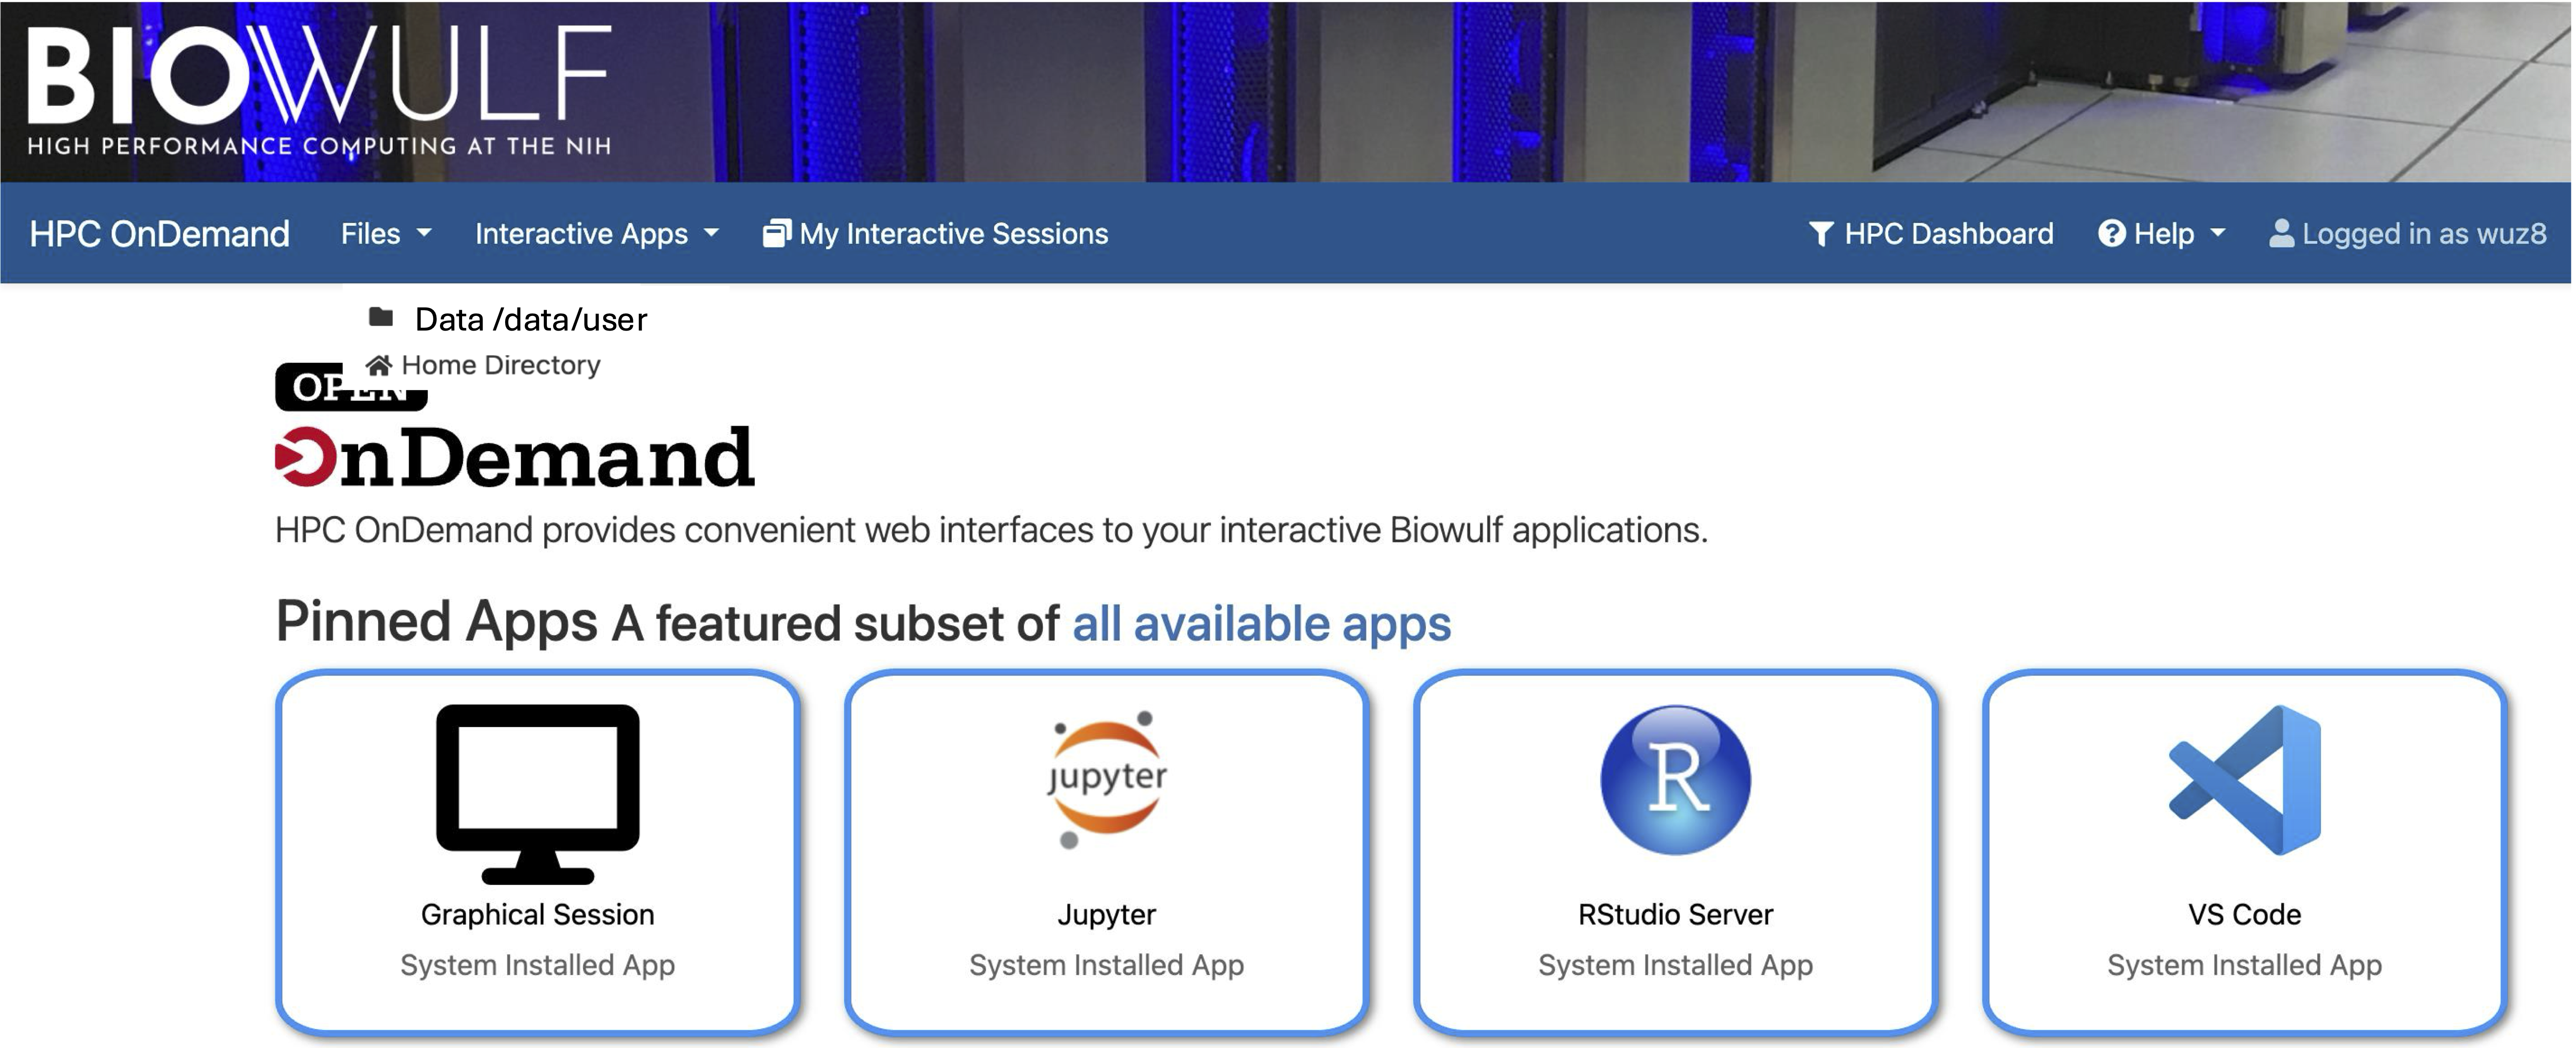
- After signing in, users will see links to applications available through HPC OnDemand such as Jupyter. User's Biowulf file system can be accessed via OnDemand as well (just click Files in the menu bar).
Get the Example Data
Goto the course overview section in the class documents and scroll to the bottom and click on "Download data used in this course" to obtain some example data. The data comes as zip file and note where it is downloaded to (usually it is the local Downloads folder). While Macs will automatically unzip, Windows users may need to right click on the file to uncompress it. After the download and uncompressing is finished, participants will see a folder called pies_data.
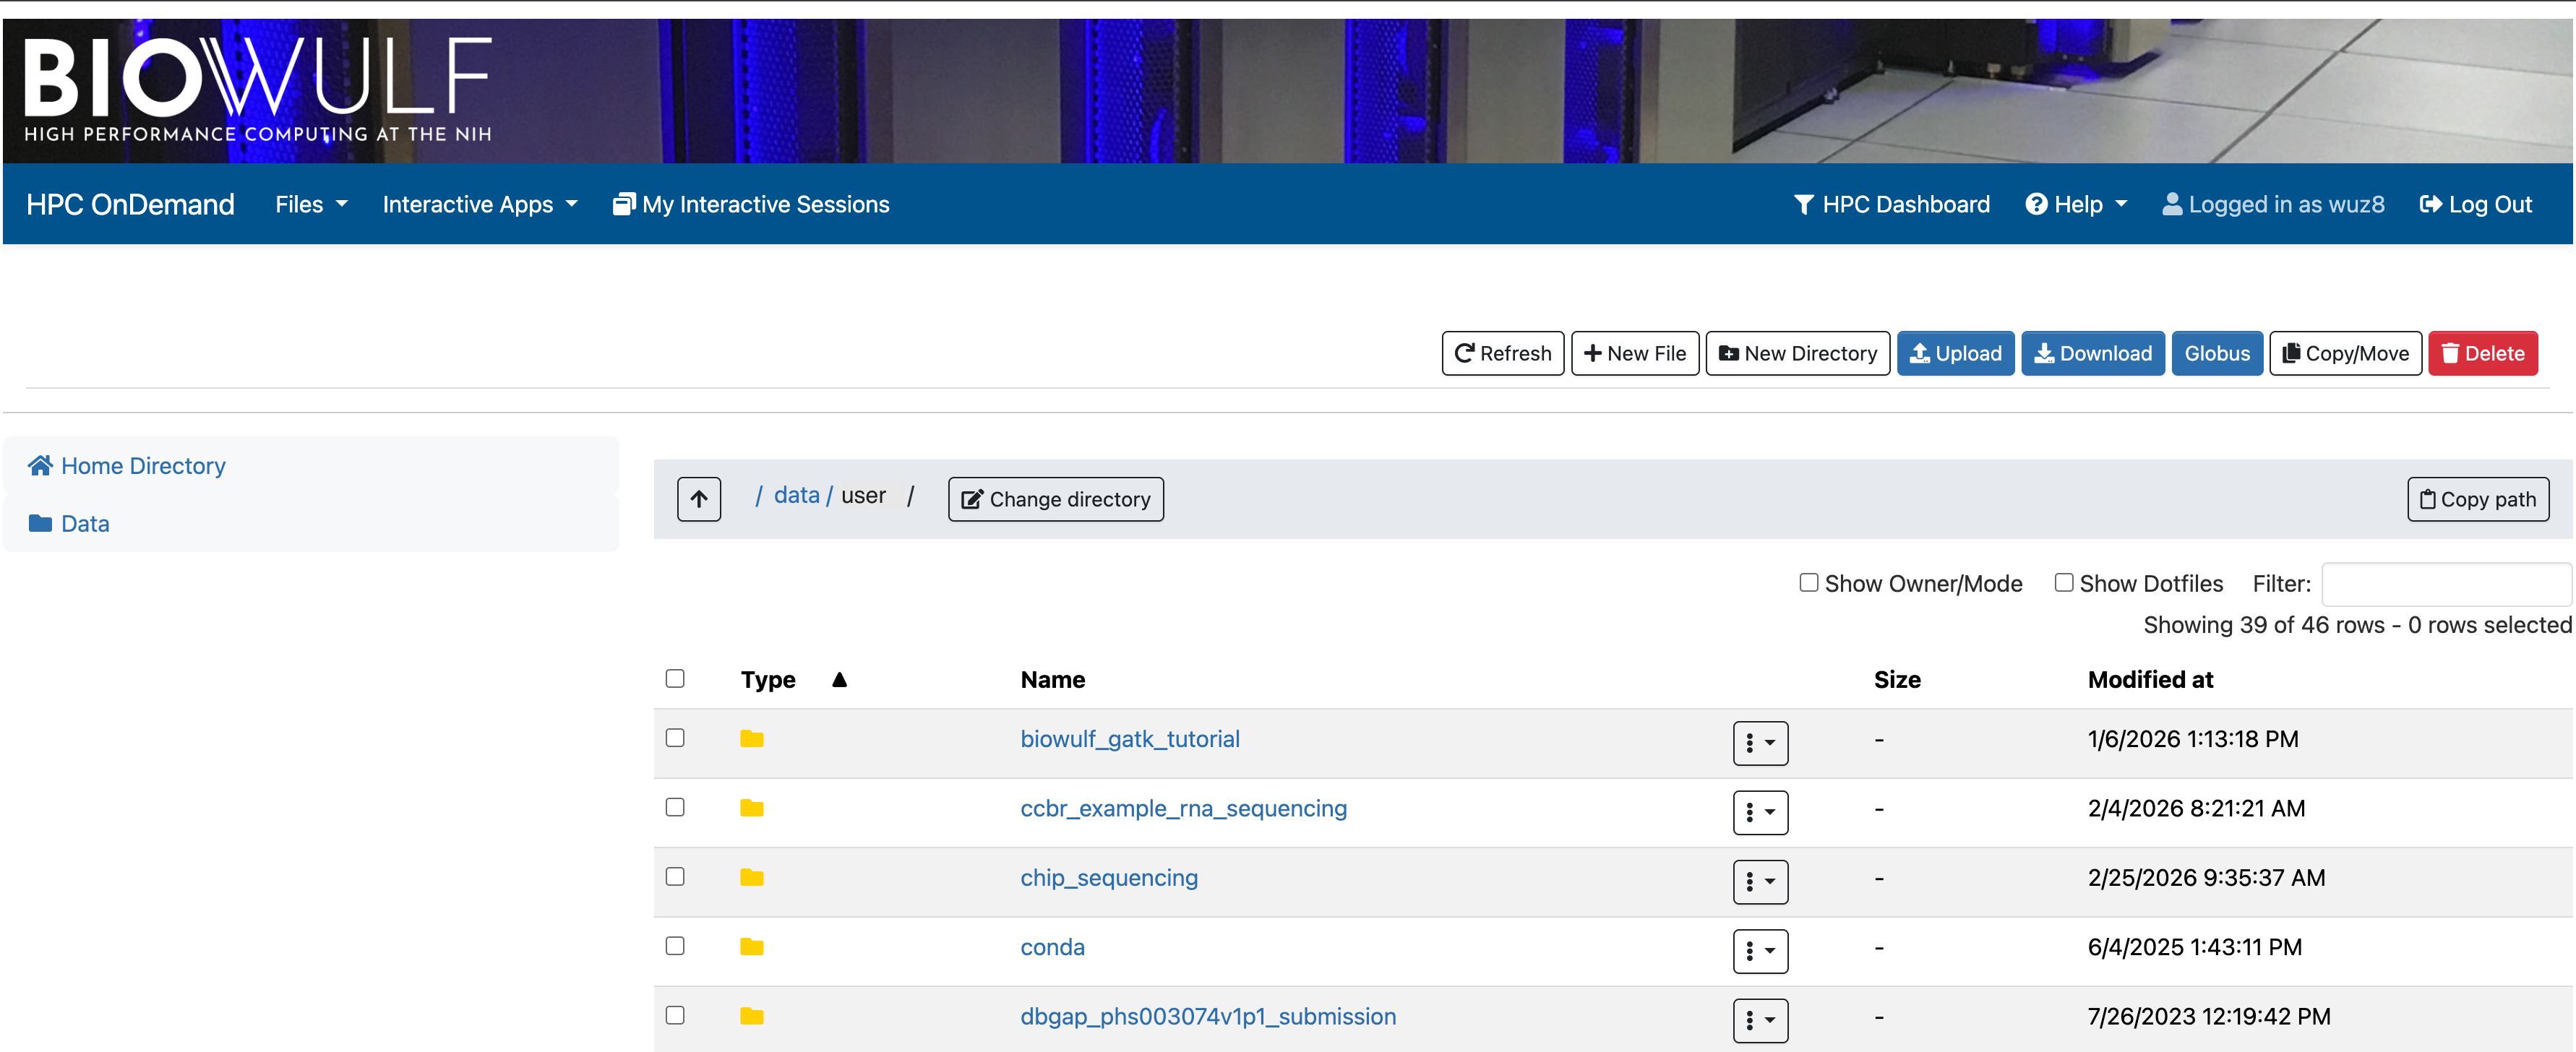
Next, click "Files" in the HPC OnDemand menu and choose the folder labeled /data/user, where user is the participant's Biowulf user ID. The subsequent page will show the content (ie. files and folders) of the participant's Biowulf data directory.
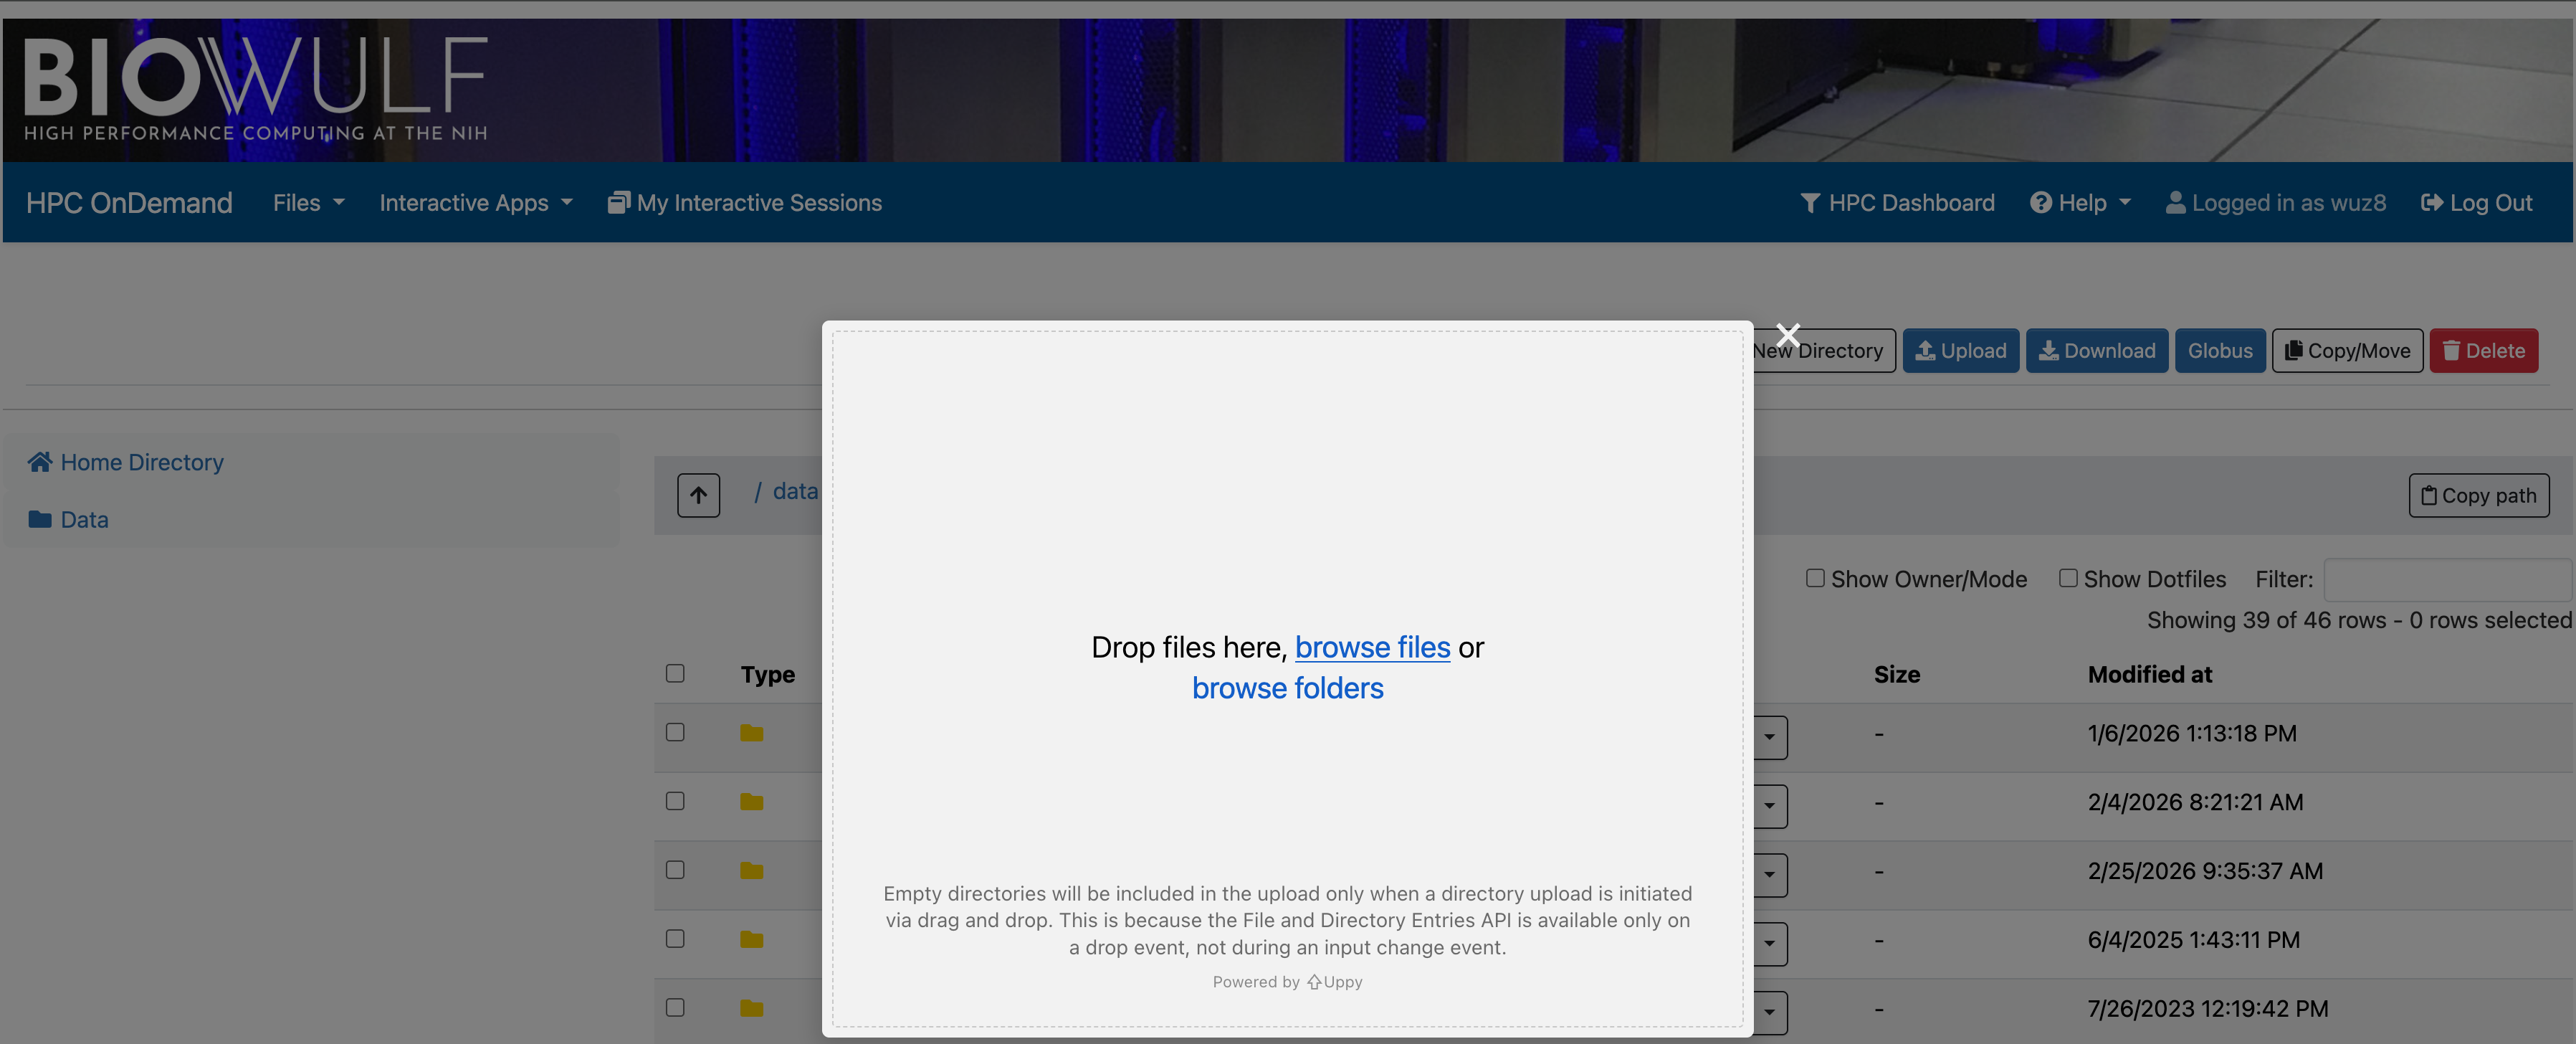
Click "Upload" to send the pies_data folder from local computer to the participant's Biowulf data directory. Users can either browse to upload or drag-and-drop.
Start a Jupyter Lab Session
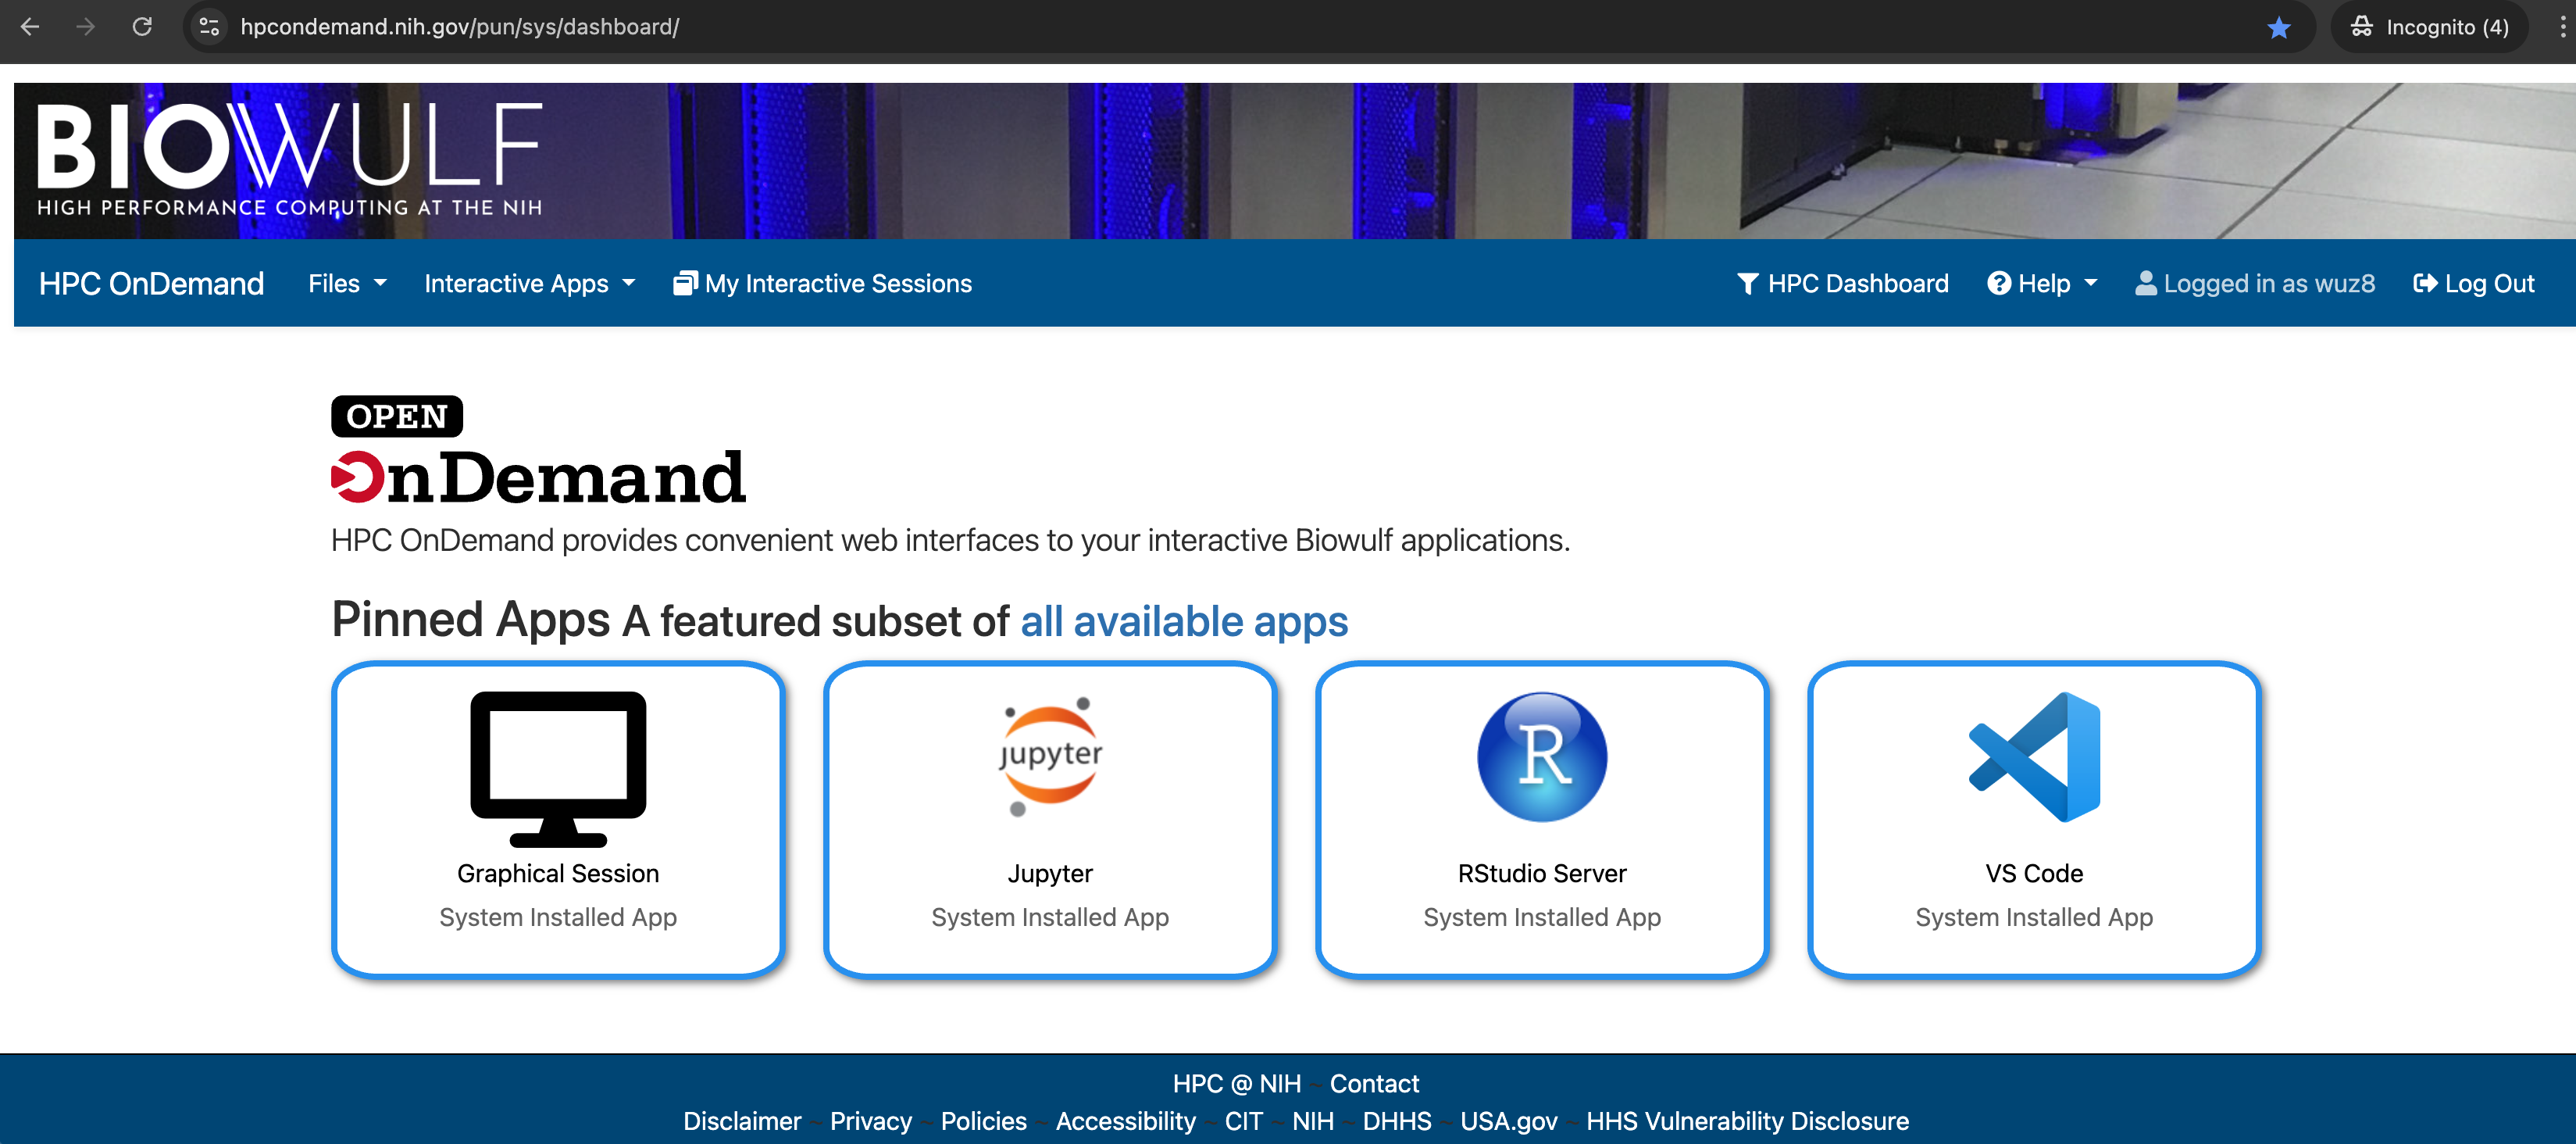
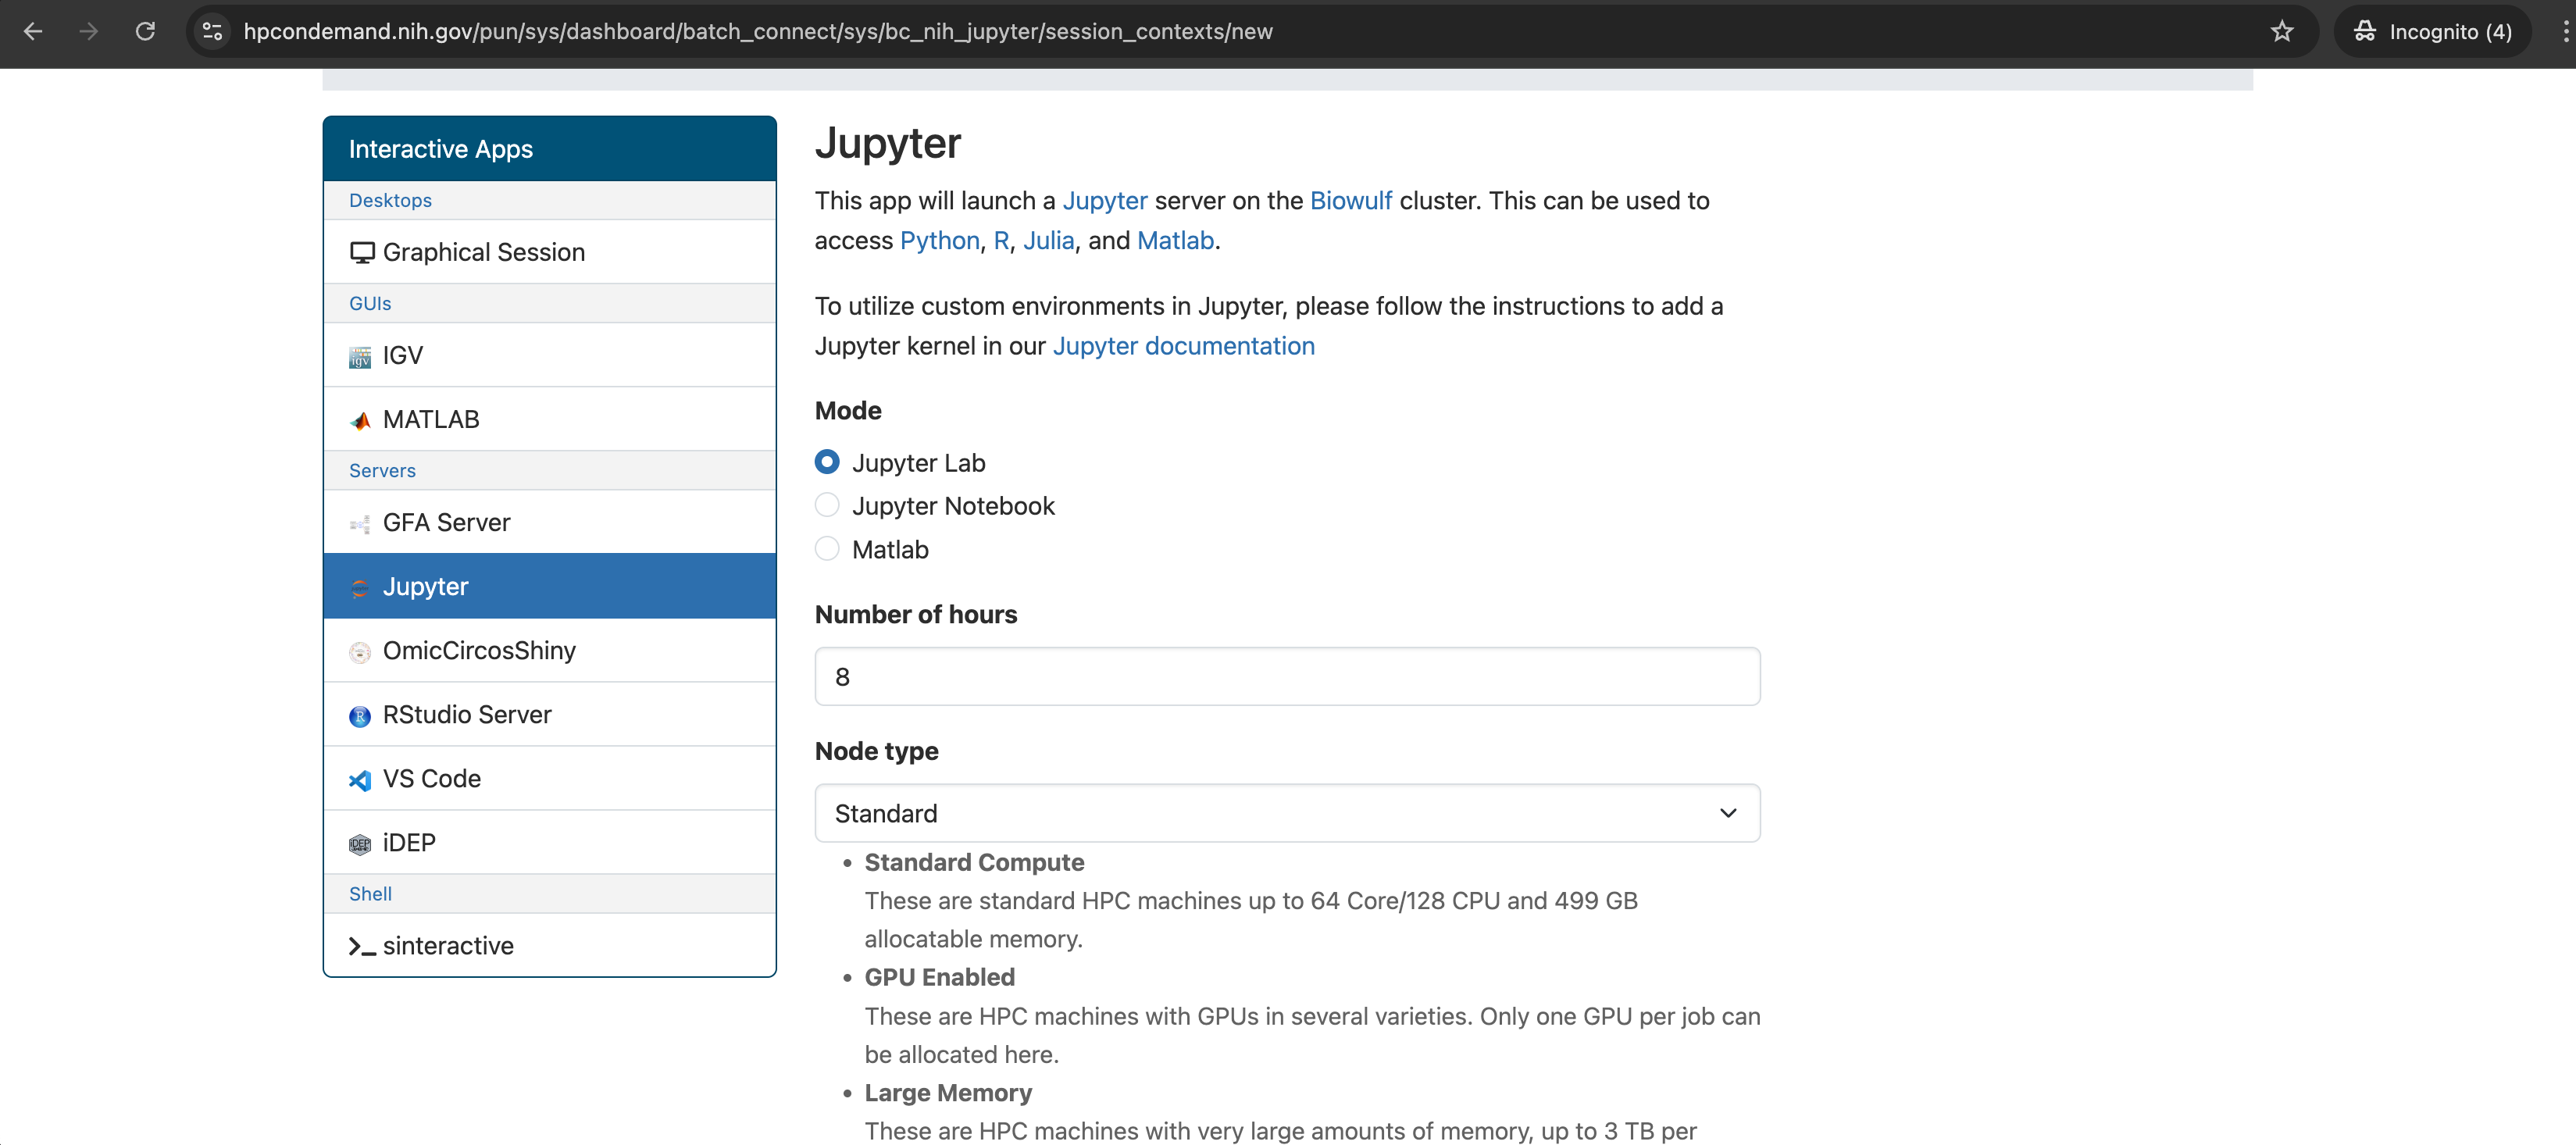
Navigate back to the HPC OnDemand website by clicking "HPC OnDemand" at the top left corner. Then click on the "Jupyter" tab to launch a Jupyter Lab session.
- The subsequent page allows users to specify compute resources. Leave these as is for this class. Also, be sure that the radial button for Jupyter Lab is selected.
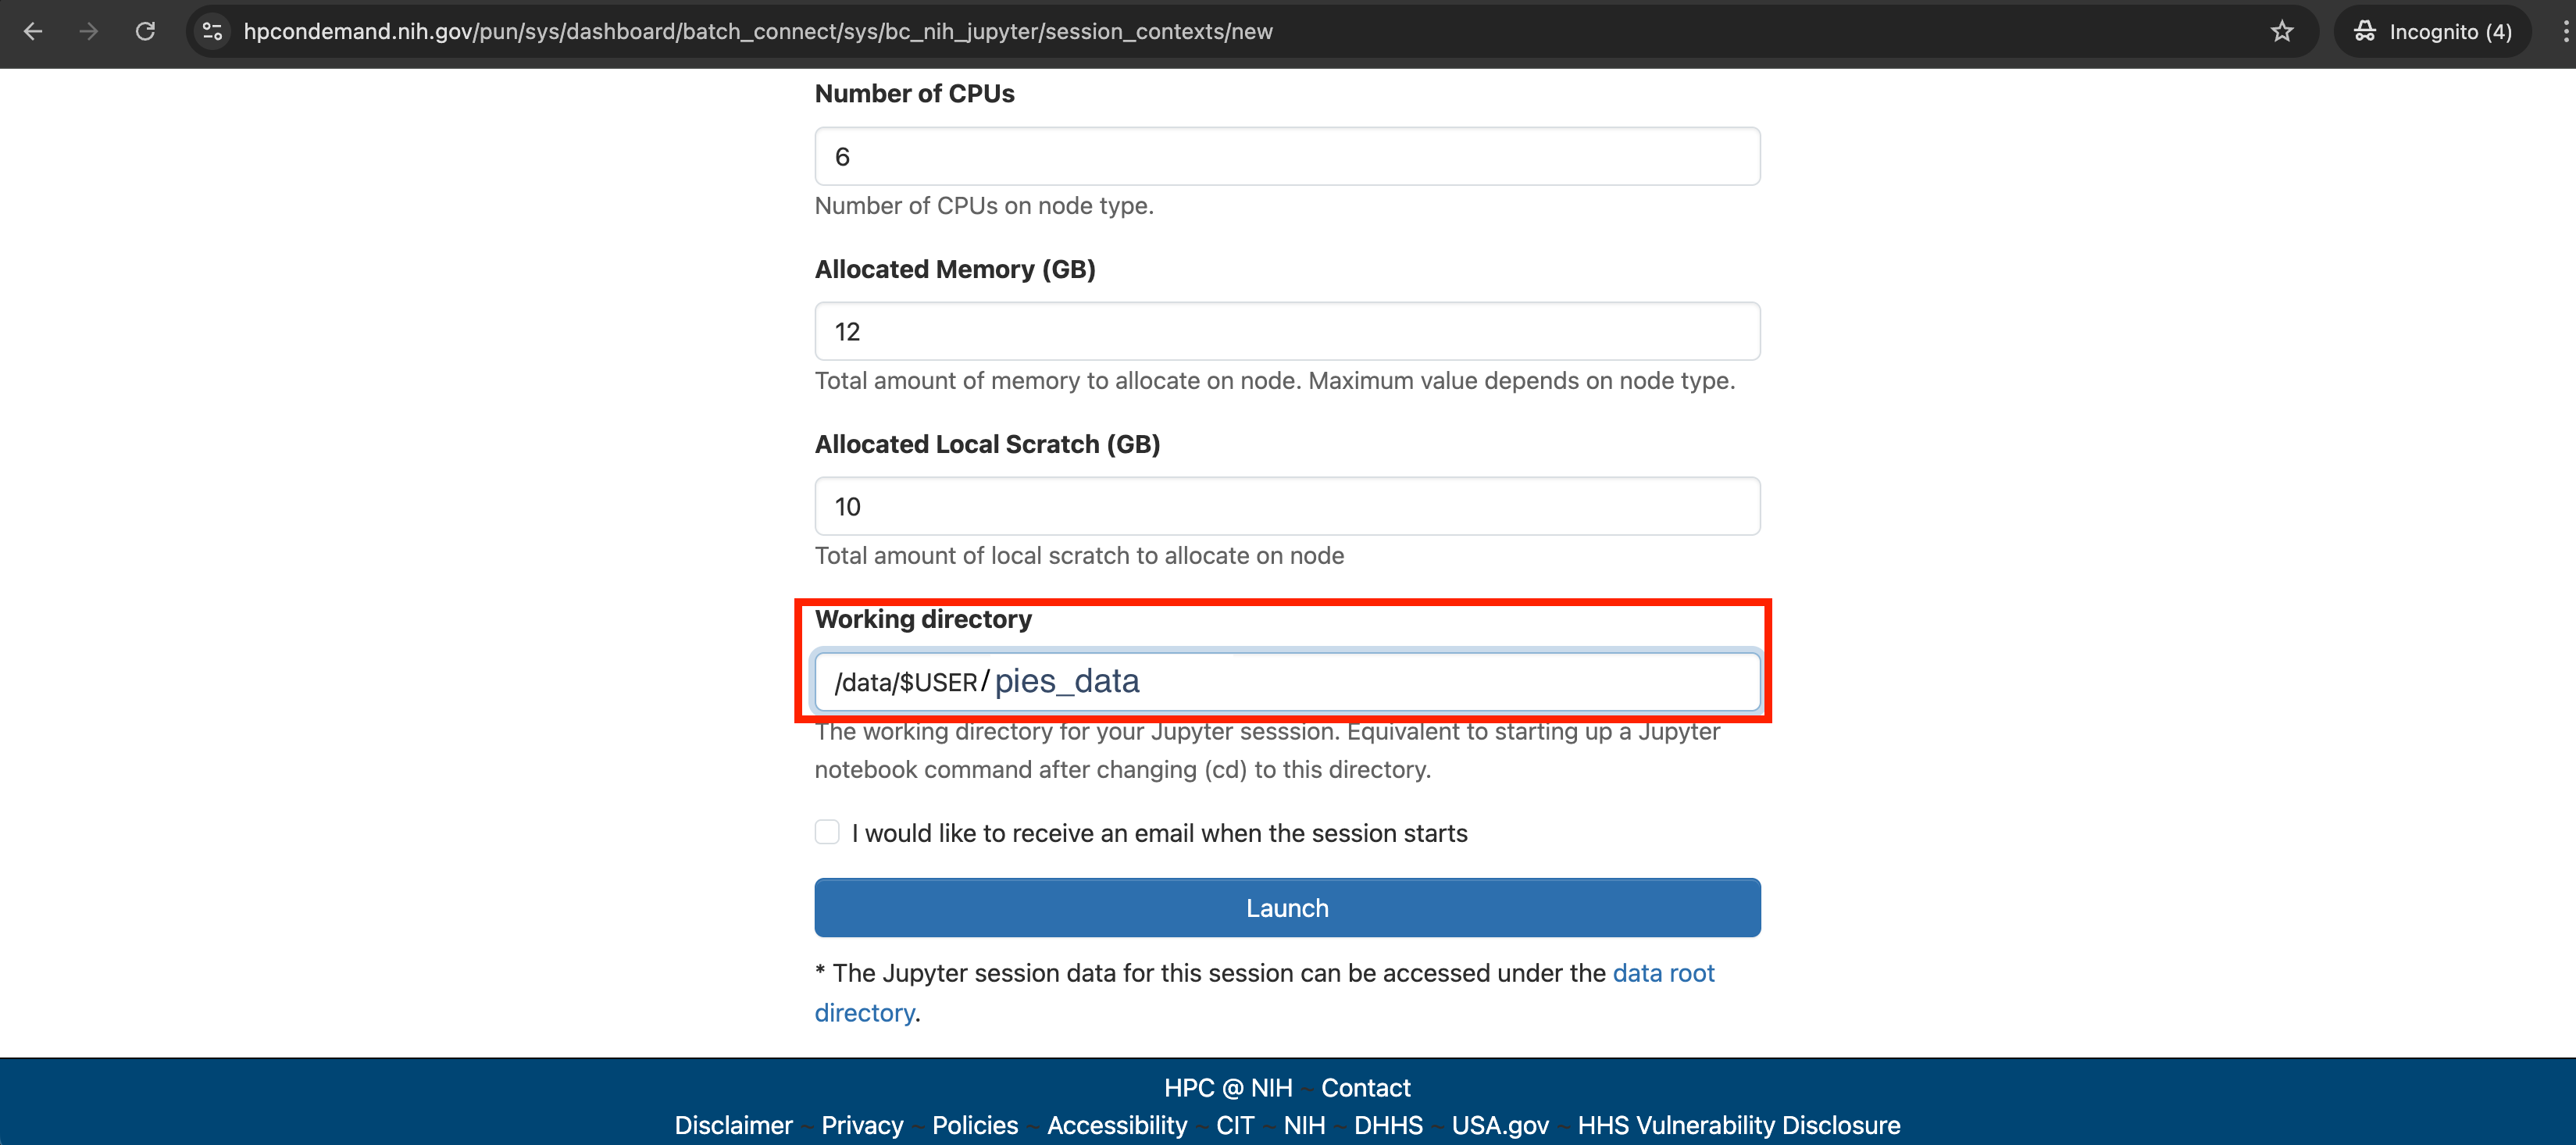
- Make sure to specify for Jupyter to start in the
/data/$USER/pies_datadirectory, where $USER is a variable that points to the participants Biowulf user ID.
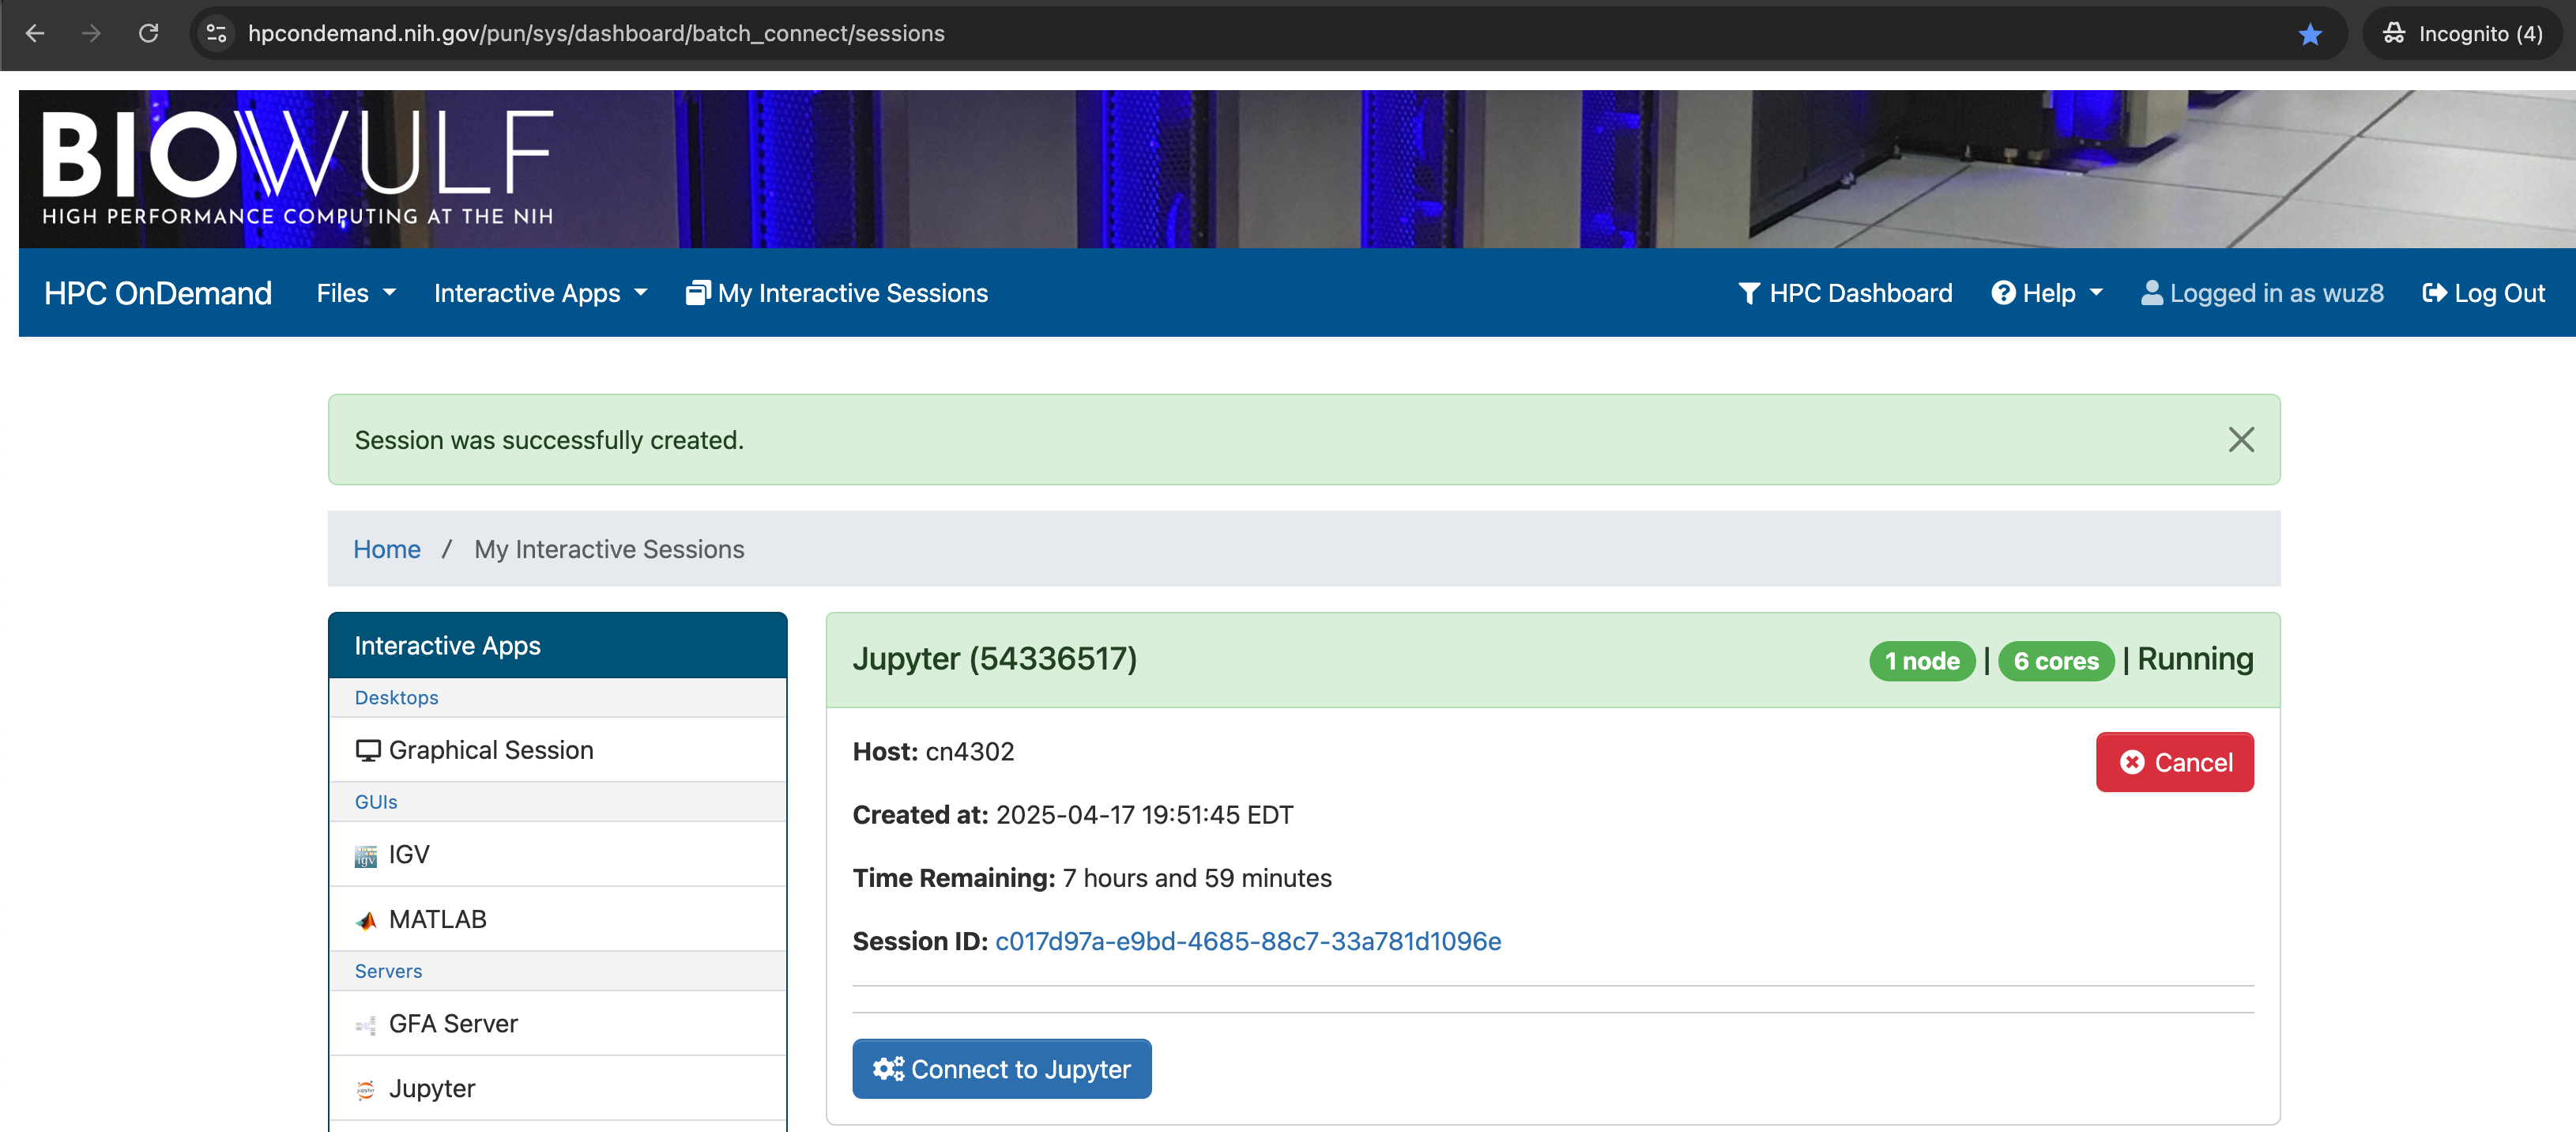
Click on "Connect to Jupyter" when the Jupyter Lab session has been granted.
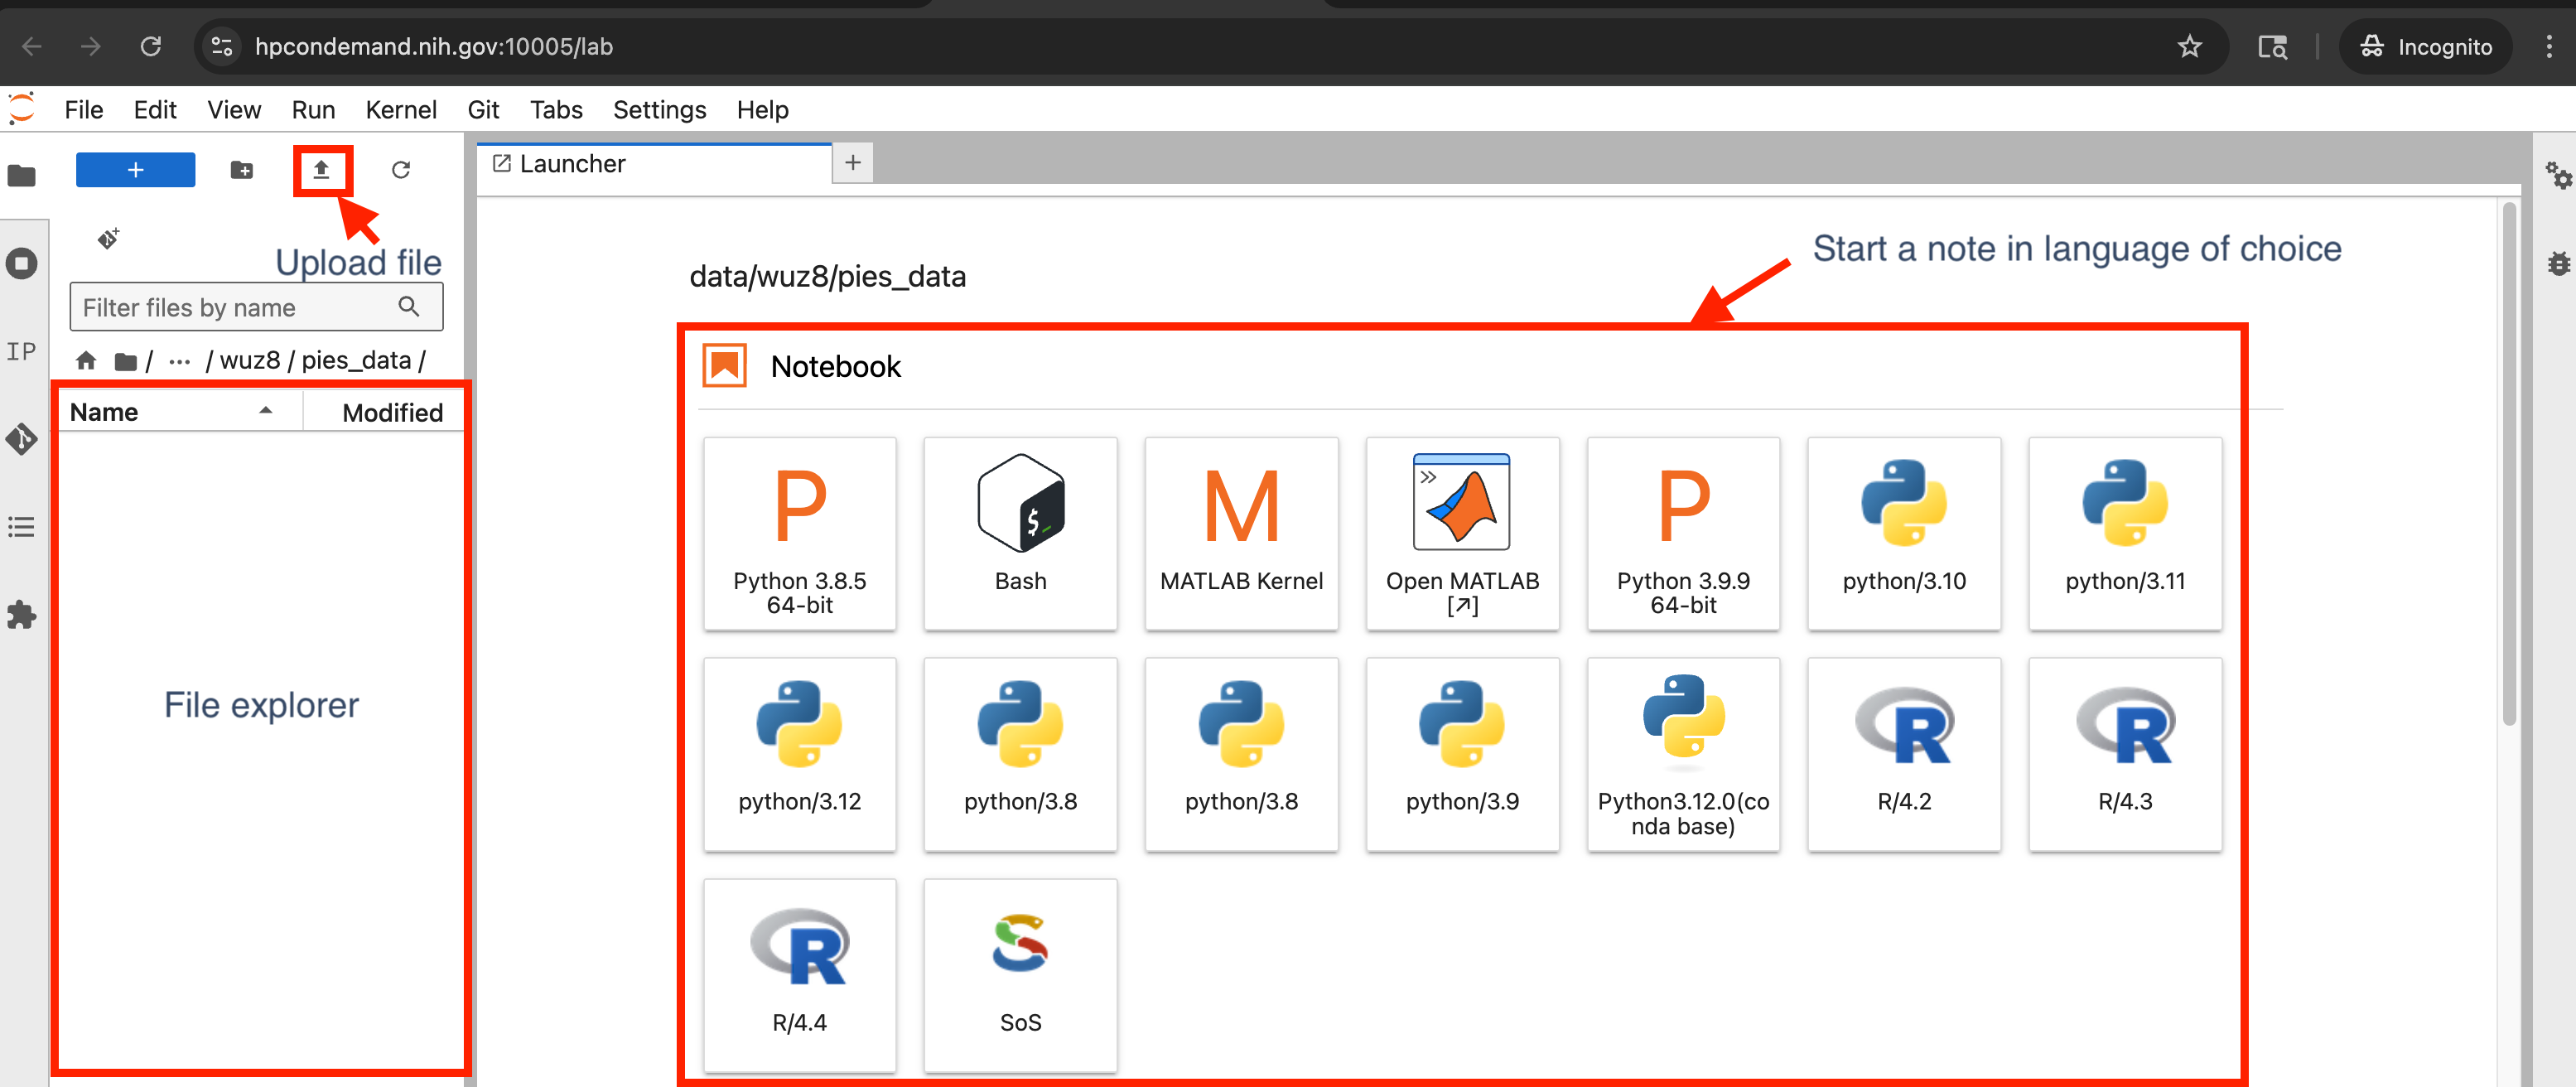
Users will see an interface that looks like the image shown below. The left hand panel is the file explorer. Users can navigate through files and folders that are available in the directory in which Jupyter Lab was started. The launcher panel contains quick links for initiating a Jupyter Notebook in the user's language of choice as well as starting a terminal session within Jupyter Lab.
Create a new Jupyter Notebook
Create a new Jupyter Notebook in Python 3.12 (click on the "python/3.12" tile). The new notebook has the name "Untitled.ipynb". Click on the disk icon in the notebook menu bar to rename it pies_class_2026.

Tip
For a detailed overview of Jupyter Lab, see BTEP's Documenting Analysis Steps using Jupyter Lab
Python Command Syntax
Arguments and options for Python commands are enclosed in parentheses. In general, the anatomy is command(argument, option).
For example, the command below is print and it will display the argument, "Hello BTEP" as output.
print("Hello BTEP")
Hello BTEP
To get help for a Python command, use help.
For instance:
help(print)

From the print command's help information, line breaks can be added using \n. Try the following to print three sentences, one in each line.
print("Python can make data analysis more efficient.\n"
"It helps with reusability and reproducibility.\n"
"There is strong community support.\n"
"External packages are available for data wrangling and visualization.")
Python can make data analysis more efficient.
It helps with reusability and reproducibility.
There is strong community support.
External packages are available for data wrangling and visualization.
What is different with
numpy.arrayused in the earlier example to generate numeric arrays?
Answer
`numpy` is a Python package that has many subcommands. To call a subcommand from a package, use the general syntax of `package.subcommand`.
numpyhas a subcommanddivide. How can that be called?
Answer
`numpy.divide`What does the
dividesubcommand fromnumpydo?
Answer
`help(numpy.divide)`Installing external packages
Python external packages are found at the Python Package Index. To install a package from PyPi, just use pip install package_name, where package_name can be any package of choice. For instance, to install scipy, do:
pip install scipy
Note
Package management for Python needs to be done at the terminal.
pip is the package installer for Python. If pip is not available with the user's Python installation, see https://pip.pypa.io/en/stable/installation/ to learn how to get it.
To uninstall a package, do pip uninstall package_name.
To update a package, use pip install --upgrade package_name.
pip freeze will pull up a list of currently installed Packages installed via pip. To find if a specific package is installed do pip freeze | grep package_name.
Those who chose to use the package manager Conda Forge can use conda install or mamba install to setup external packages.