Lesson 2: Getting Started with QIIME2
Lesson Objectives
- Obtain sequence data and sample metadata
- Import data and metadata
- Discuss other useful QIIME2 features including view QIIME2, provenance tracking, and the QIIME2 forum.
DNAnexus
DNAnexus provides a secure cloud based platform for the analysis and sharing of next generation sequencing data. This class will use a pre-built teaching environment, the GOLD platform, which includes all of the software needed installed and ready to go.
Getting started with DNAnexus
Step 1: Login to DNAnexus
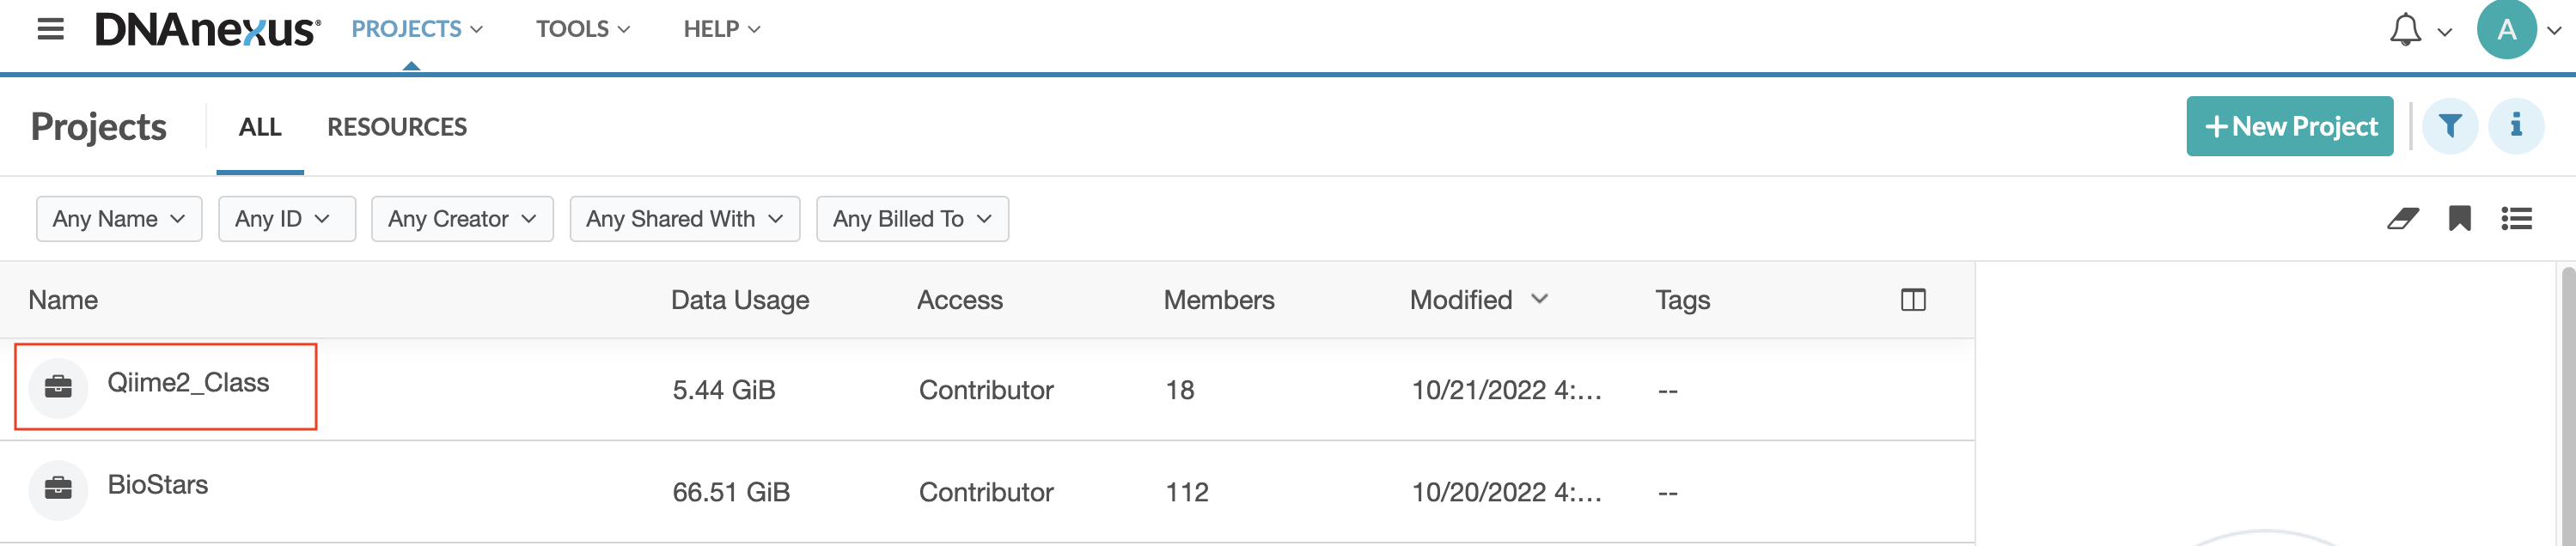
Step 2: Once you login, you should see the Projects page. If you have used DNAnexus previously, you may see more than one project listed. If this is your first time using DNAnexus, you will only see the project name for this course listed, Qiime2_Class. Double click on Qiime2_Class.
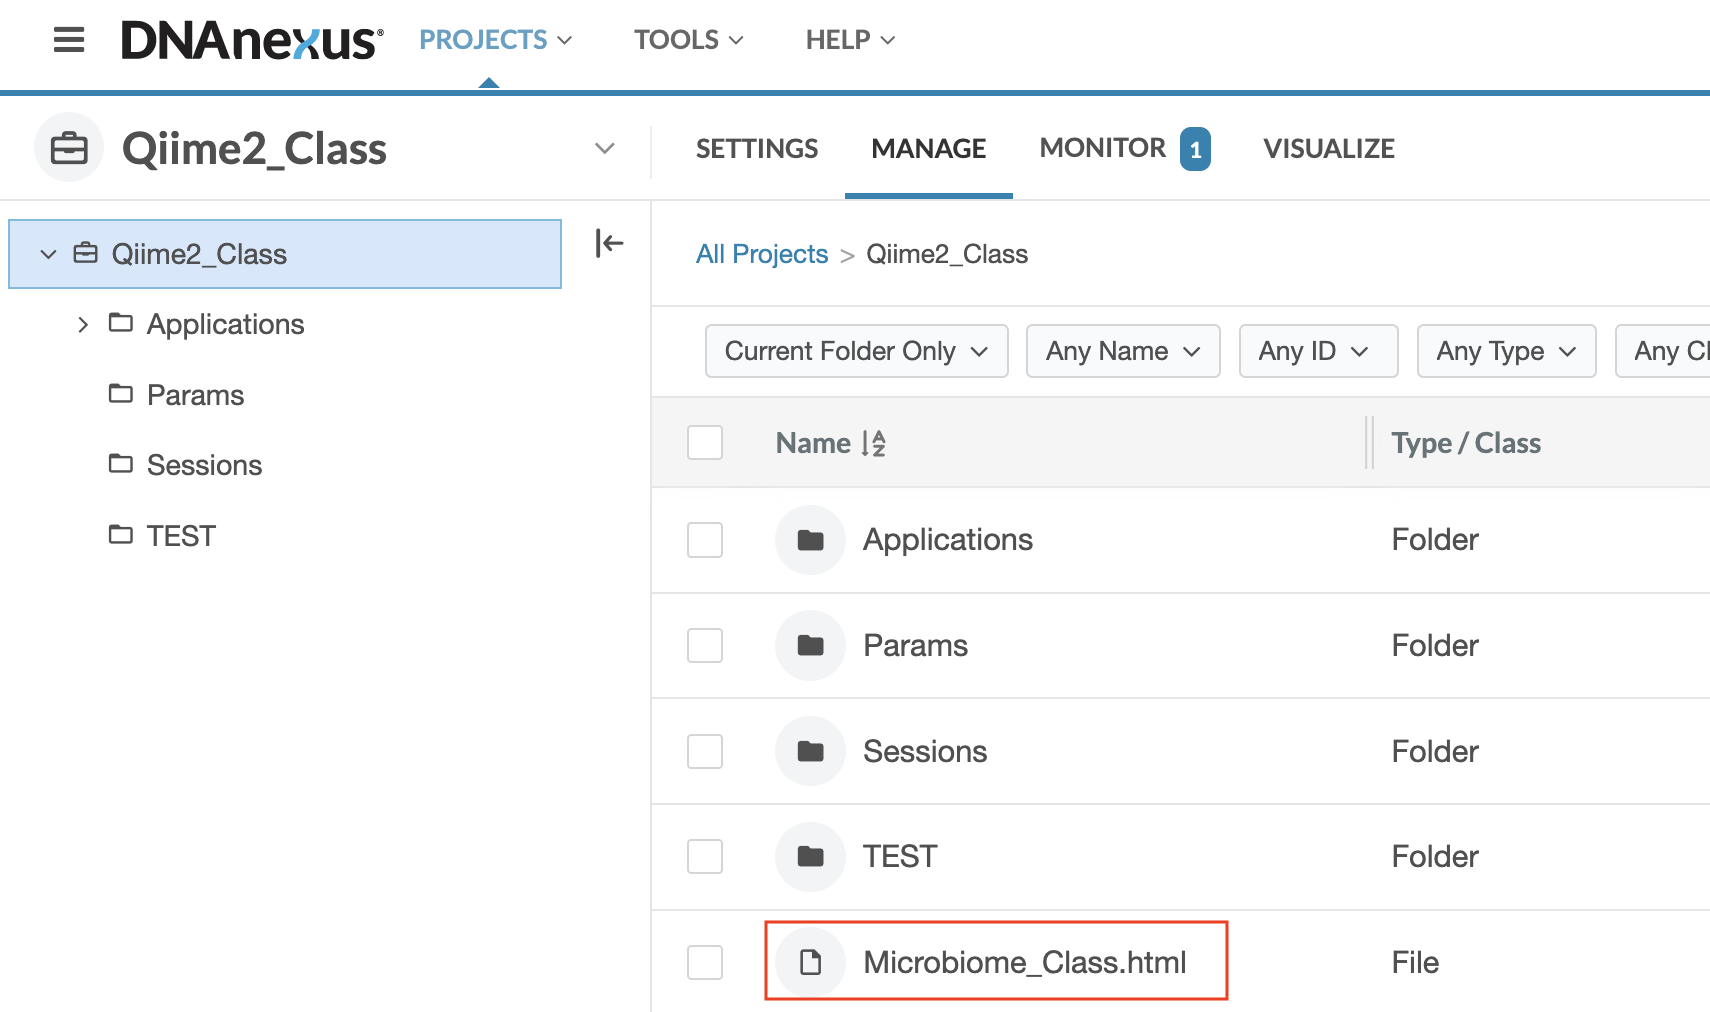
Step 3: Once you double click on the Qiime2_Class project, you will see a project directory containing multiple subdirectories and files. Select (double click) on Microbiome_Class.html.
Step 4: The Microbiome_Class.html file will open the GOLD platform application, and you will see a screen that looks like this:

At the top of the page you will see the instructors pictures and logins. You will need to find your name (First and Last) in the table below the instructors. Once you find your name click on the link associated with your name in the login column. The name that you see in the login column will serve as your username in step 5.
Step 5: The login link will open a terminal with a prompt to login. Login with your username (See step 4) and password (to be distributed in class).

Step 6: Once you login at the terminal, you will see the following page:
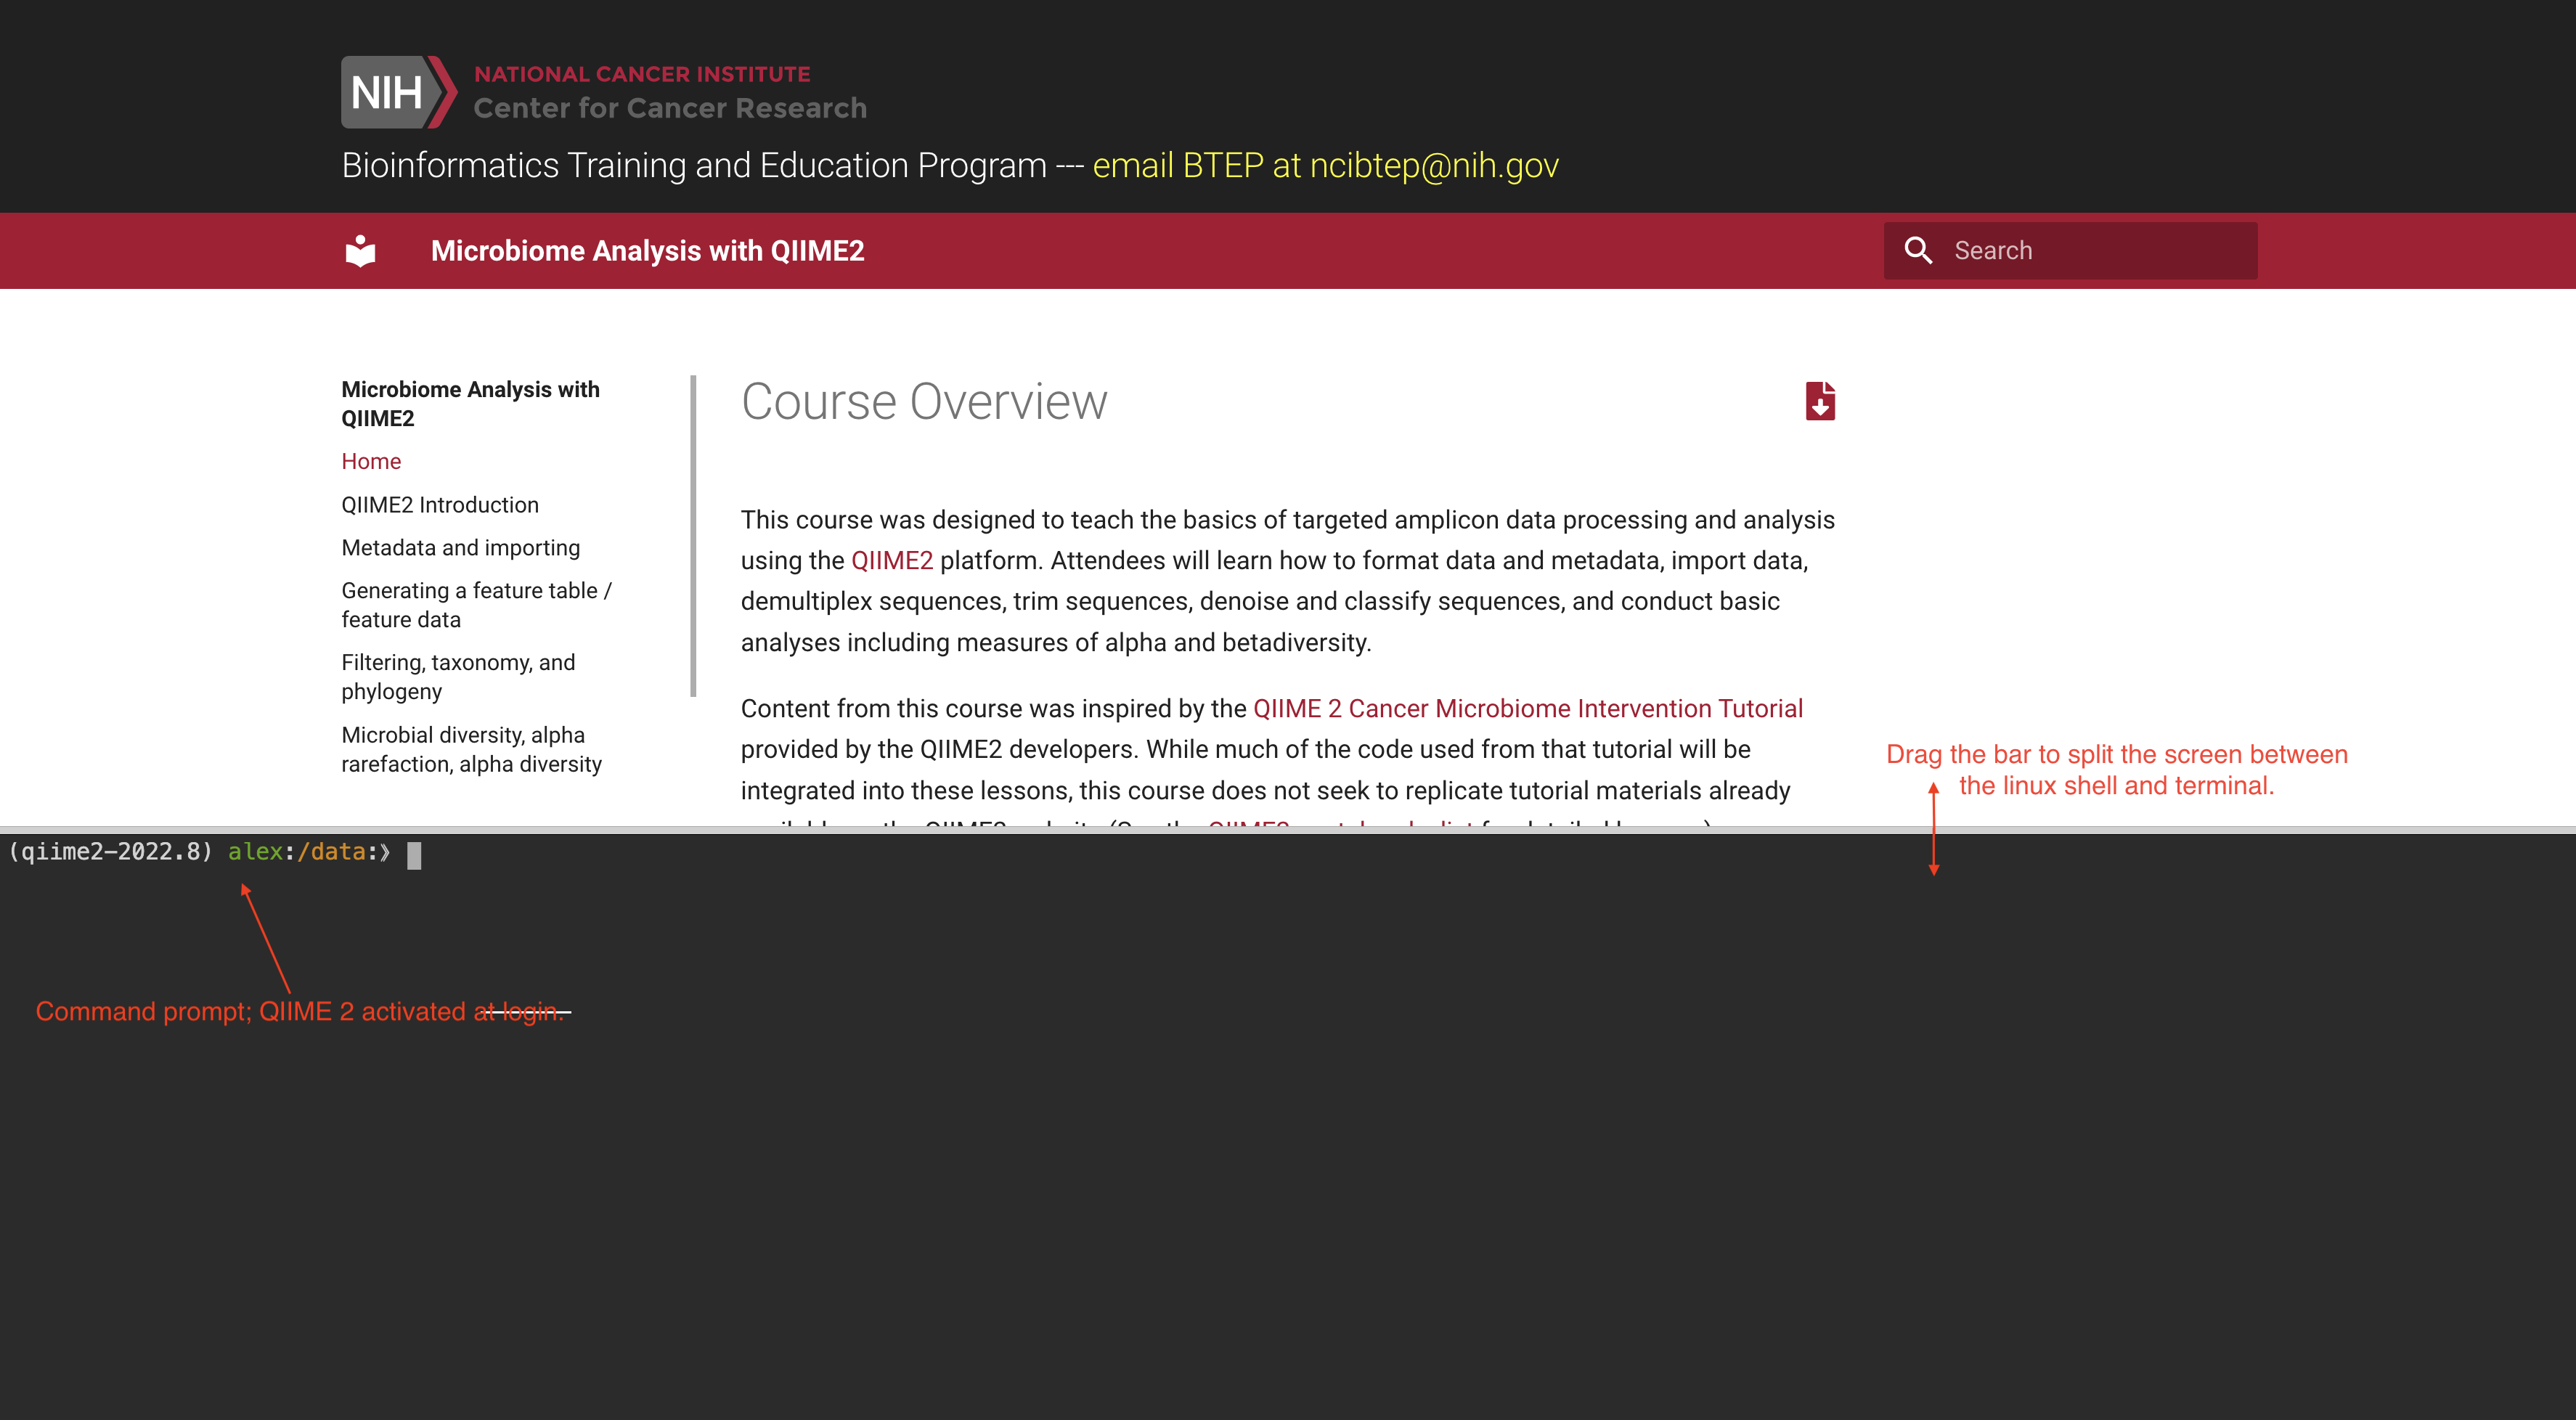
The course documentation is accessible at the top of the page and can be dragged up or down for viewing. The command line terminal accounts for the rest of the page. You may need to resize the screen to see the command prompt.
Now you should be logged onto the GOLD platform and ready for class.
Ending your DNAnexus session: if you are finished with the GOLDsystem for the day, logout using
exit
What is QIIME 2?
A powerful, extensible, and decentralized microbiome analysis package with a focus on data and analysis transparency. QIIME 2 enables researchers to start an analysis with raw DNA sequence data and finish with publication-quality figures and statistical results. --- 2016-2021, QIIME 2 development team.
The plugin architecture of QIIME 2 enables the platform to easily evolve with the the latest developments in the field. See the core plugins as of QIIME 2-2022.8 and the latest plugins.
Multiple ways to use QIIME2
Q2studio
- Graphical user interface
Q2cli
- Command line interface
- The classic way to use qiime2
Artifact API
- Python 3 application programming interface (API) for QIIME 2
- Use with Jupyter notebook
- Recommended for advanced users
Galaxy
The recommended use of qiime2 and the most common use is via command line (q2cli), which we will be using for this course. The q2cli is particularly powerful if you are working with big data. See the additional resources, if you need a brief linux refresher.
Some useful linux commands
pwd(print working directory)ls(list)nano(basic editor for creating small text files)rm(remove files)mkdir(make a directory)cd(change directory)mv(rename or move files)less(view files)man(manual)cp(copy)
QIIME2 Installation
You will not need to install QIIME2 for this course series. If you would like to install QIIME2 on your local computer, there are detailed installation instructions on the QIIME2 website.
Using QIIME2 on Biowulf
There are also versions of qiime2 available as modules on Biowulf, NIH’s high performance computing system.
To see available versions use
module avail qiime
Also, check out the QIIME2 Biowulf help page.
If you are interested in a reproducible workflow to use on Biowulf, Samantha Chill, a bioinformatician with CCBR, created a workflow that is readily available from github.
What is amplicon sequencing?
The QIIME2 platform can be used for different types of -omics data. For this course, we will be focusing on targeted amplicon sequencing of the 16S rRNA gene.
The 16S rRNA gene (~1500 bp) codes for a ribosomal RNA of the small ribosomal subunit of the prokaryotic ribosome (30S). Ribosomes are made up of proteins and RNAs and are important for translation (protein synthesis from mRNA). The 16S rRNA is highly conserved among bacteria and archaea due to the importance of their function. Within conserved regions of 16S rRNA, there are nine hypervariable regions (V1-V9), and these regions are used for establishing phylogenetic relationships useful for taxonomic classification. See the following figure from Fukuda et al. 2016.
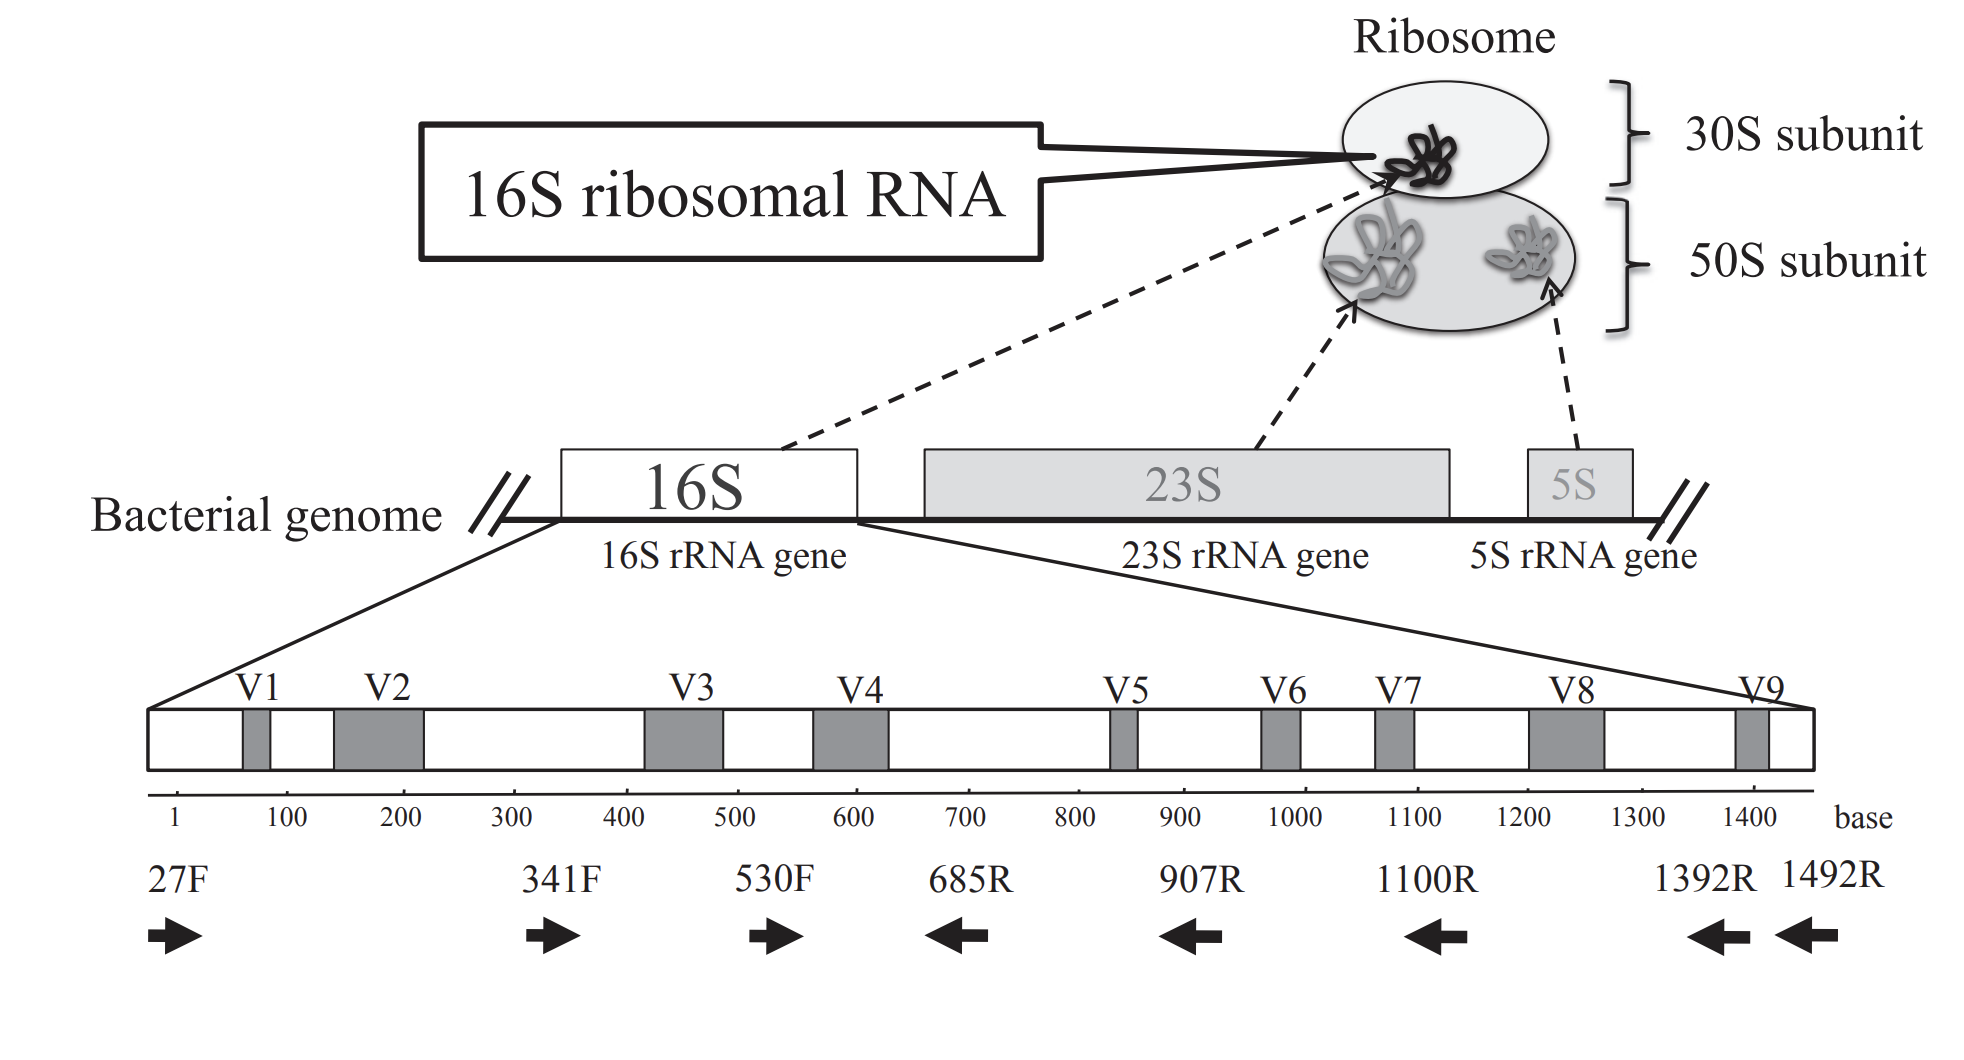
Image from: Fukuda K, Ogawa M, Taniguchi H, Saito M. Molecular Approaches to Studying Microbial Communities: Targeting the 16S Ribosomal RNA Gene. J UOEH. 2016 Sep;38(3):223-32. doi: 10.7888/juoeh.38.223. PMID: 27627970.
Things to know about 16S rRNA:
- Found in all bacteria and archaea. Also present in mtDNA and chloroplasts (See the endosymbiotic theory).
- Multiple copies per genome
- Taxonomy based on 16S rRNA has been extremely popular, and databases are continuously growing.
- Classification resolution at the Genus level or higher.
Other target genes of interest:
18S rRNA - Microbial eukaryotes
18S rRNA (ITS1, ITS2) - Fungi
COI of mtDNA (cytochrome c oxidase) - Animals
The data used in this tutorial
This course will use code and data from the QIIME2 Cancer Microbiome Intervention tutorial from the QIIME 2 website. The data used herein were published in Liao et al. 2021 and Taur et al. 2018. In particular, Taur et al. 2018, will be the focus of the data analysis steps or post-denoising steps (See the cancer tutorial from QIIME 2). This research focuses on reestablishing the gut microbiome using auto-FMT (a fecal transplant using the patient's preserved gut microbiome) following allogeneic hematopoietic stem cell transplantation. More on this later.
Getting started with QIIME2
QIIME2 is a platform for the processing and analysis of microbiome sequencing data. A general amplicon workflow in QIIME2 may look like the following:

Image adapted from QIIME2 documentation (Conceptual overview of QIIME2)
The first step is to import the data as a QIIME2 artifact (a .qza file). Data can be imported at most stages in the workflow. The red arrows highlight only a few possible objects one would be interested in importing. We are starting in the red box.
QIIME2 Artifacts
Before we get started, let's briefly discuss the two main file types used with QIIME2. These are .qza files and .qzv files.
.qza - The QIIME2 artifact file. These contain data.
.qzv- The QIIME2 visualization file. These contain visualizations that can be viewed using QIIME 2 View.
These are zipped files that contain provenance and other information in addition to data. Each artifact has a unique identifier so that you can easily track provenance.
You can simply use unzip to access the data, or use qiime tools export. Check out the QIIME2 export tutorial for more information on exporting data and visualizations.
Qiime2view
We will use Qiime2view frequently throughout this course, and you will use it frequently in the future if you plan to use QIIME2 in your research. This is a great tool for exploring QIIME2 visualizations. You can drag and drop files from your local computer or visualize a file from the web. This allows you to easily share results with collaborators without requiring software installations.
Metadata formatting
For any next generation sequencing experiment, you will need sample information (sample metadata) to make sense of your data. The key to a good study is to collect good metadata. You should minimally have all of the information required to investigate your hypotheses. Also, check out the MIMARKS recommendations for depositing data in NCBI and other data repositories.
QIIME2 requirments for sample metadata
- In tsv (tab separated) format
- Include a SampleID column as the first column.
- Missing data is represented by empty cells, not NAs
- Supports categorical and numeric data (may include a row with
#q2:typesof either categorical or numeric) - rows that begin with # are ignored.
- Whitespace is ignored.
Keemei is a particularly nice metadata validation plugin on google chrome, if your data is available in google sheets.
For more detailed information on QIIME 2 metadata, see the QIIME2 metadata tutorial.
Note on Excel: Excel will also guess column types at import. This has resulted in incorrect gene names in data (E.g., SEPT4 becoming 4-Sept). It can also lead to altered changes in sample names, if sample names are numeric.
Examining the metadata
Let's take a look at the metadata associated with QIIME 2 Cancer Microbiome Intervention tutorial.
qiime metadata tabulate \
  --m-input-file /data/sample-metadata.tsv \
  --o-visualization metadata-summary.qzv
This command allows us to interactively explore the metadata.
If we simply want to get some basic information. We can try out one of the QIIME 2 utilities.
qiime tools inspect-metadata /data/*tsv
Data import
As mentioned previously, the first step of any QIIME 2 analysis will be to import the data. Each type of data will be stored in its own QIIME2 artifact. For example, sample metadata, ASV / OTU tables, representative sequences, taxonomy, will each be located in a different qza file. This will make more sense as we begin to work through the data. Check out the QIIME2 Importing Data tutorial for examples on how to import different types of data.
In following the QIIME2 Cancer Microbiome Intervention Tutorial, this course will use Liao et al. 2021 and Taur et al. 2018.
Importing raw fastq files
We will import a small subset of fastq files to demonstrate initial sequence processing steps. The main questions we need to answer to import our raw data are:
-
Is the data demultiplexed or multiplexed?
Often you will receive your data back from a sequencing facility already demultiplexed, meaning the sequences have been separated by sample into individual files. In this case, you will have a
.fastqfile per sample (or two if paired end). Conversely, you may need to demultiplex, or split the reads by sample, yourself. In this case, you will often have three files containing the barcodes, the forward reads, and the reverse reads. QIIME 2 has protocols for handling demultiplexed or multiplexed data. -
Is the data paired-end or single-end?
We also will need to know whether our data is paired-end, includes forward and reverse reads, or single-end. NOTE: If using paired-end sequencing, make sure the paired end chemistry is sufficient for read overlap. For example 250 PE chemistry will result in almost complete overlap of V4.
Check out this forum post for raw data import guidance.
Importing our example data
In our example data, the sequences are paired-end demultiplexed data.
Raw fastq files are currently in a directory named /data/data_to_import. QIIME2 has specific functions for importing specific types of raw sequencing data. There are protocols for EMP data (multiplexed and demultiplexed), other multiplexed fastq data, Casava 1.8 demultiplexed data (format: SampleID_BarcodeID_L001_R1_001.fastq.gz), and all other types of demultiplexed fastq data using a fastq manifest.
All import steps use qiime tools import but they vary in the command options (--type and input-format)
If you run
qiime tools import --help
types and formats.
qiime tools import --show-importable-types
SampleData[PairedEndSequencesWithQuality].
qiime tools import --show-importable-formats
CasavaOneEightSingleLanePerSampleDirFmt for the importable format.
The only additional information we need to provide include the --input-path, which is where our data is located (i.e., /data/data_to_import) and the --output-path, where we want the results to be stored. Let's name our imported demultiplexed sequence artifact demuxsequences.qza.
Let's import
qiime tools import \
  --type 'SampleData[PairedEndSequencesWithQuality]' \
  --input-format CasavaOneEightSingleLanePerSampleDirFmt \
  --input-path /data/data_to_import \
  --output-path demuxsequences.qza
See the moving pictures tutorial for an example of importing multiplexed EMP sequences.
Our output (demuxsequences.qza) is demultiplexed sequences ready for denoising or OTU clustering.
Summary of imported data
Following import, we want to check our sequence quality and the number of sequences per sample (read depth). This can be done using qiime demux summarize.
qiime demux summarize \
  --i-data demuxsequences.qza \
  --o-visualization demuxsequences-summary.qzv
Let's move this file to public so that we can view it on view.qiime2.org.
mv demuxsequences-summary.qzv public/
We will return to these results in Lesson 3, to determine the parameters for denoising.
Import ASV table
To demonstrate that you can import at later stages in the workflow, let's import a feature table (e.g. ASV count matrix). To import an ASV / OTU table, the table has to be in .biom format. Luckily, there is nice documentation for converting a tab-delimited file to a biom file.
Note: A feature table is the equivalent of an OTU / ASV table in QIIME2.
qiime tools import \
  --input-path /data/feature-table.biom \
  --type 'FeatureTable[Frequency]' \
  --input-format BIOMV210Format \
  --output-path featuretable_ex.qza
Provenance Tracking
Every qiime2 artifact includes provenance information, which includes things like the unique ID of the artifact(s) used as input, the format, type, method and action, run time, etc.
You can check the uuid (universally unique identifier) of an artifact at any time using qiime tools peek filename.
QIIME2 forum
Lastly, the QIIME2 forum is a fantastic resource to get help with qiime2 plugins or questions related to your workflow or research design. There is also a "best-of-the-forum" tag, which is worth a peruse.