An overview for versioning of code using GitHub
Learning objectives
This class provides an overview of the GitHub web interface and Git command line, which are tools used for code versioning. After this class, participants will
- Understand the importance of versioning
- Be able to perform basic versioning tasks using GitHub, including
- Create a repository
- Upload code
- Commit changes
- Get difference between versions
- Revert to a previous version
- Copy a repository to local
- Describe branches
- Merge content between two branches
- Be able to perform basic versioning tasks using Git command line such as
- Creating a respository
- Set up repository specific configurations
- Committing changes
- View commit log
- Post to GitHub
- Get difference between versions
- Revert to a previous version
- Download a repository (clone versus pull)
Importance of versioning
Versioning is a critical aspect of writing code for data analysis or software development. It enables tracking of changes and reverting if necessary. The ability to version is an essential skill whether working individually or collaborating in a group.
Versioning using GitHub
GitHub is a repository that enables versioning, collaboration, and sharing of code, which are essential to transparency, discovery, and reproducible analysis. A nice graphical user interface (GUI) allows for efficient work.
Note
Sign up for an account to use GitHub.
GitHub dashboard
Users will be greeted by the dashboard upon signing into GitHub. The following items are presented in the dashboard.
- Top repositories
- A green button labeled "New" allows for the creation of a new repository
- An envelope button to see notifications
- A button at the top far right of the dashboard that when clicked provides options for users to view profile and change settings

Click on the upside down triangle next to the user ID to view and manage organization affiliations.

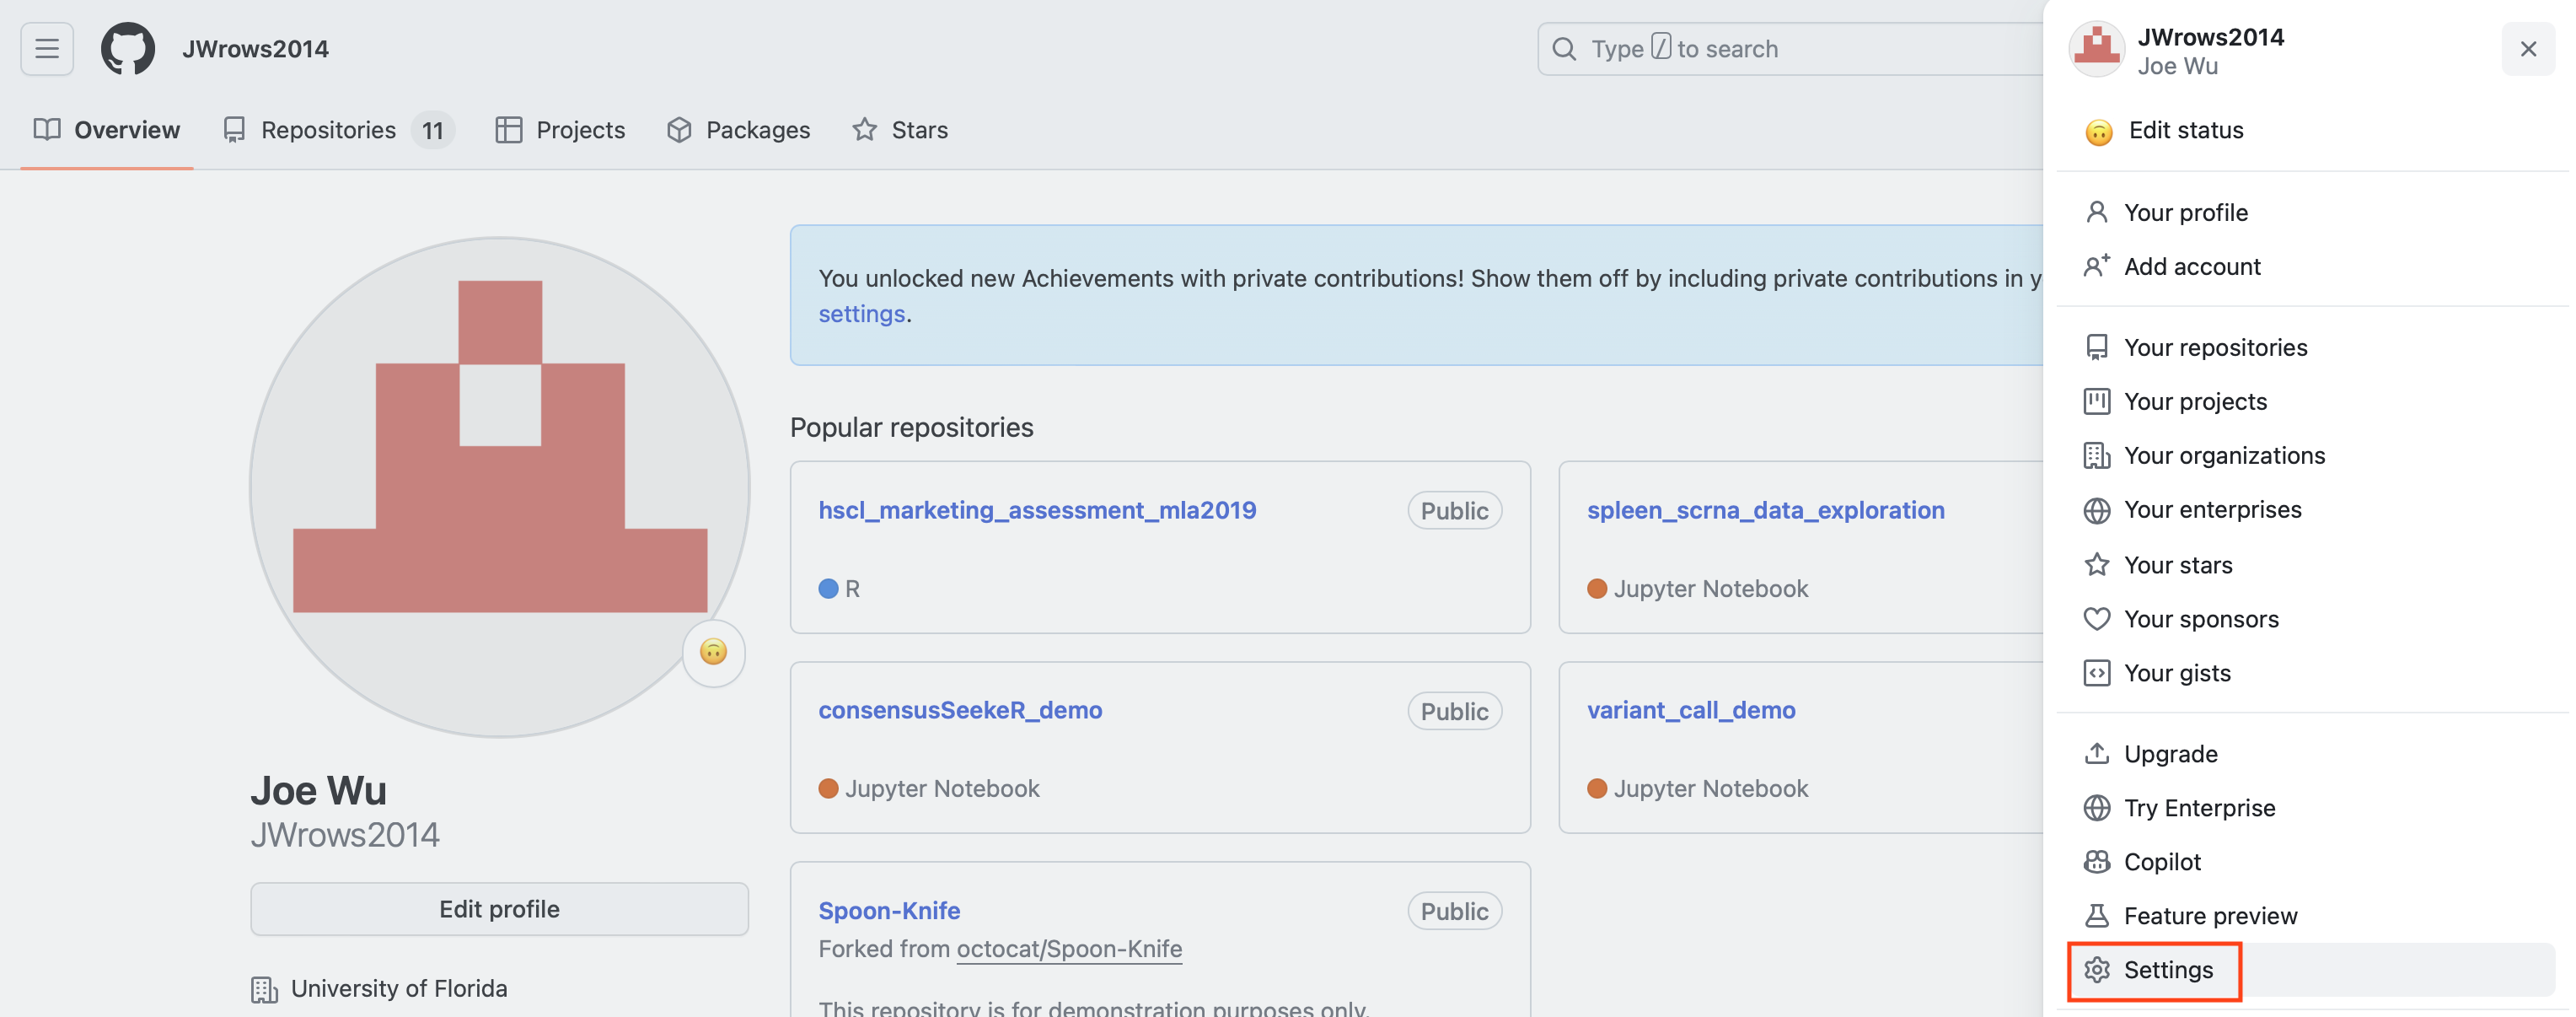
Click on the circle on the top far right corner of the dashboard to see a menu of options including
- Viewing user's profile
- Linking to user's repositories
- Editing user's settings

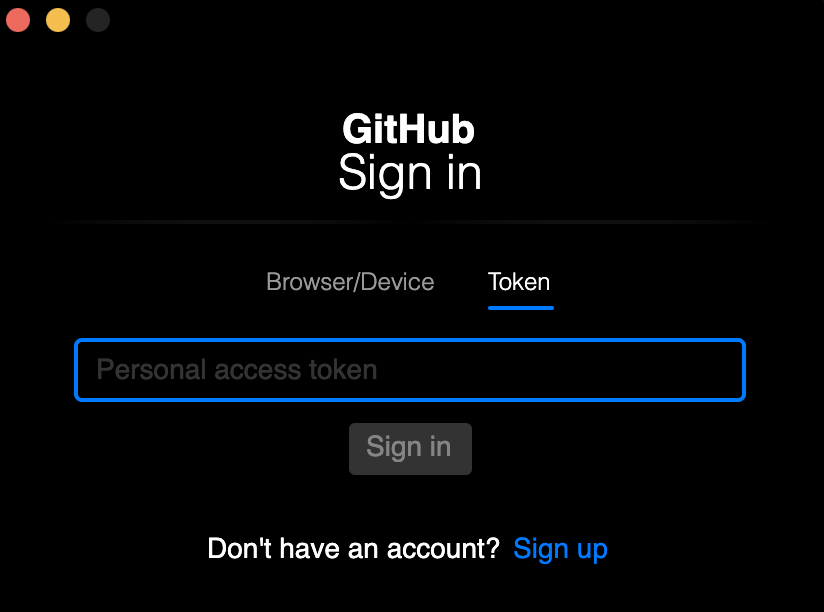
GitHub authentication
There are many authentication options for GitHub and users will select the one that is most appropriate for the project. See https://docs.github.com/en/authentication for details. One of the methods is to use a perosnal access token or PAT. See this blog for more information regarding the transition to use personal access token rather than passwords.
Definition
"Personal access tokens are an alternative to using passwords for authentication to GitHub when using the GitHub API or the command line." -- GitHub Authentication
Tip
"Personal access tokens are intended to access GitHub resources on behalf of yourself. To access resources on behalf of an organization, or for long-lived integrations, you should use a GitHub App. For more information, see "About creating GitHub Apps."" -- GitHub Authentication
This class utilizes the classic perosnal access token although a fine-grained personal access token can be used. Fine-grained personal access tokens have additional security advantages. Refer to the GitHub documentation on personal access tokens for more information.
To create a personal access token, click on the user's icon on the upper right corner of the GitHub page.

Then, click on "Settings".
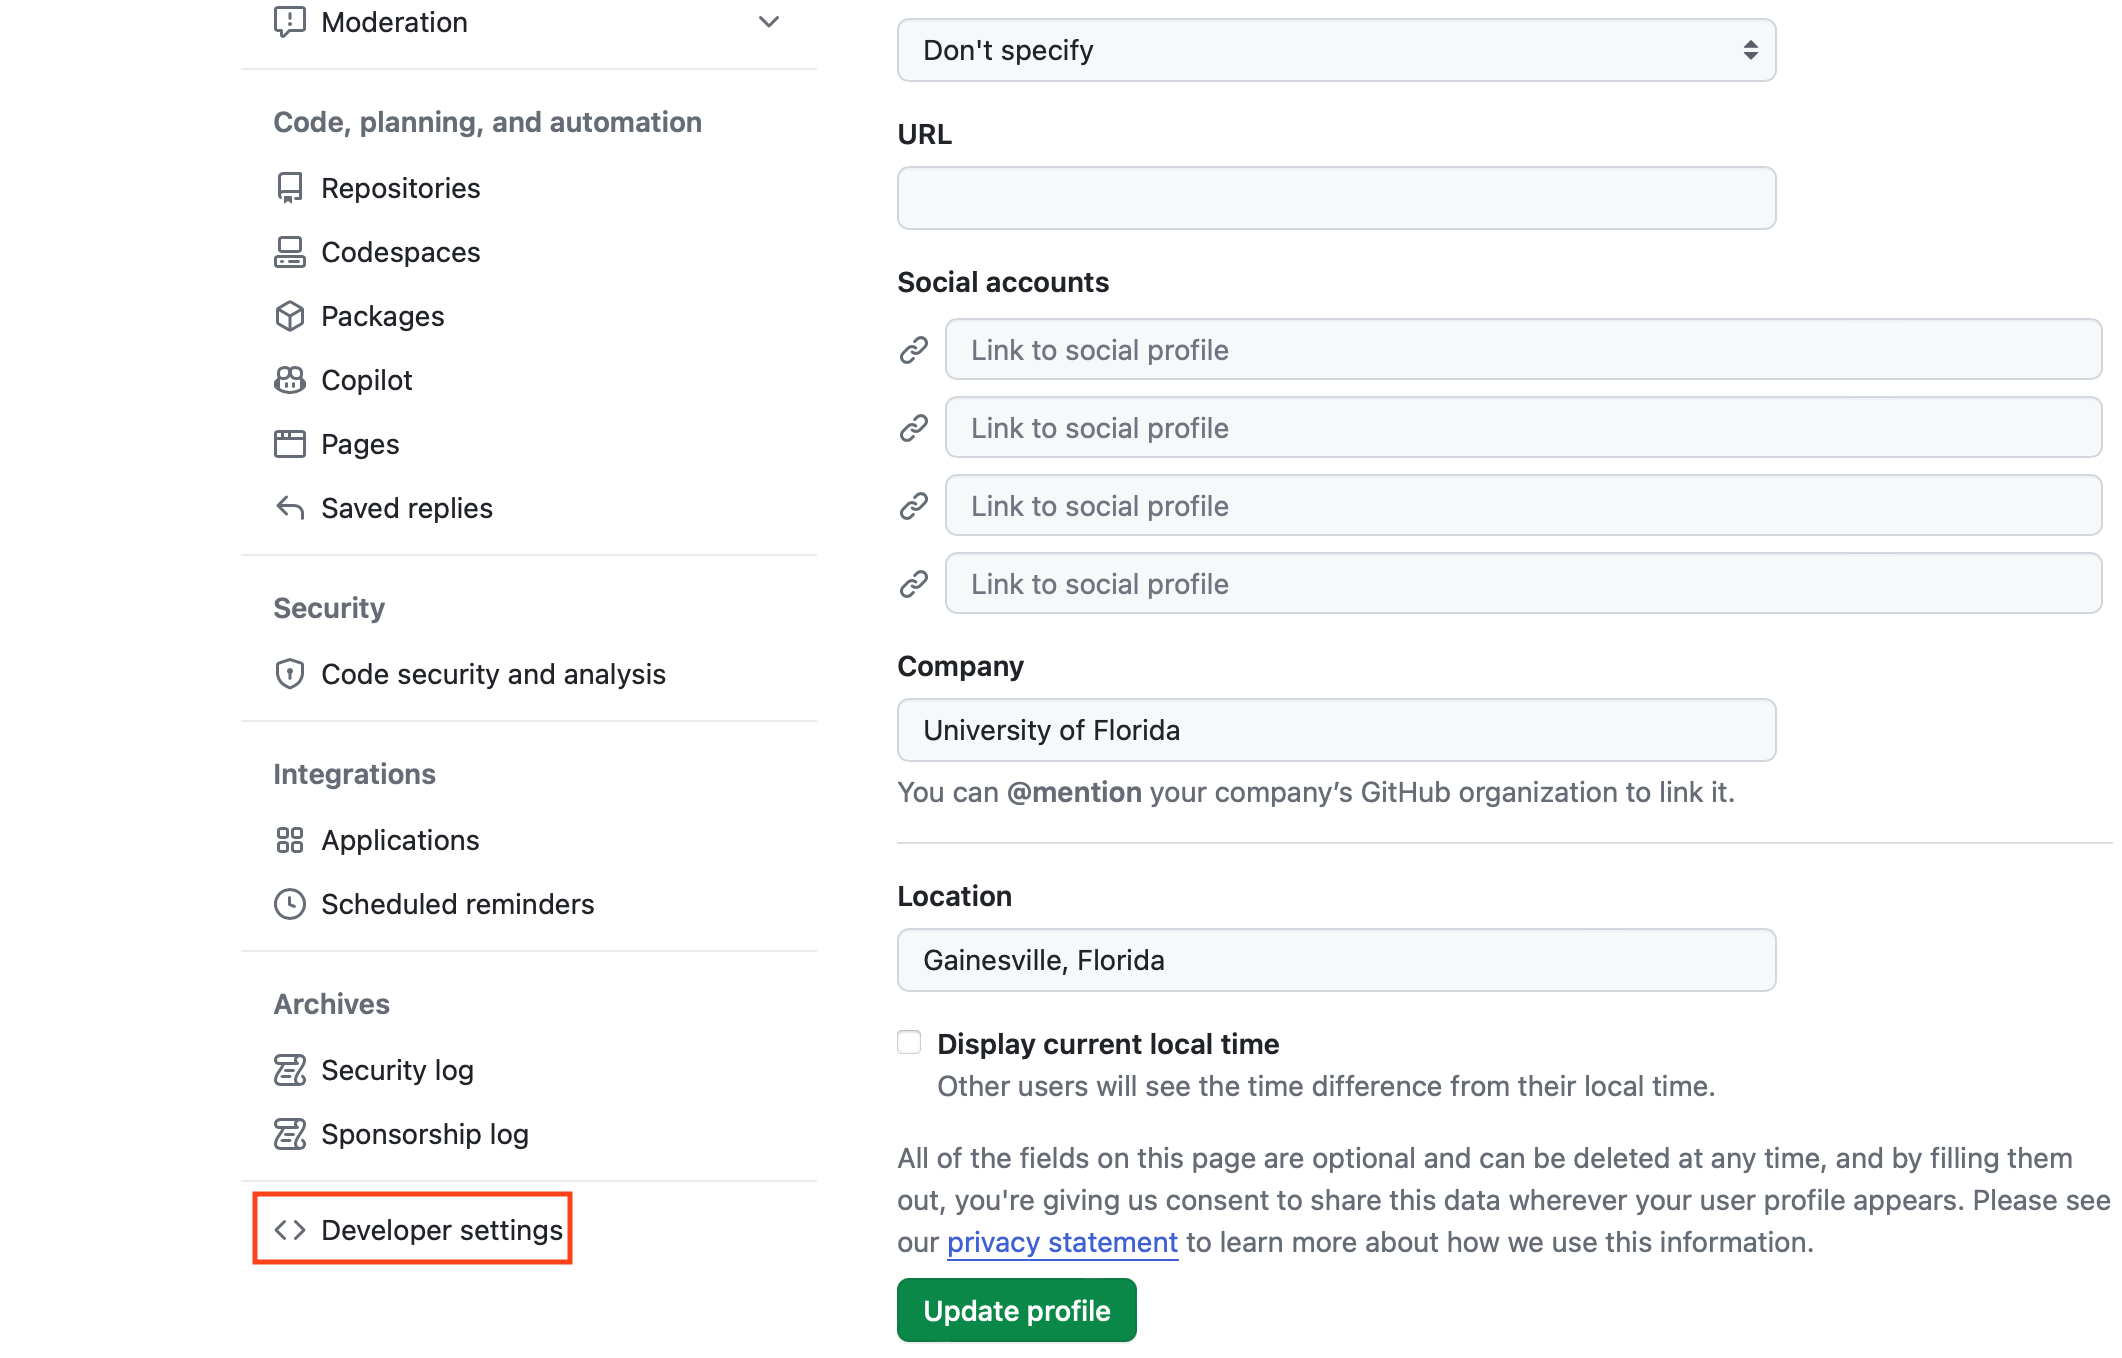
Scroll down the subsequent page and select "Developer settings".
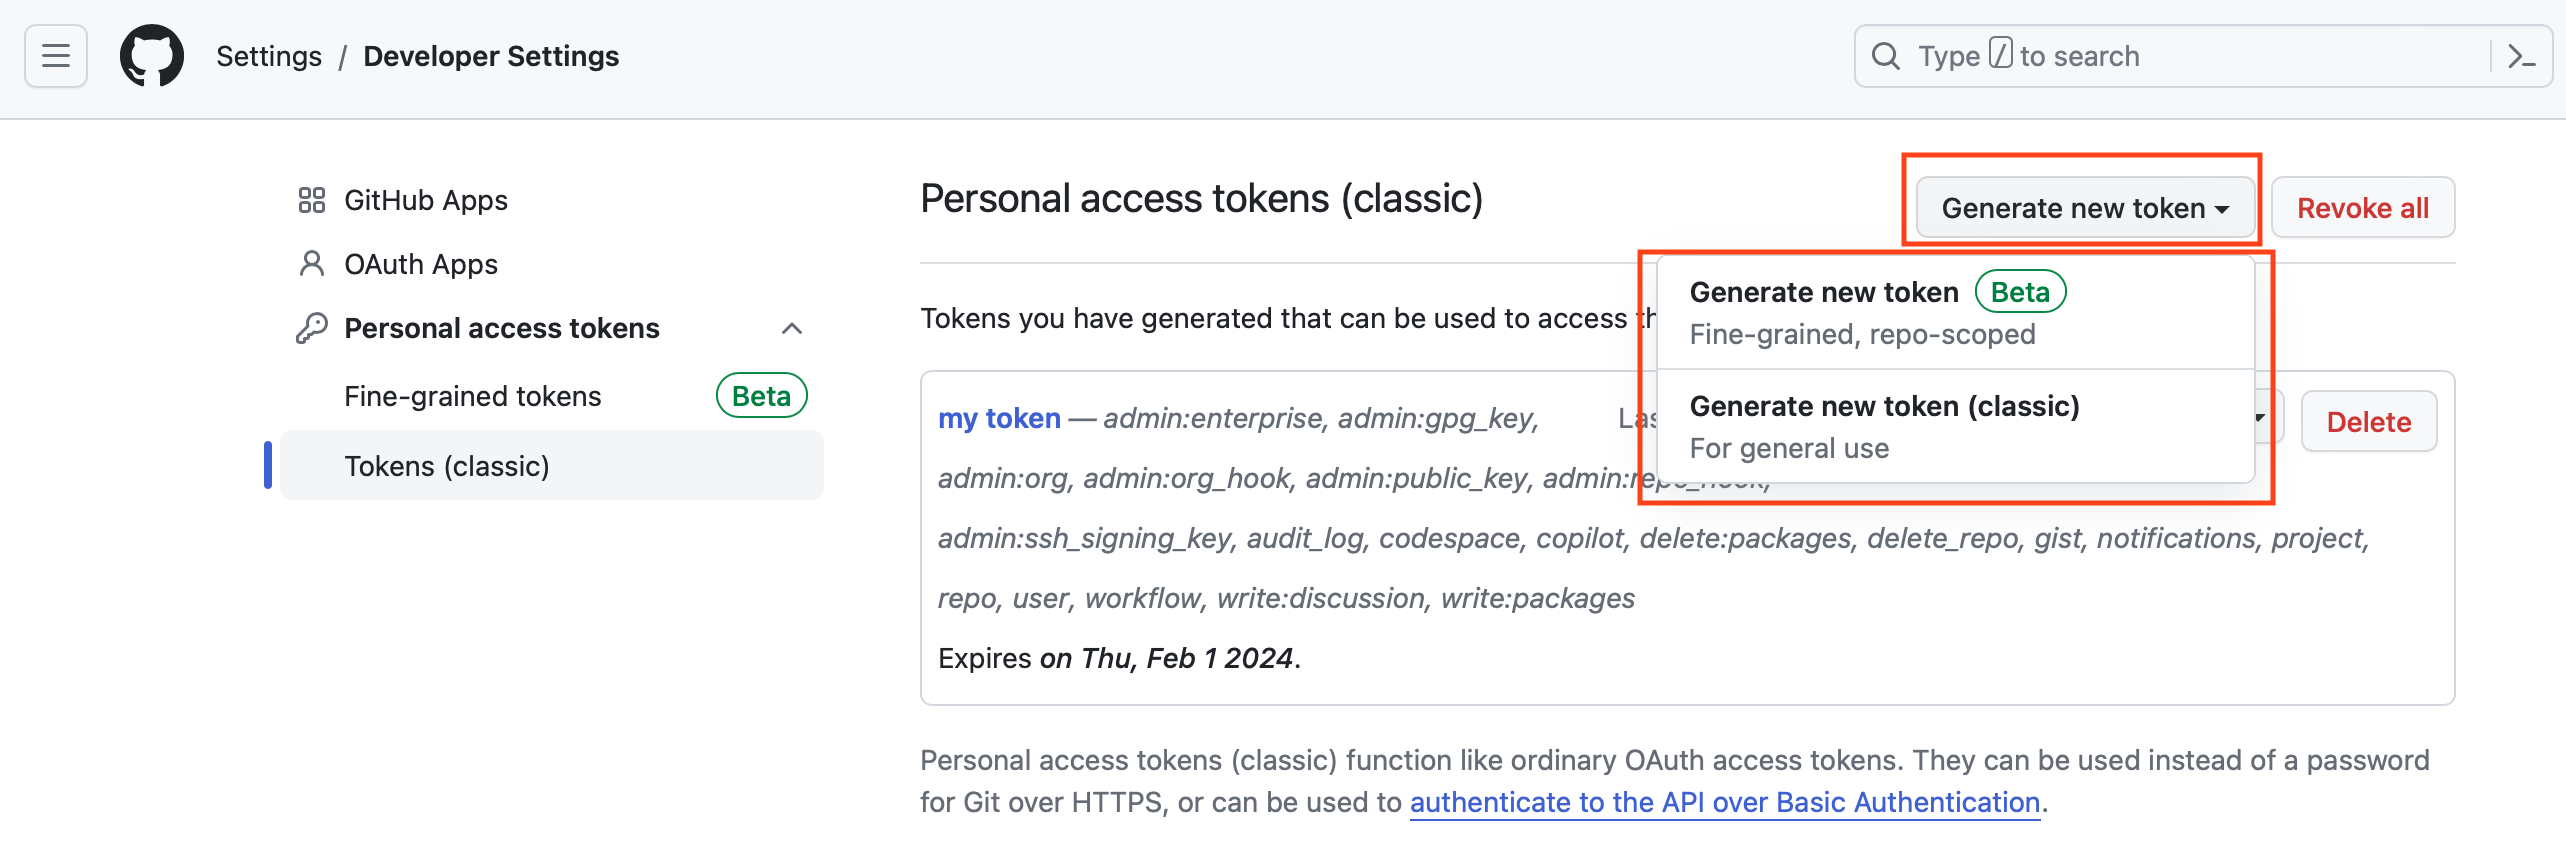
Users will then be presented with options to create a fine-grained or classic personal access token. This example will create a classic personal access token.

Click on the "Generate new token" drop down.
Note
Git stores the personal access token in the MacOSX keychain or Windows Credential Manager when using Git Bash for Windows. This will be discussed more in the Git command line section.
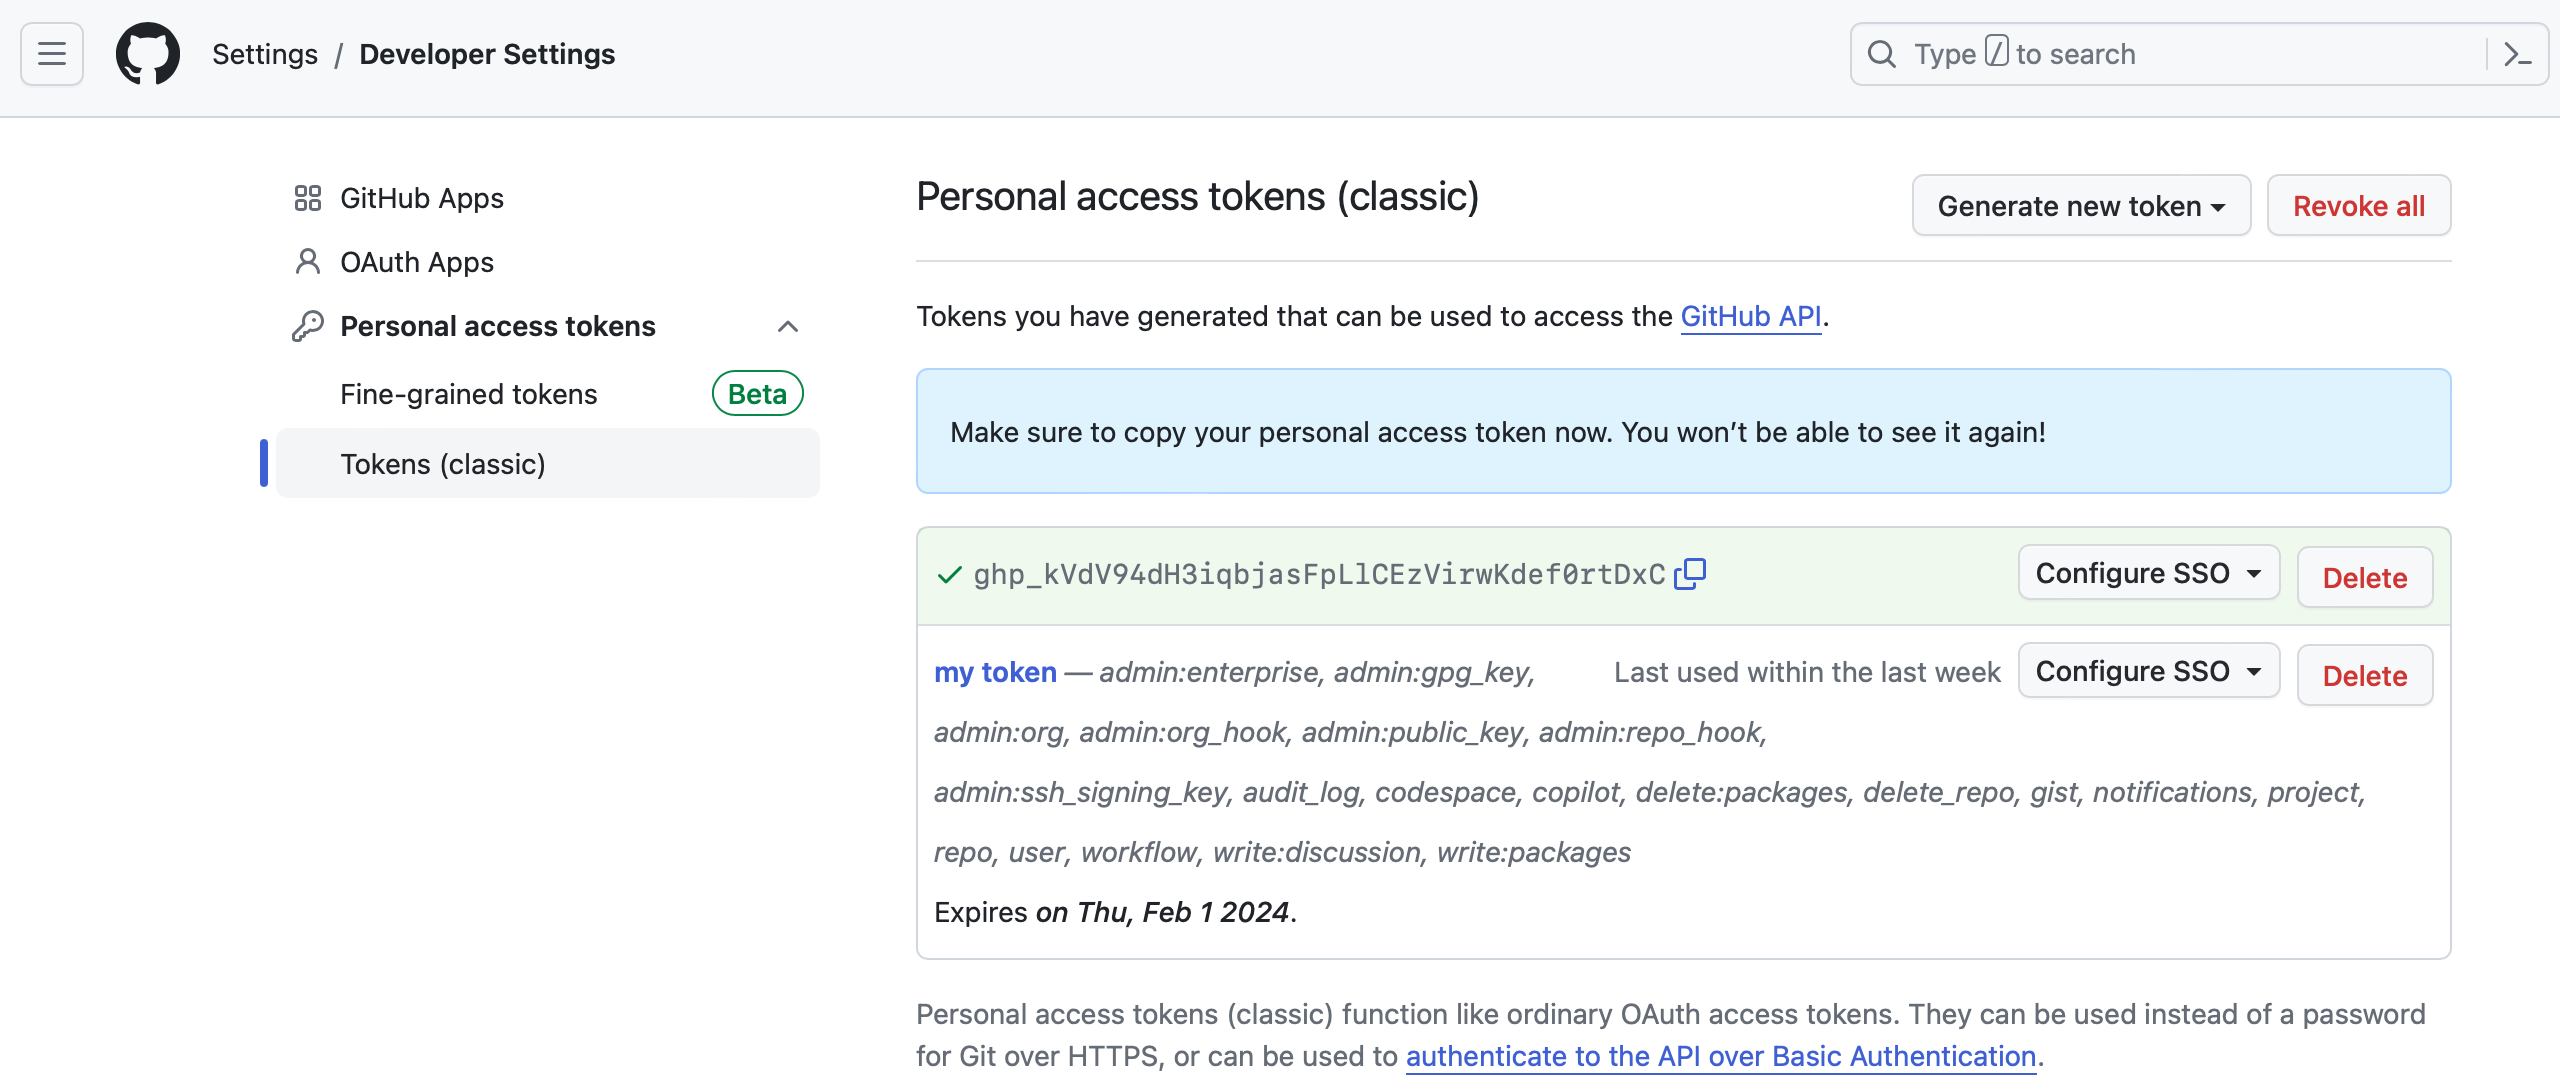
At the subsequent page, users can enter a note for the personal access token as well as select an expiration. Make sure to select the appropriate permissions for the token in the check boxes below the "Expiration" drop down. Scroll to the bottom of the page and click on "Generate token" button when ready.
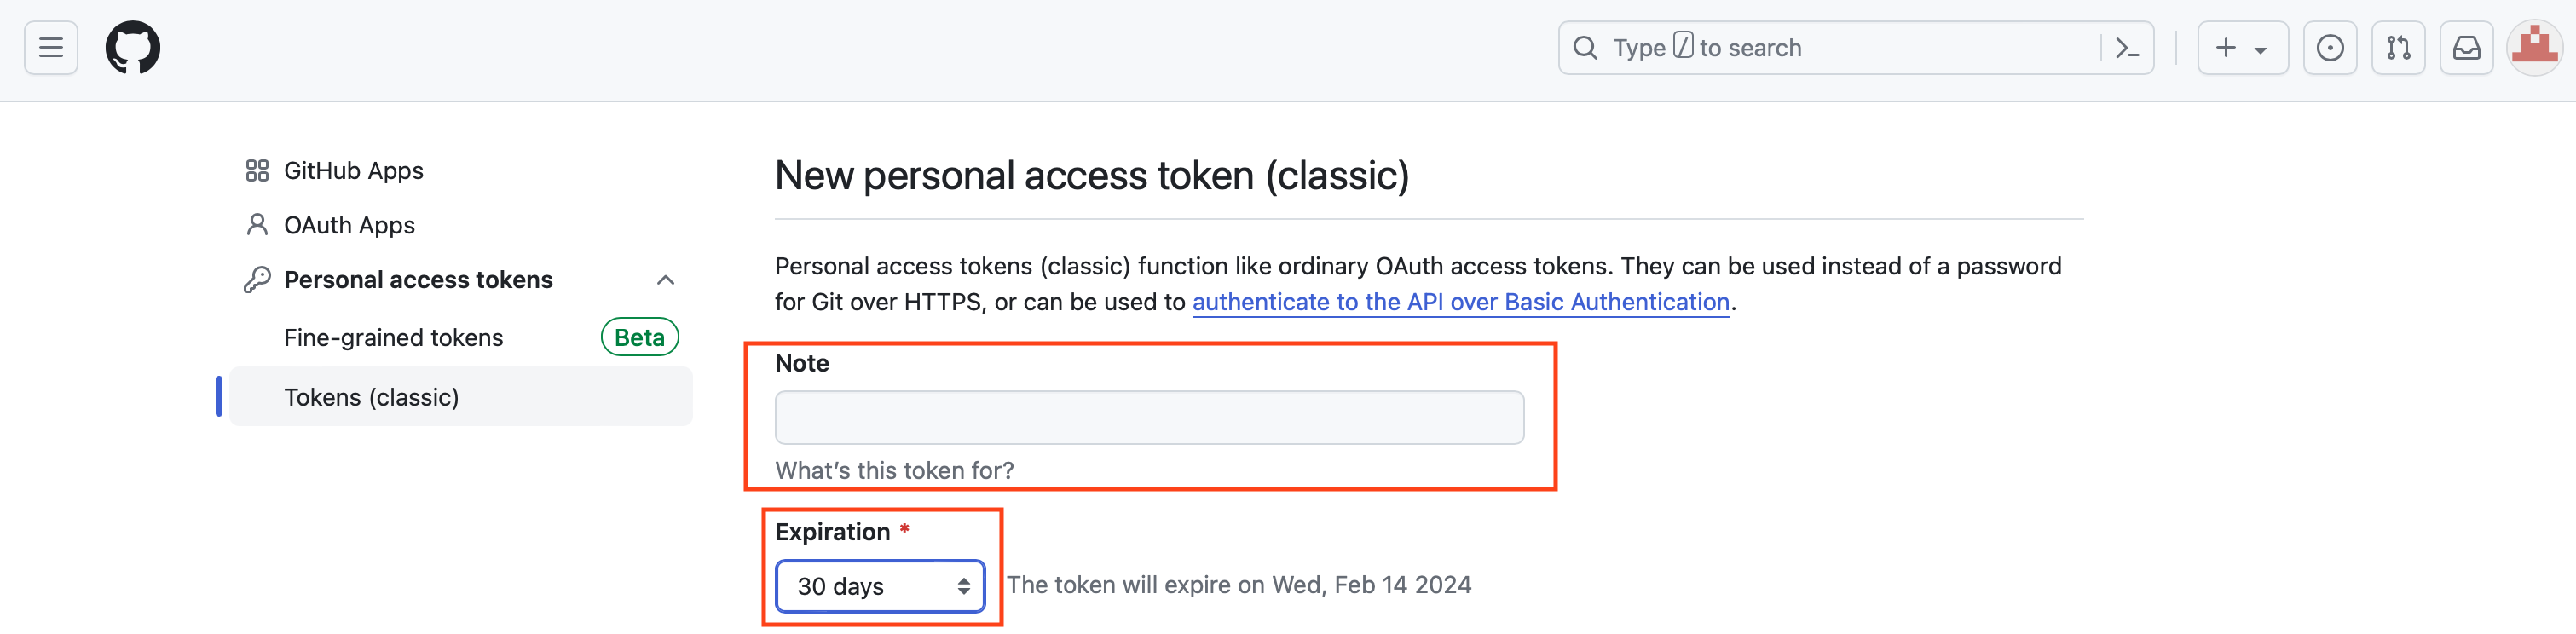
Remember to copy the token (at least temporarily as the MacOS keychain and Windows Credential Manager will save it.).
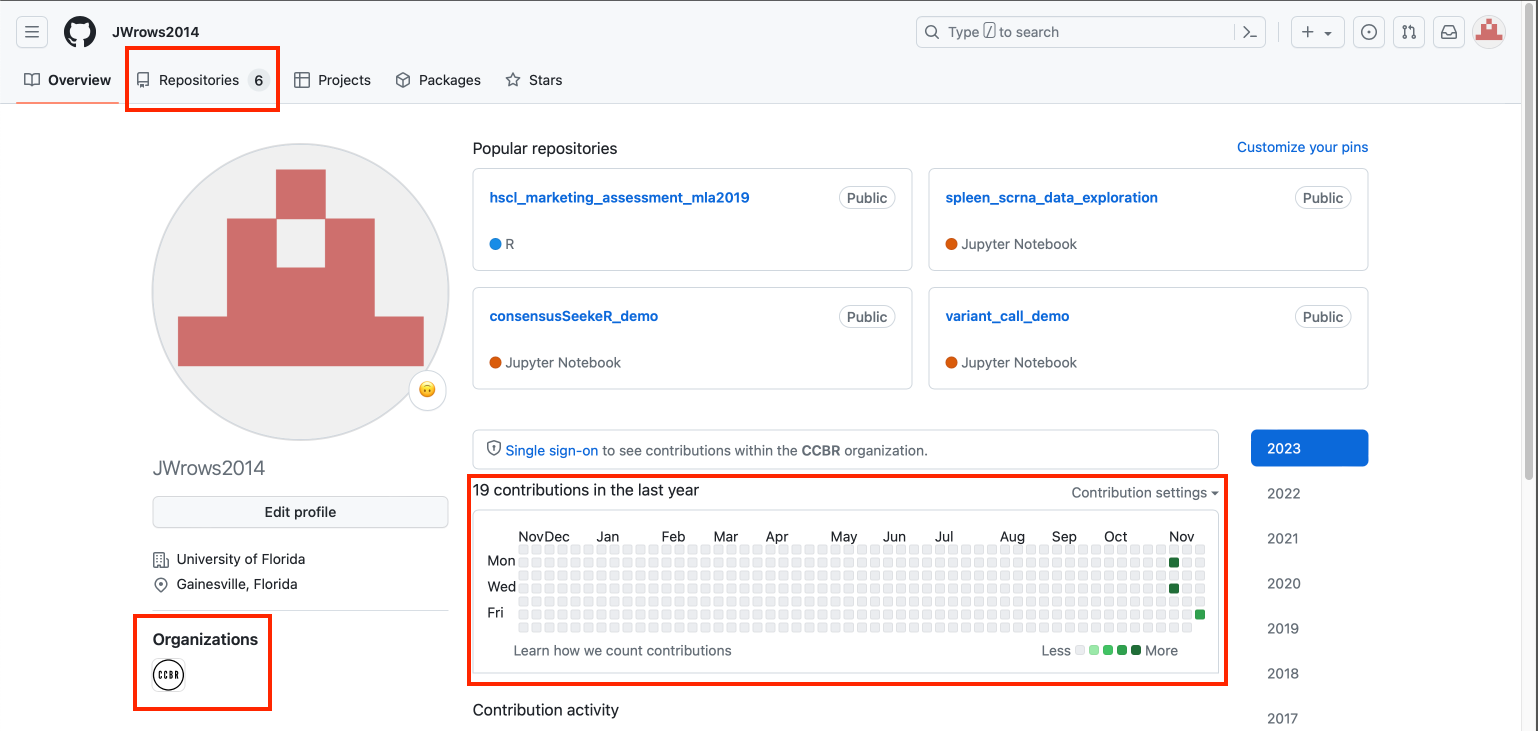
GitHub profile view
Clicking on profile provides an overview of the user's GitHub profile. From here, users can access their repositories, view organizations in which they belong, and view activity.
Definition
"A repository is the most basic element of GitHub. It's a place where you can store your code, your files, and each file's revision history. Repositories can have multiple collaborators and can be either public or private." -- GitHub
Create a new repository
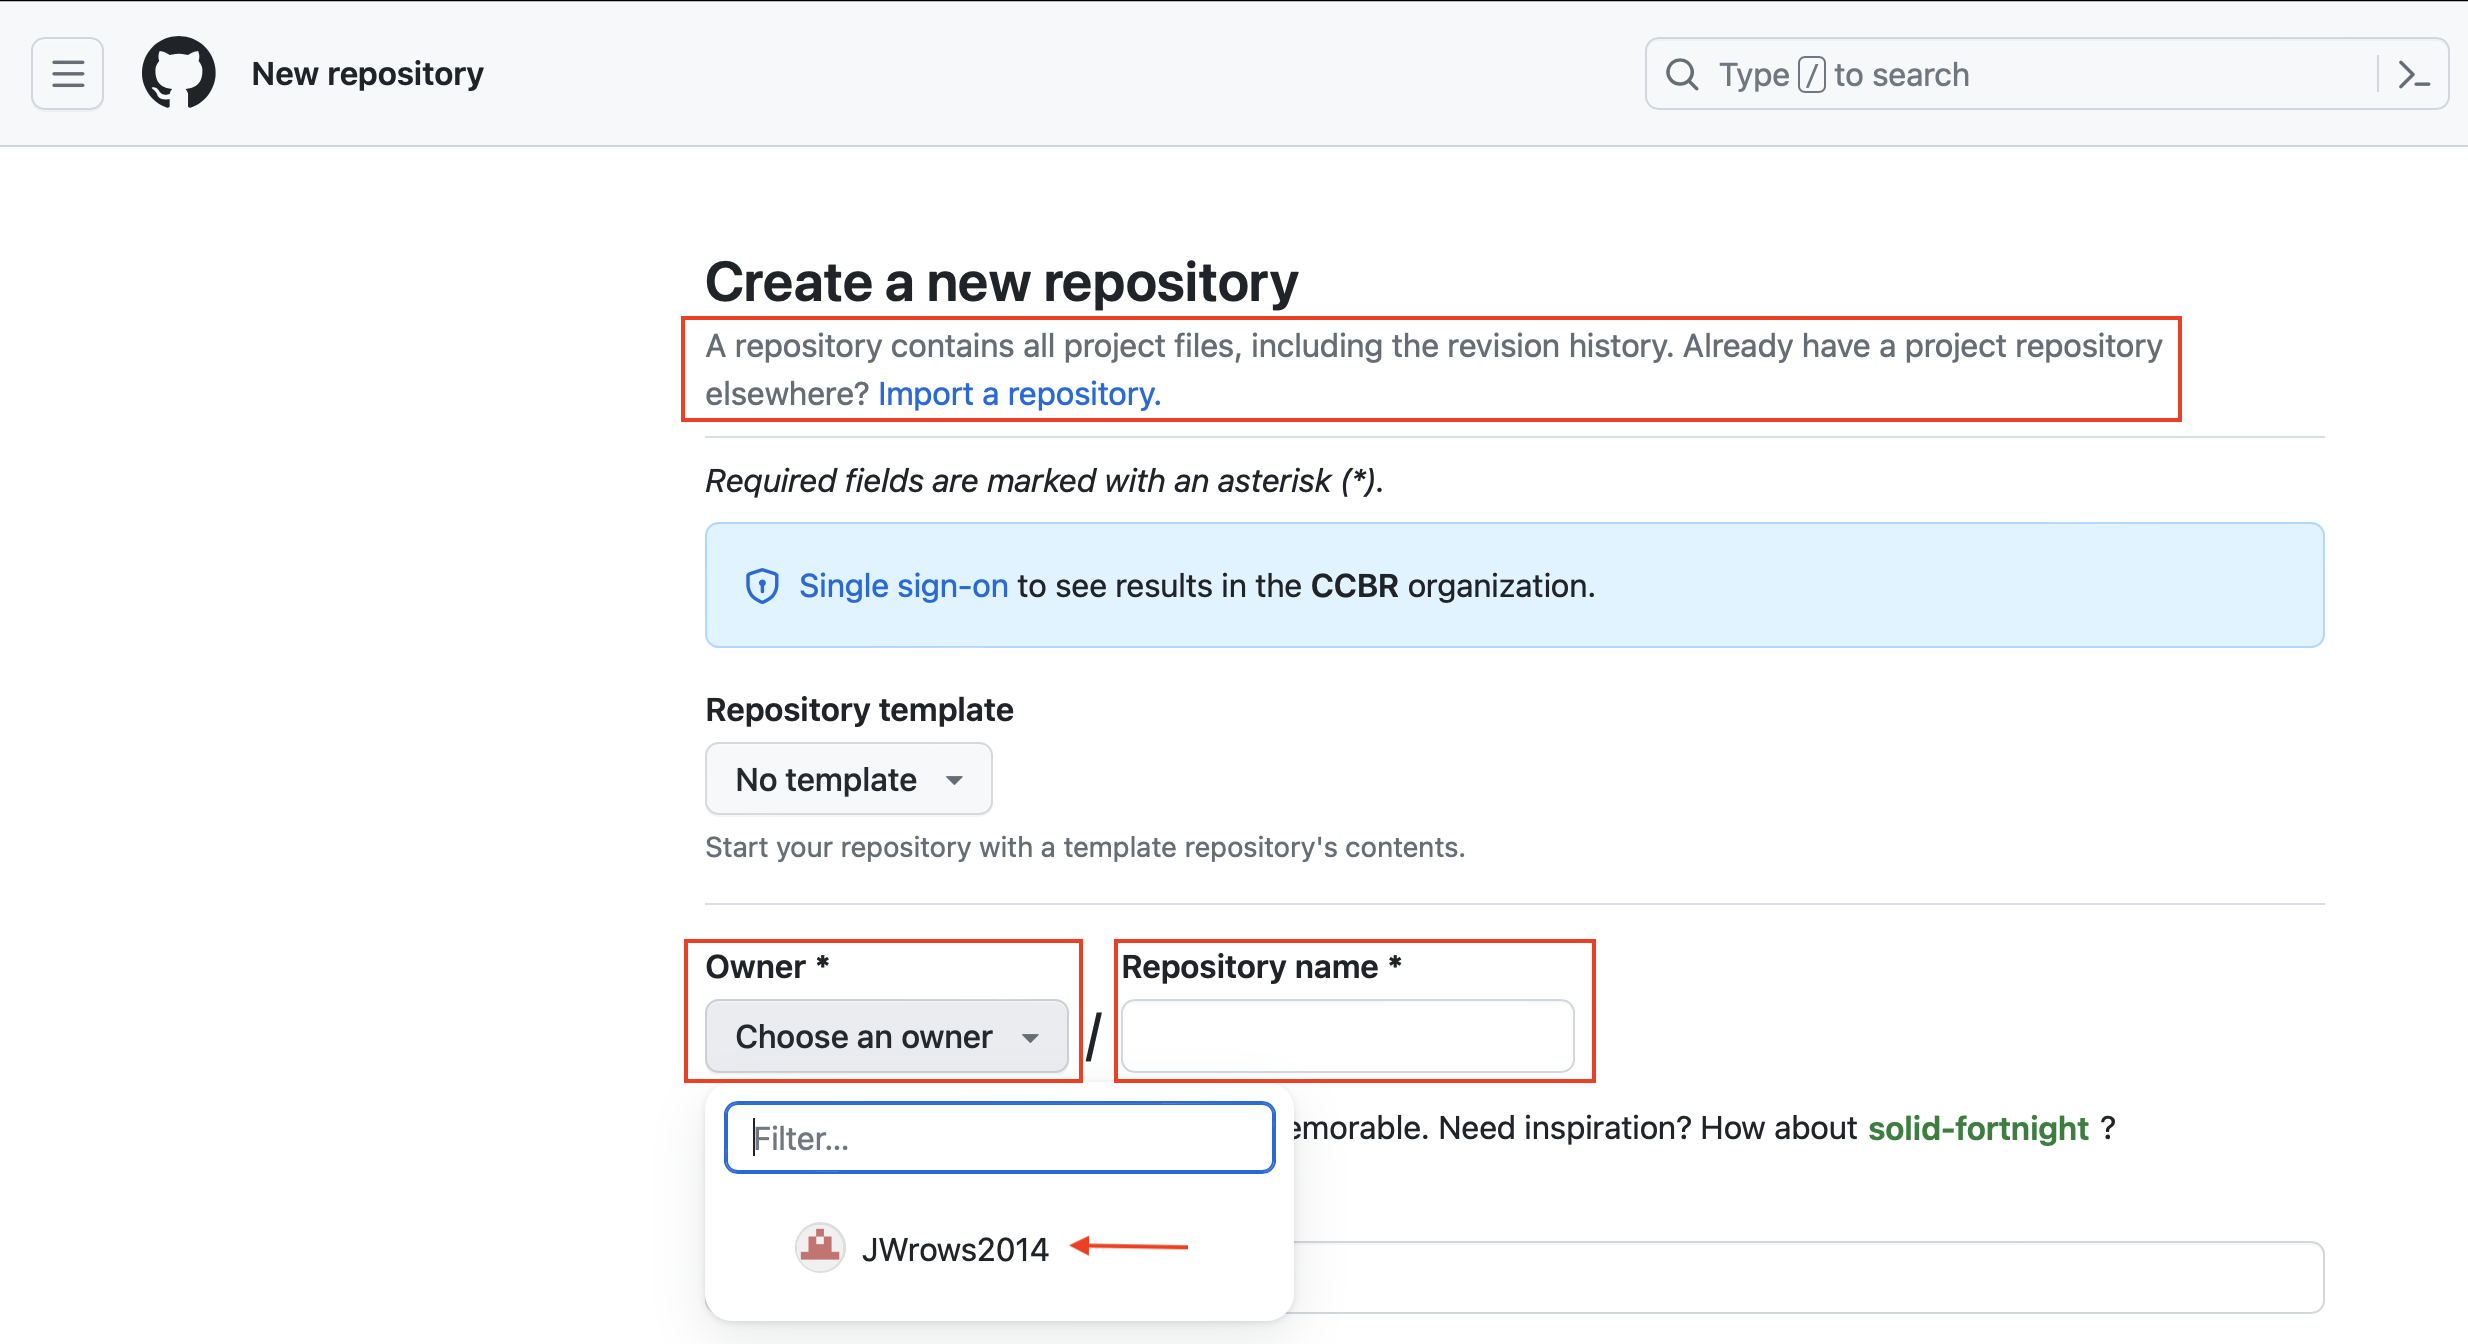
Click on the "Inverto cat" icon next to the user ID at the top left corner of the GitHub page to return to the dashboard. To create a new repository, click on the green button labeled "New" in the GitHub dashboard. Be sure to choose the repository owner by clicking on the drop down labeled "Choose an owner". Next, name the repository. Users can also import repositories from other versioning systems. For this demonstration, the repository will be named "version_control_github_gui".
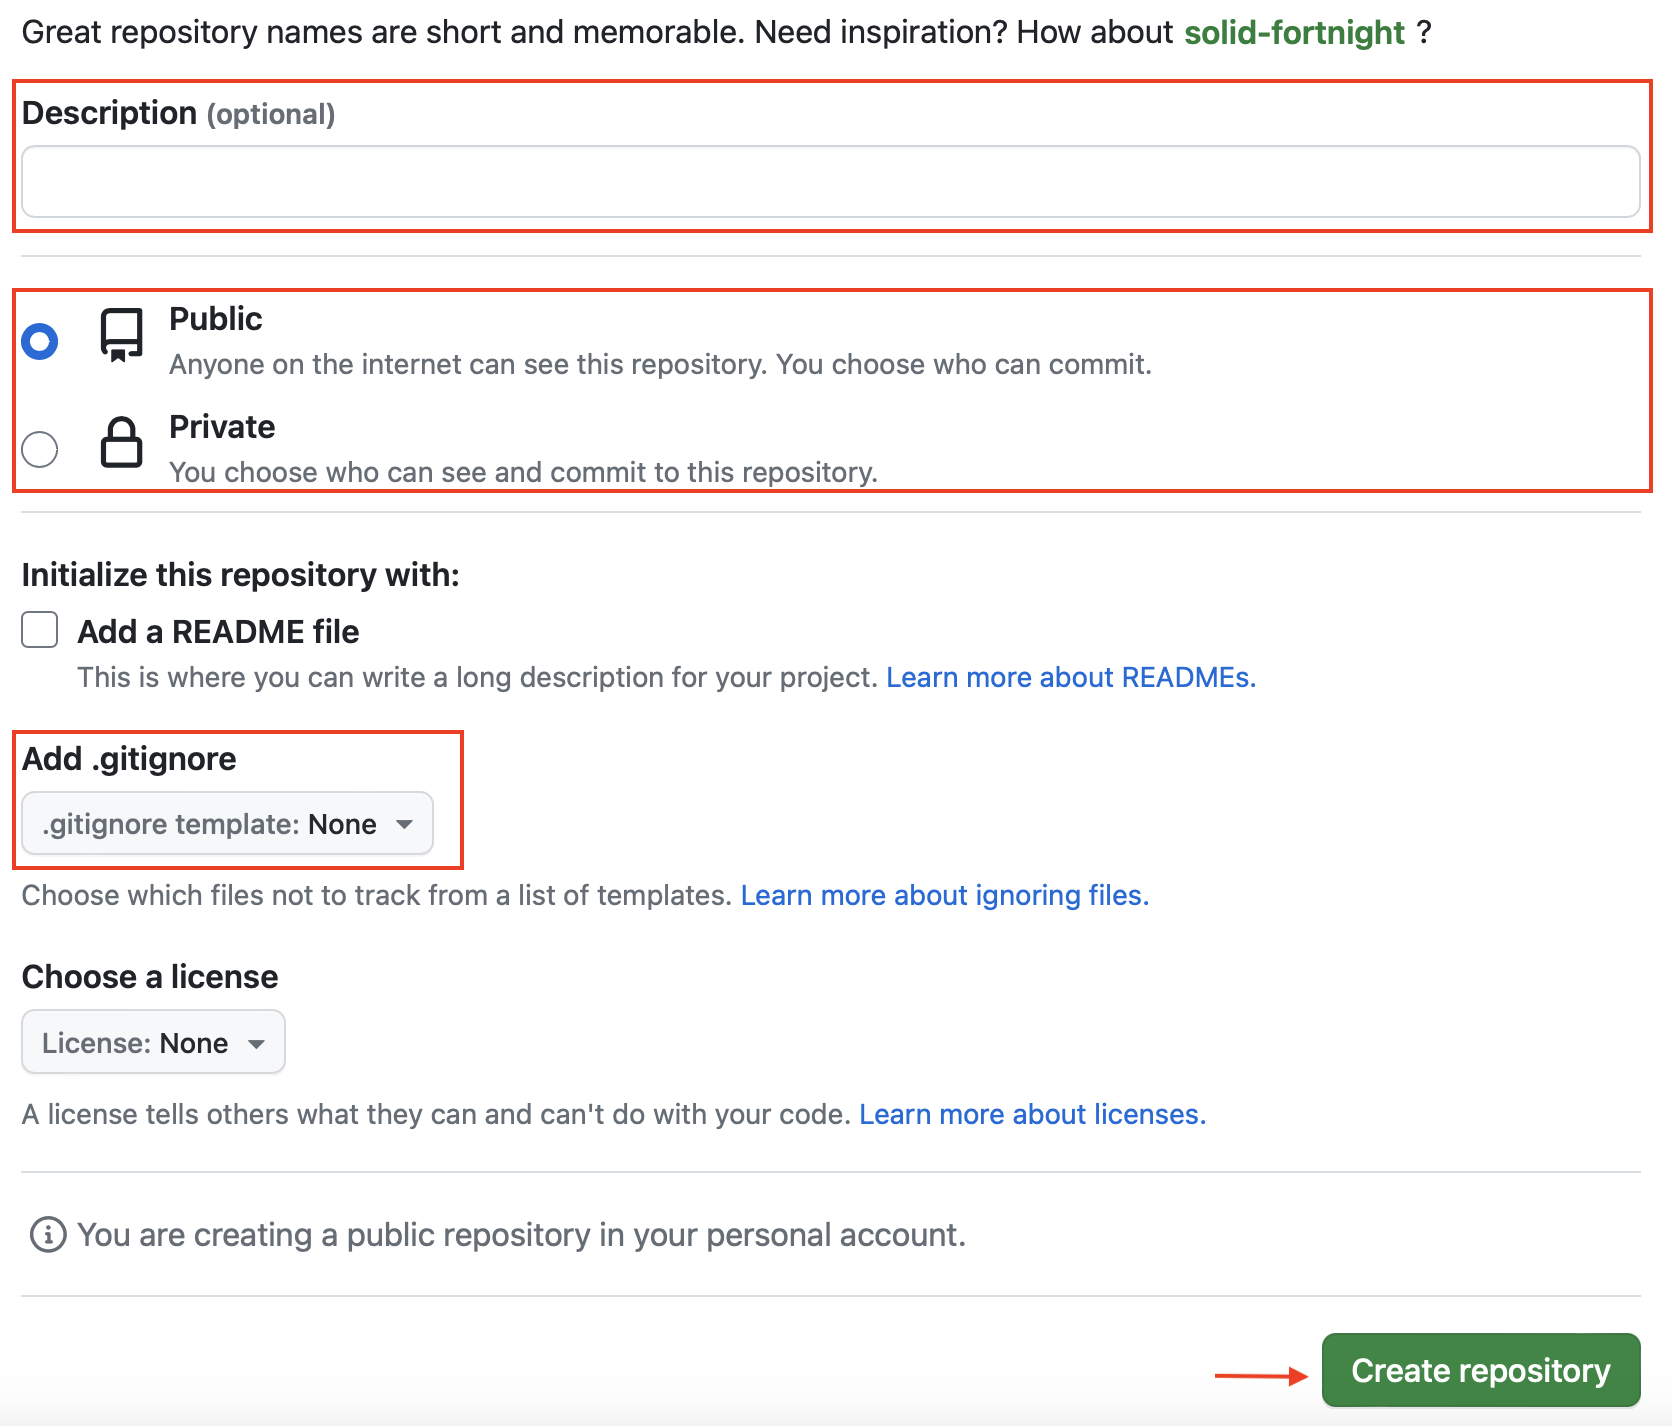
Next, enter a description for the repository and choose whether it should be public or private. As an example, the description will be "This repository demonstrates the use of GitHub through an example R script.". Set this repository to private for the time being. It is a good idea at some point to include a README that gives others an idea what the repository is about. This will be ignored for now. A ".gitignore" file contains content that will not be added to the repository and will not be used here. When ready, hit the "Create repository" button.
Uploading code and committing
The next step is to either create or upload existing files.
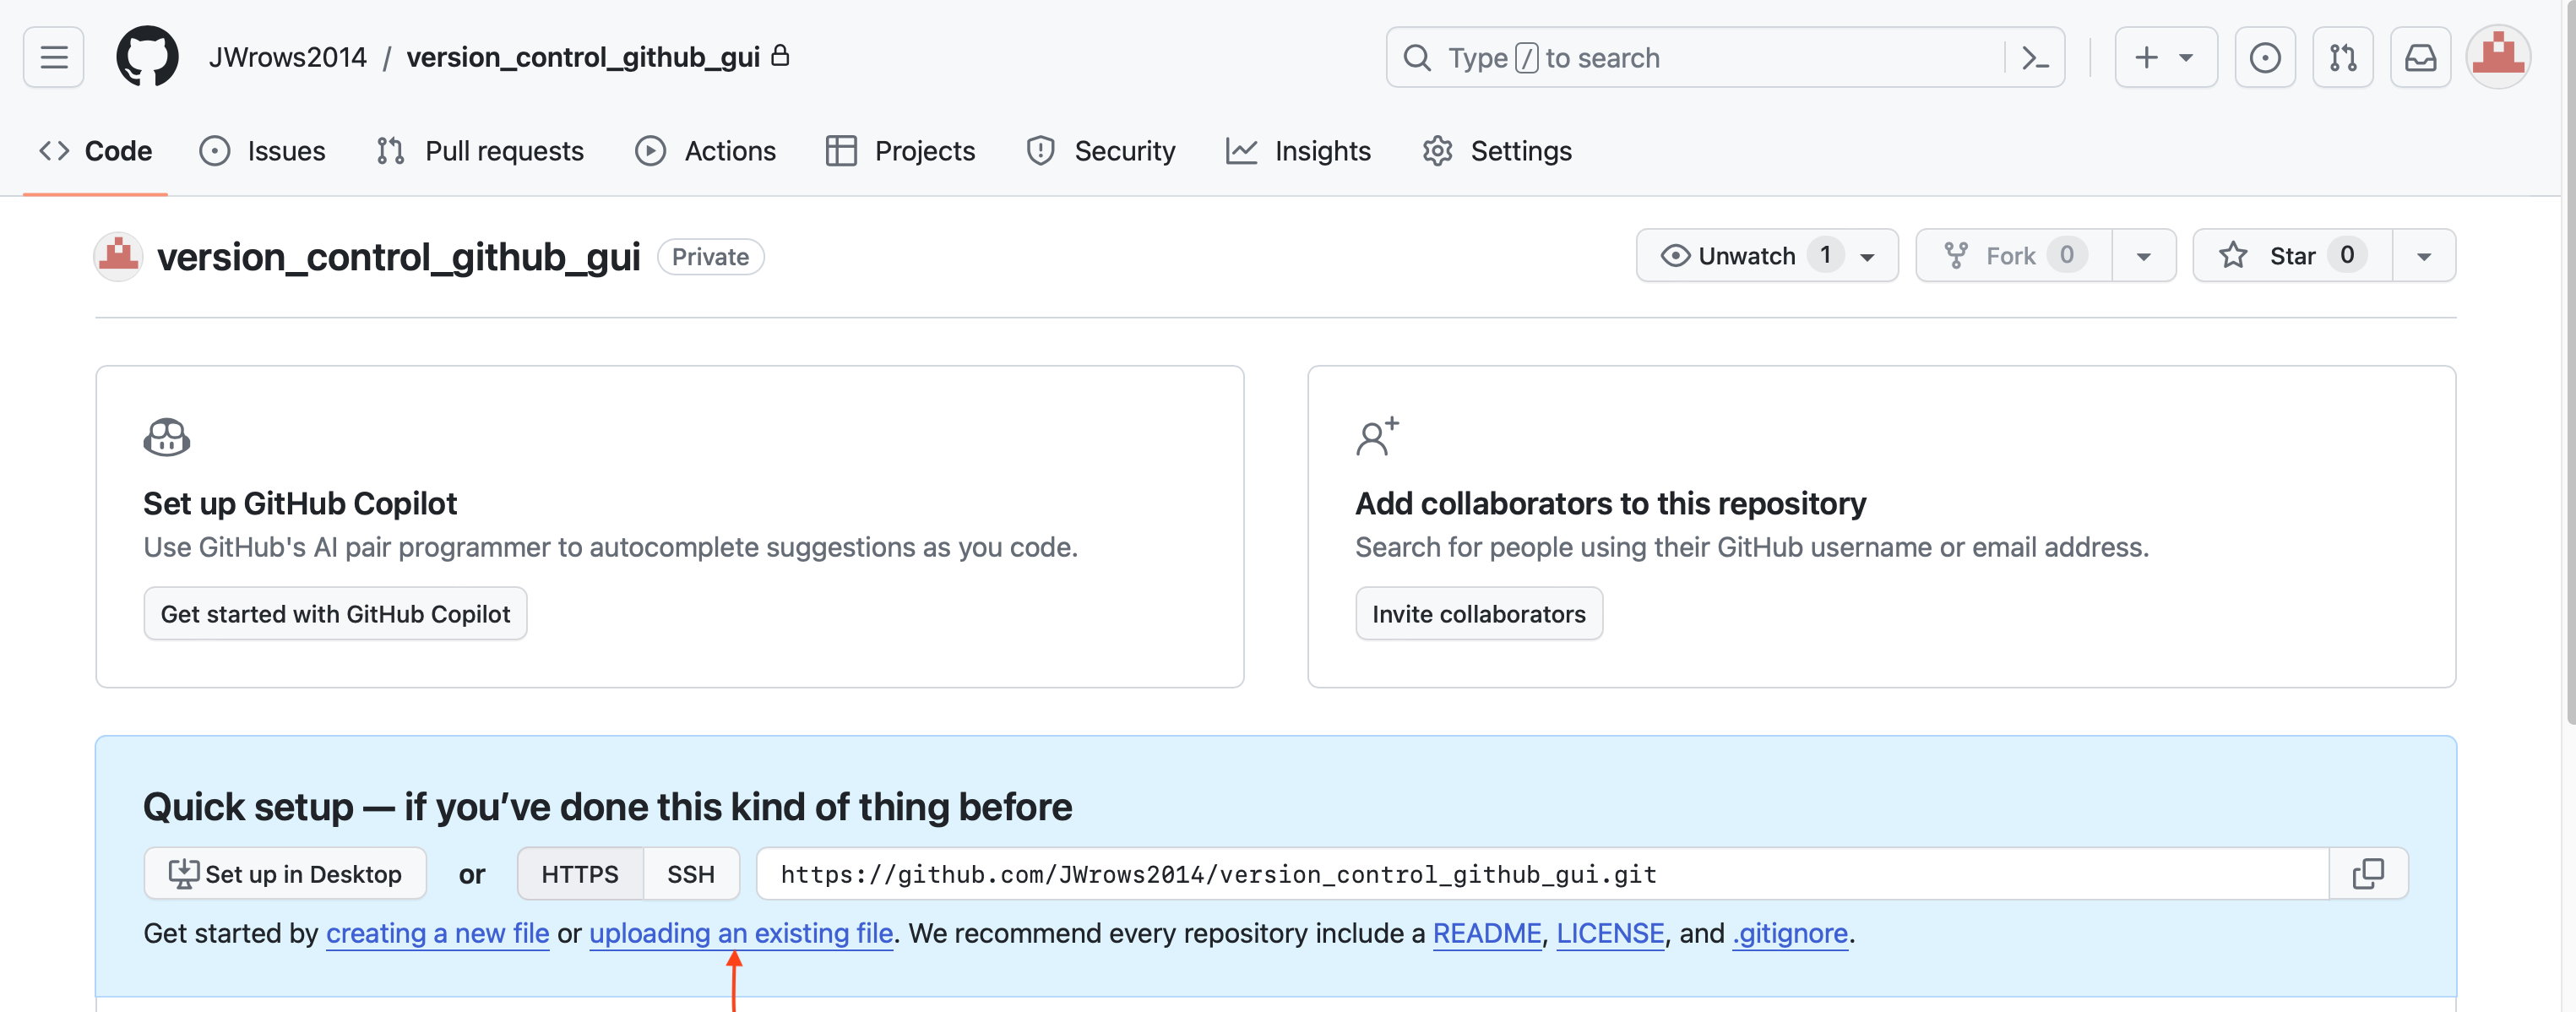
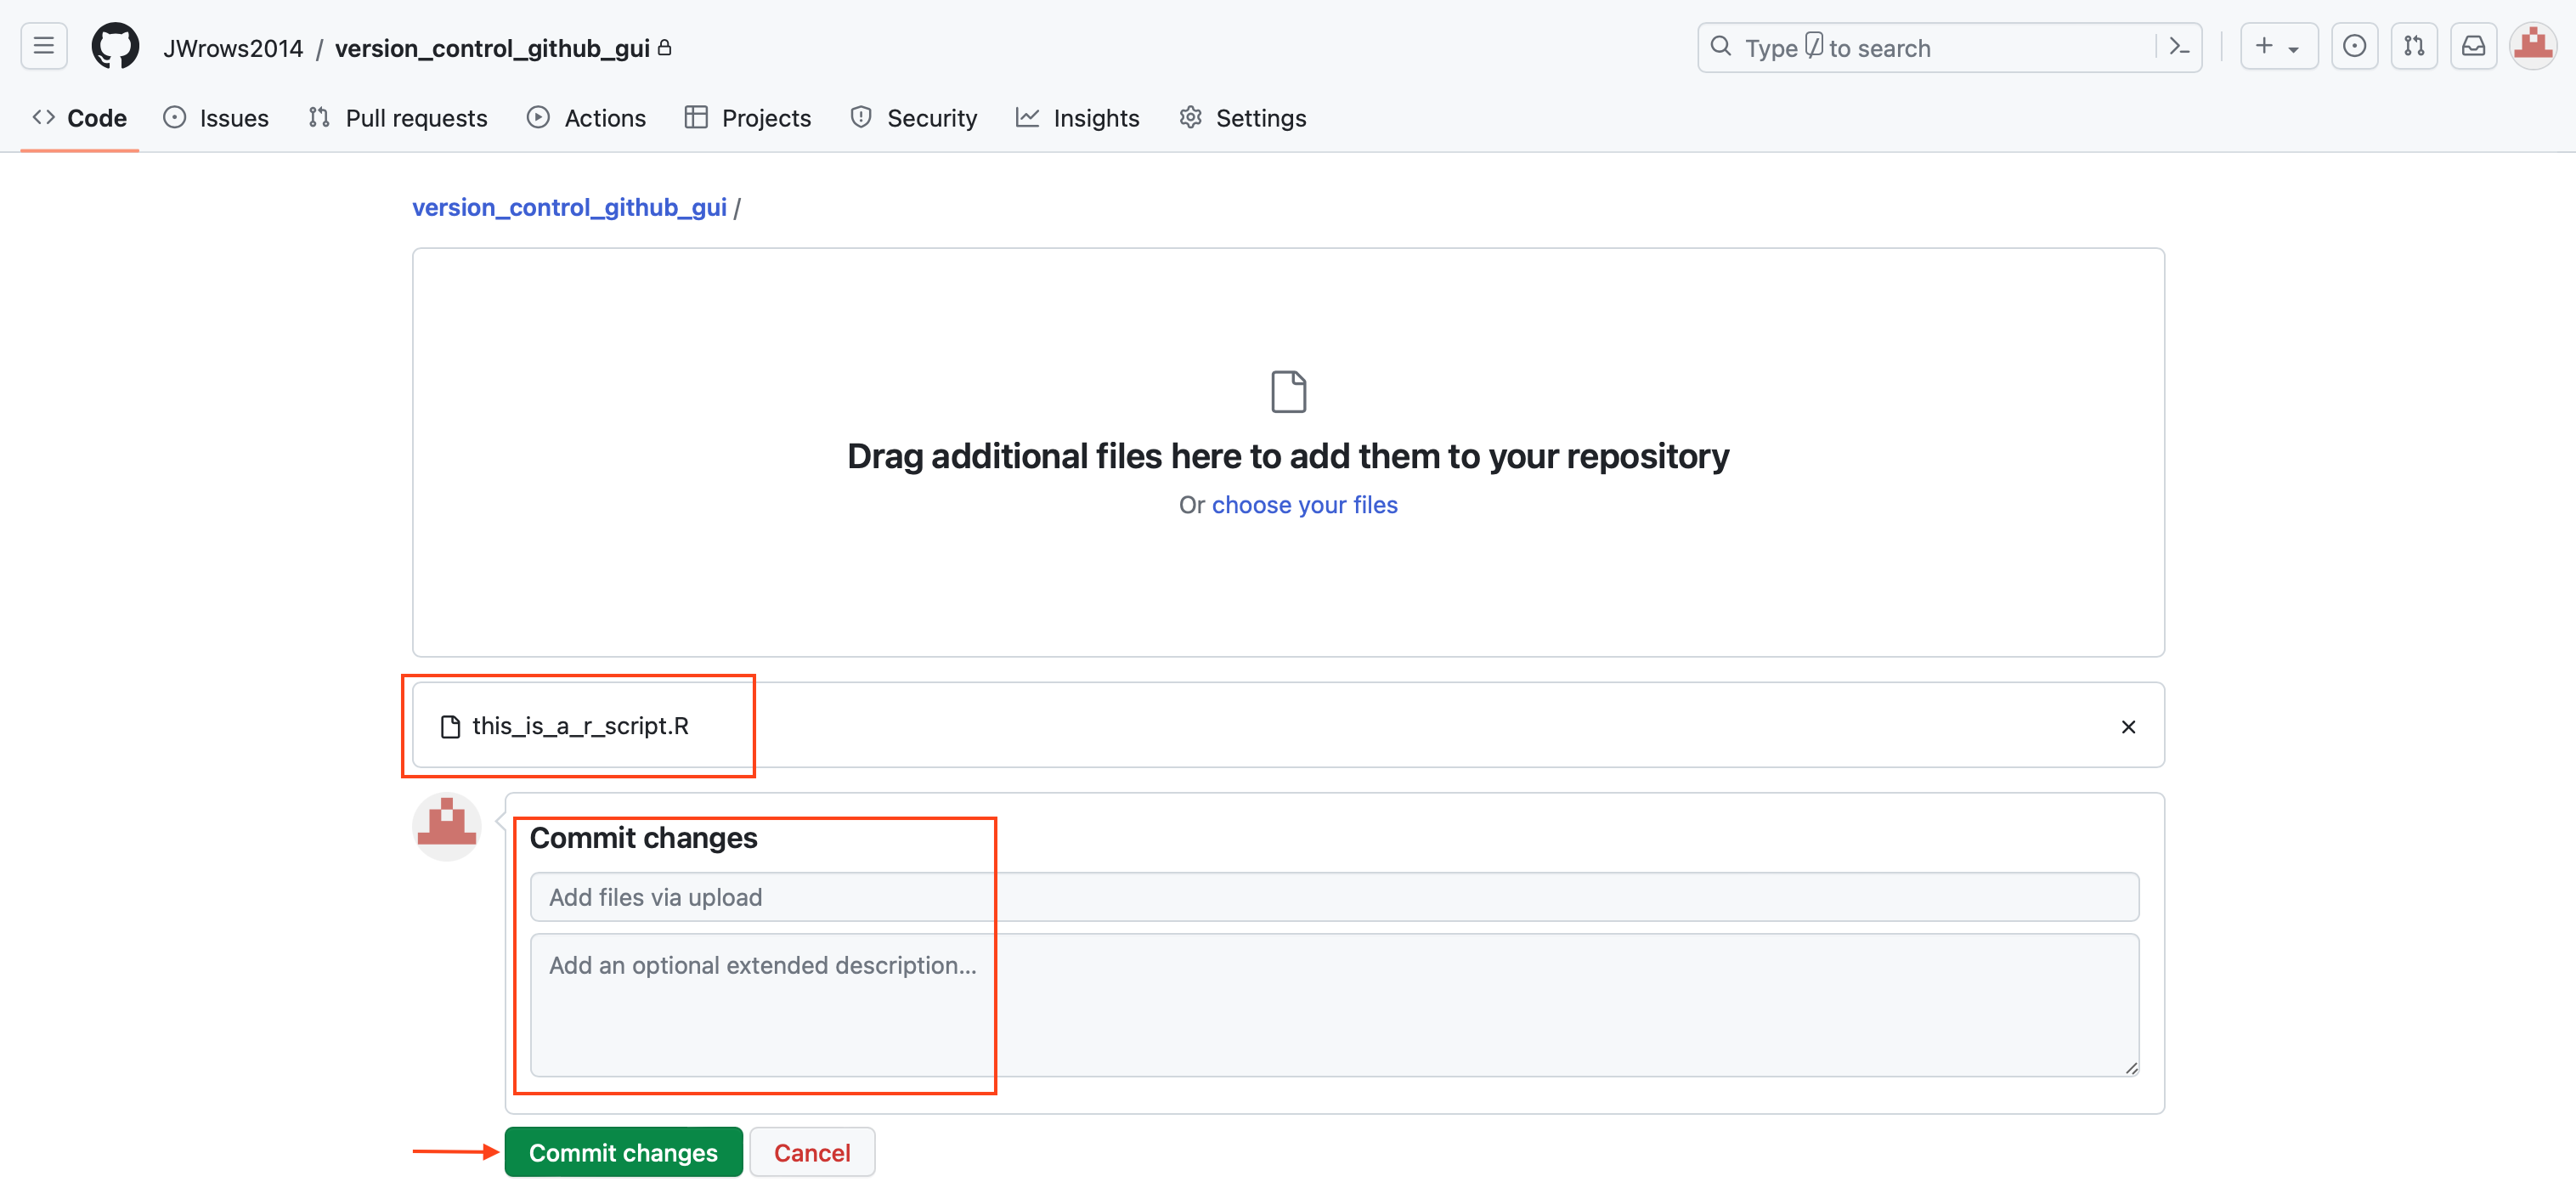
Click on the "uploading an existing file" link to upload a file named this_is_a_r_script.R from local computer. Add additional commit messages to describe what was done. Click on "Commit changes" when ready.
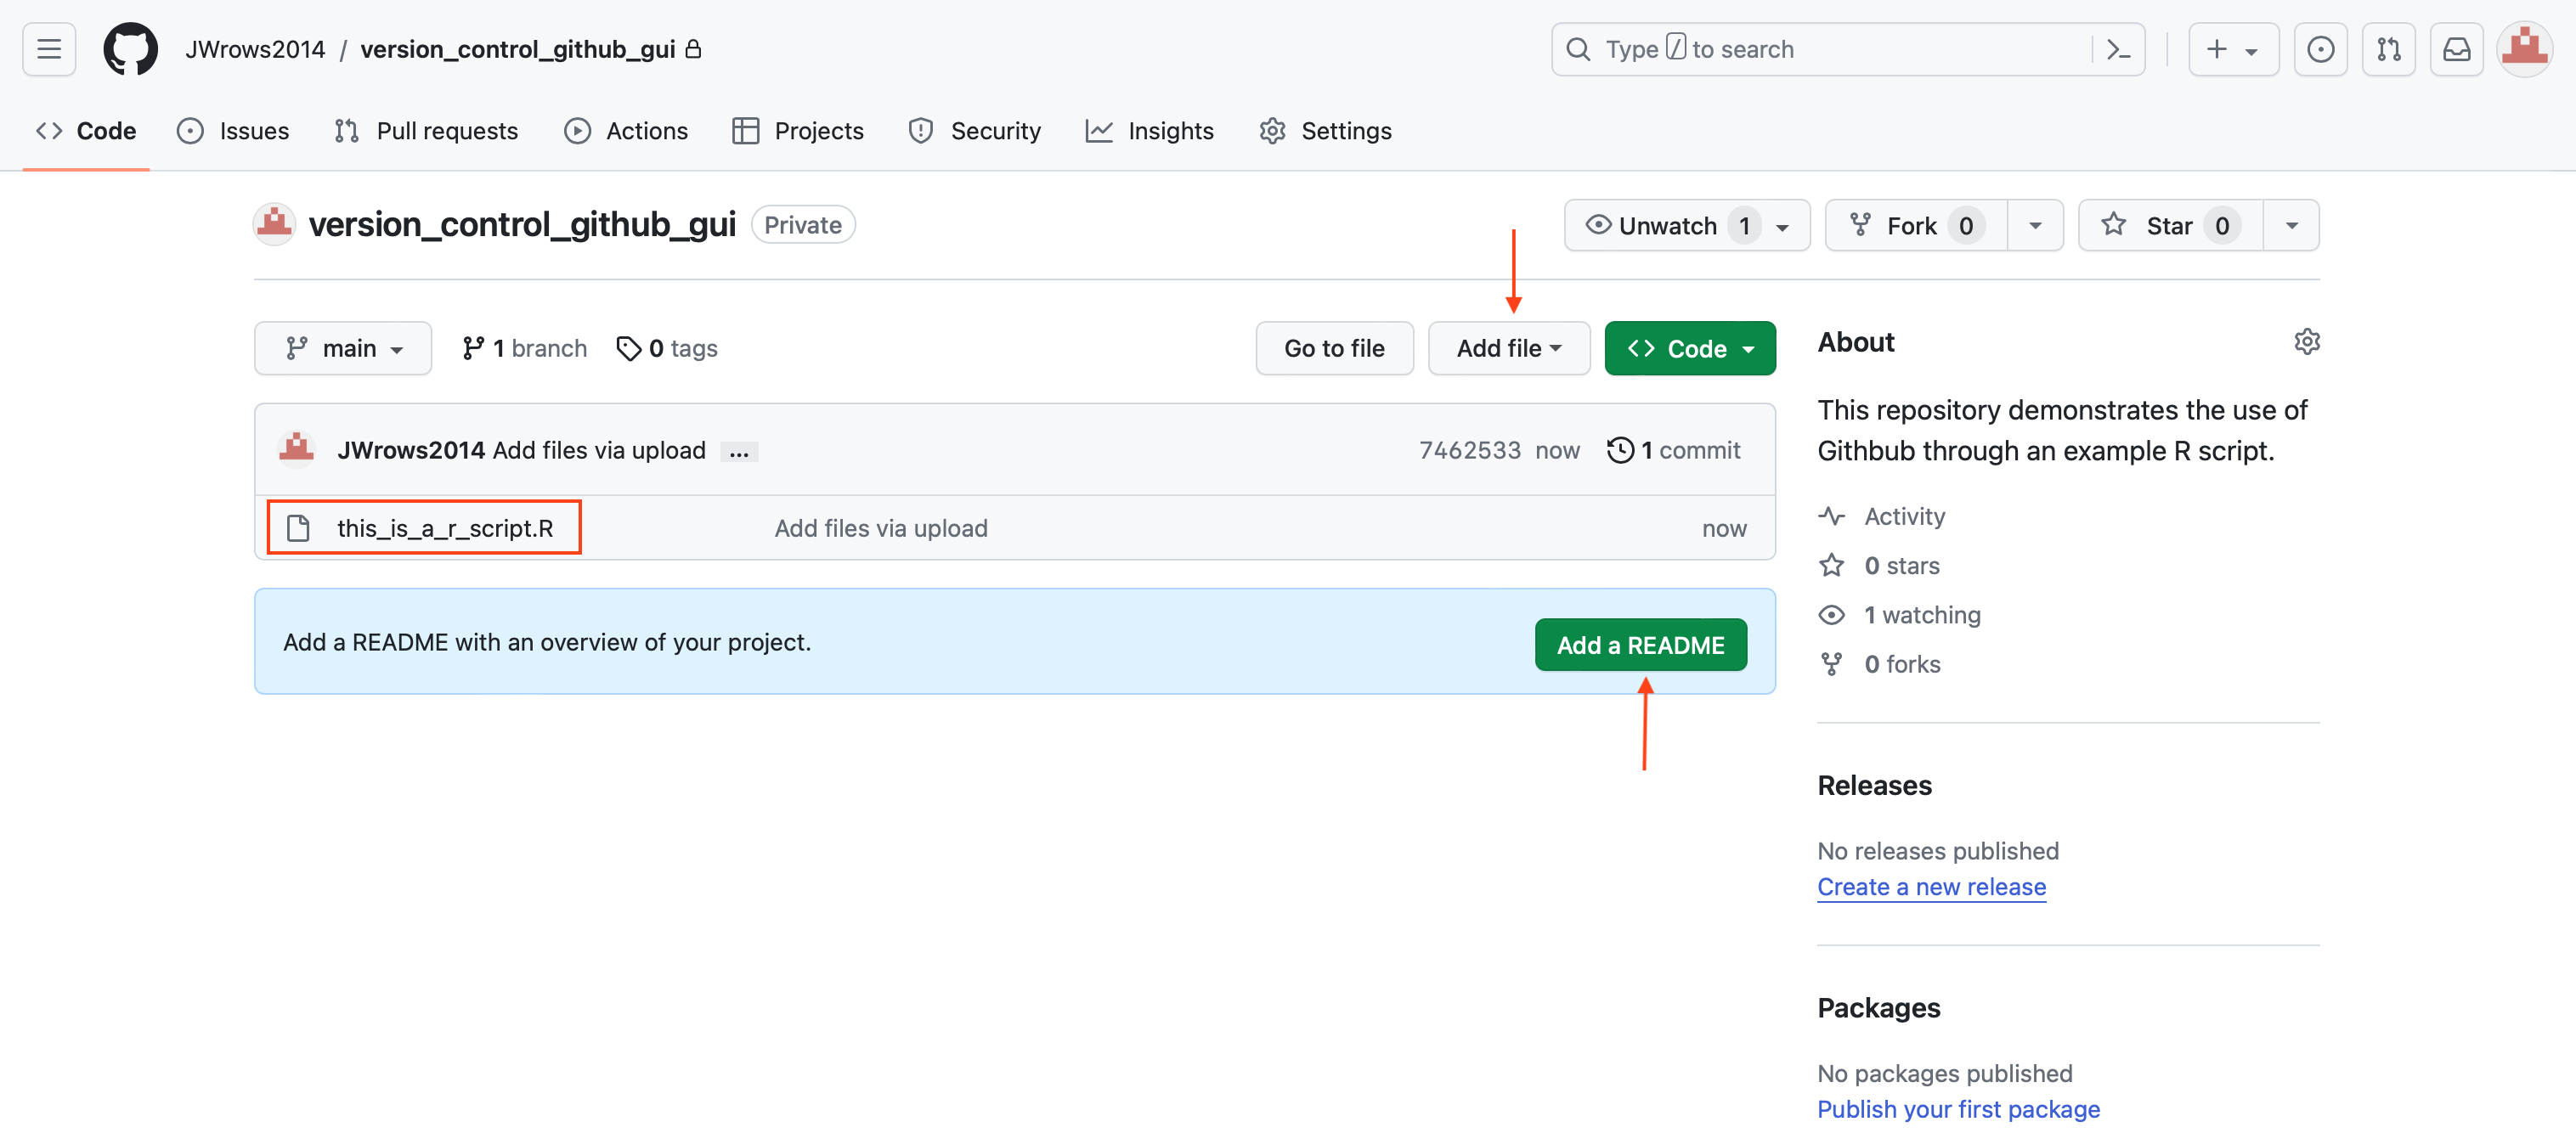
After committing, users will be taken to the repository view. Here, there is only one file, this_is_a_r_script.R. Click on the "Add file" drop down to create or upload files. A README can be added by clicking on the "Add a README" button.
Clicking on this_is_a_r_script.R will reveal a blank script.
![]()
Go back to this_is_a_r_script.R on local computer and add the following.
## This R script is used to demonstrate version control using the
### GitHub webpage

# load data
data("mtcars")
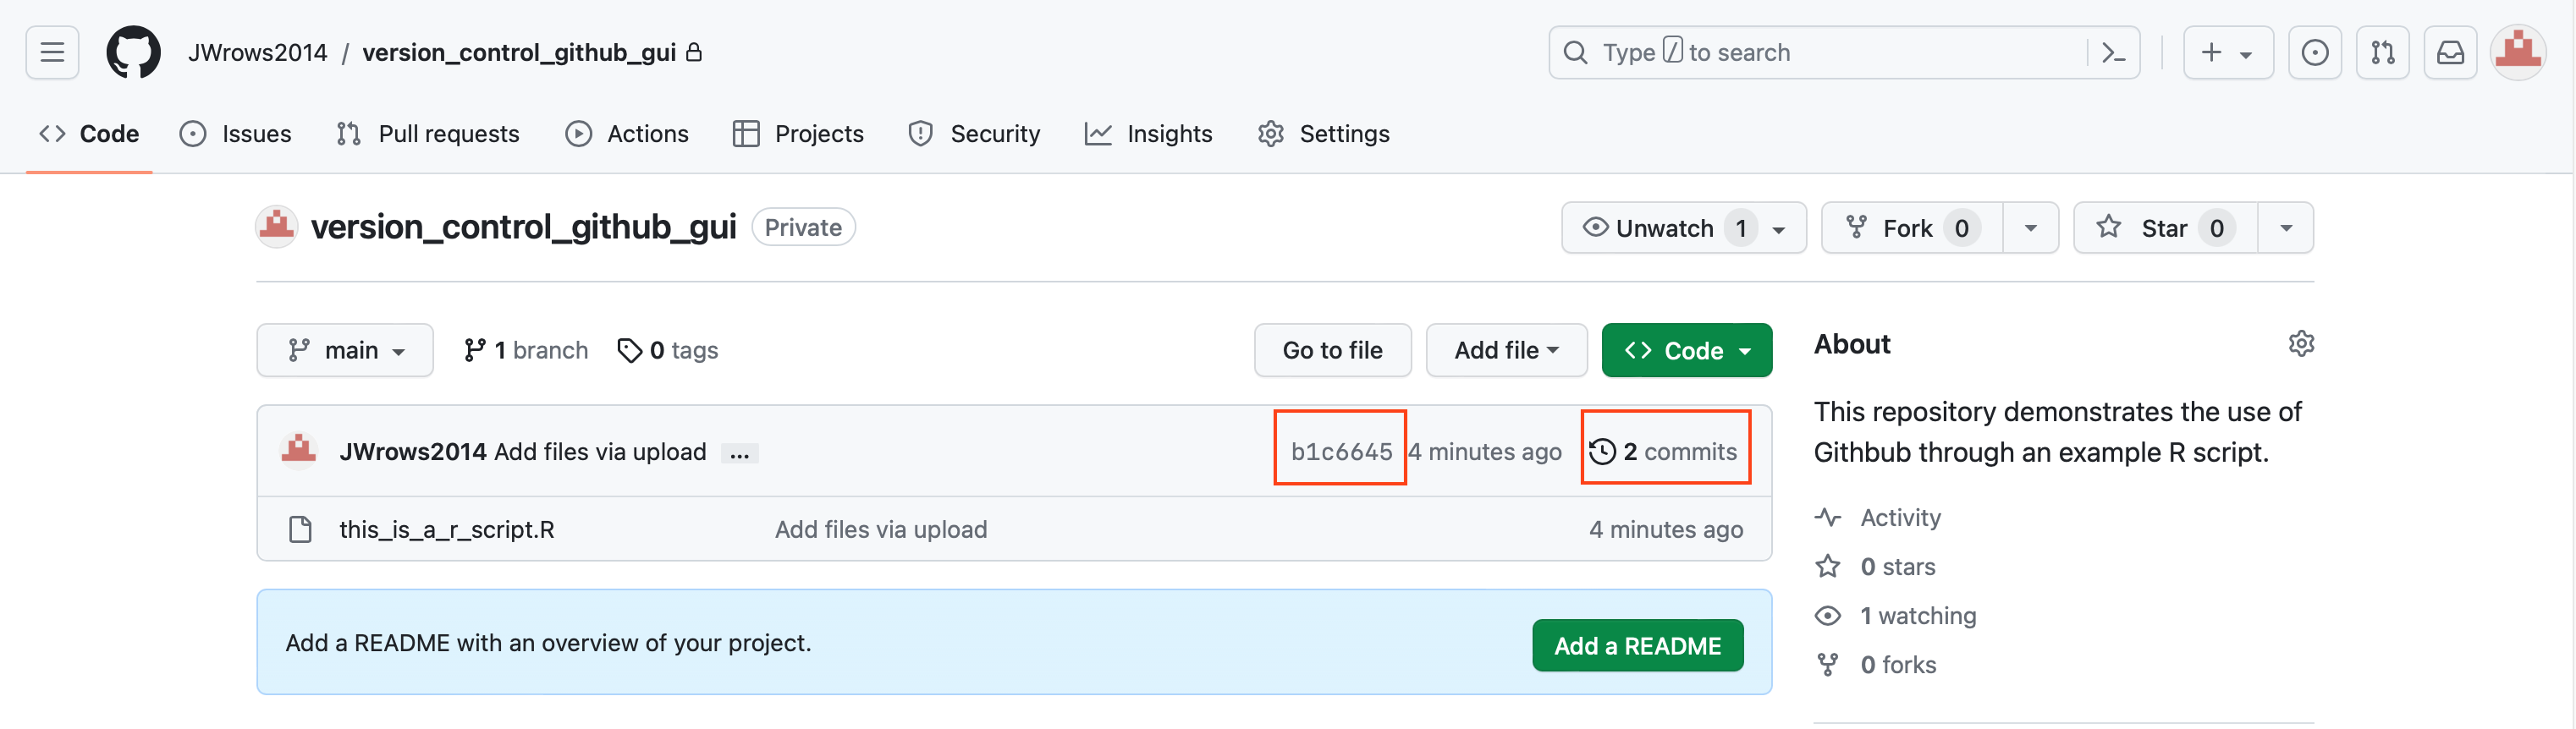
Next, click the "Add files" drop down and select "Upload files" to upload the revised script. Then add additional commit comments and submit.
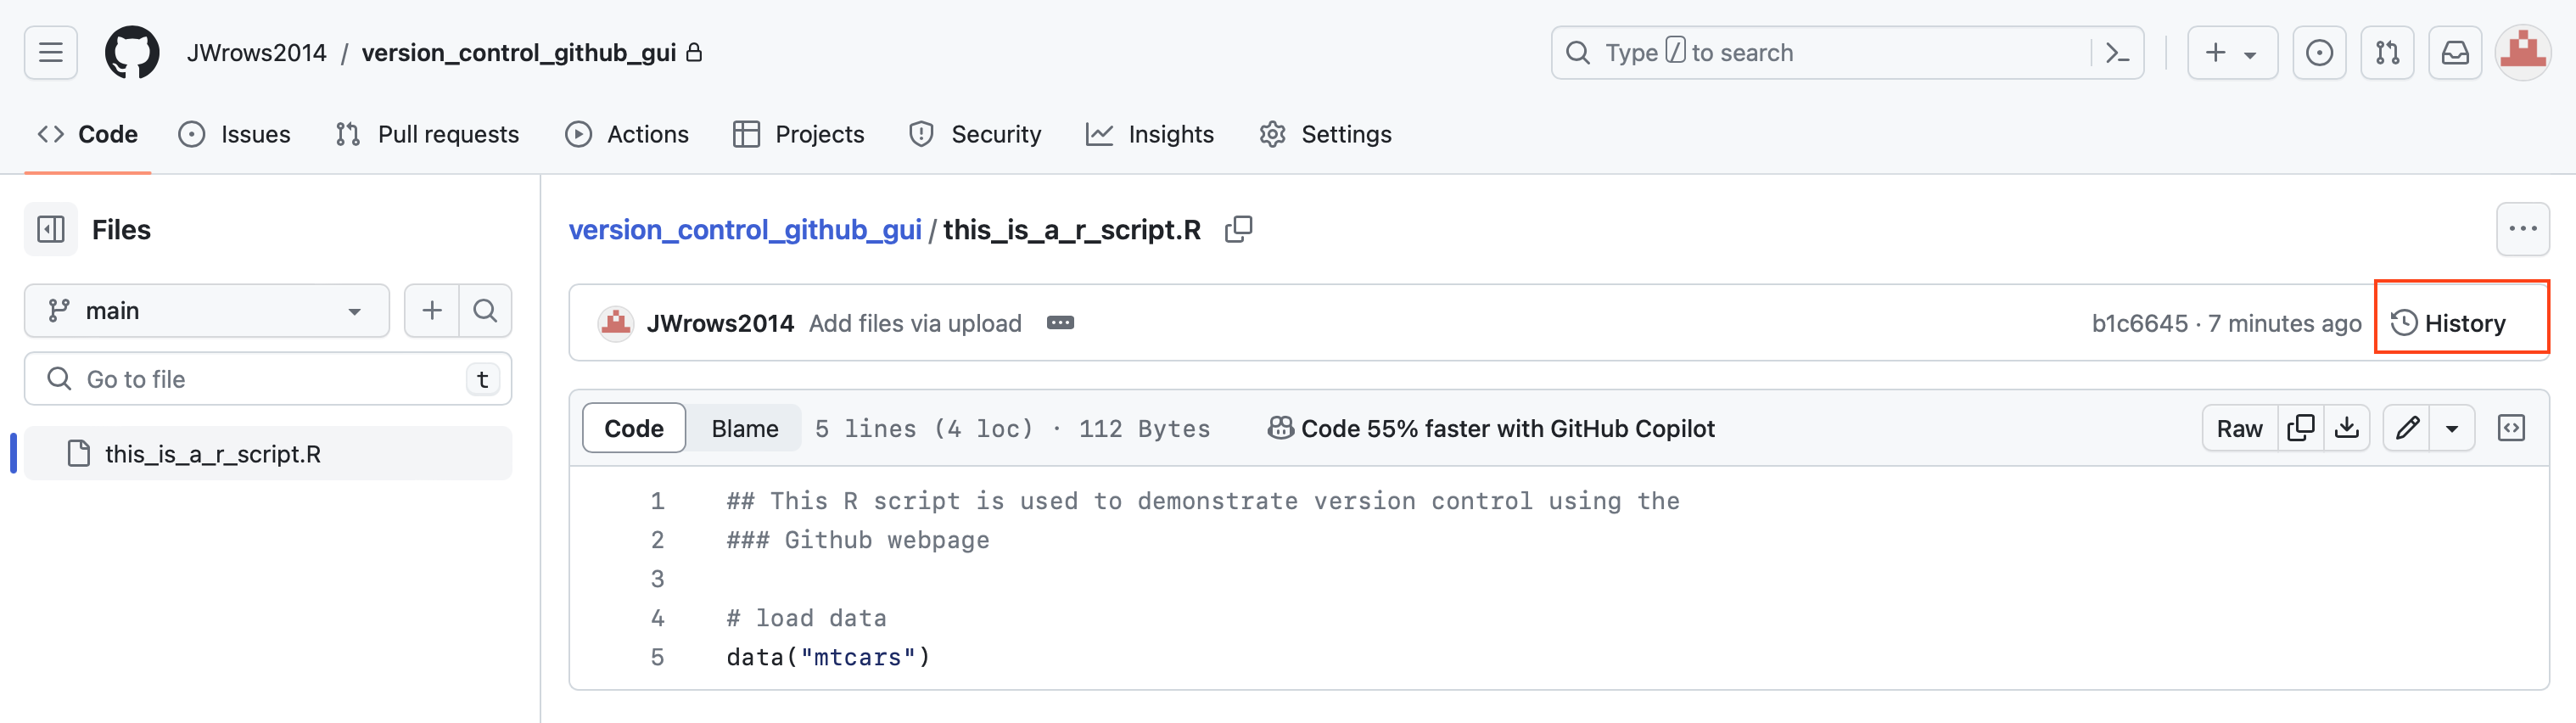
After committing, the user will see that the number of commits have been increased to 2. The alpha-numeric "b1c6645" is the beginning of the ID specific to that commit.
Get differences between versions
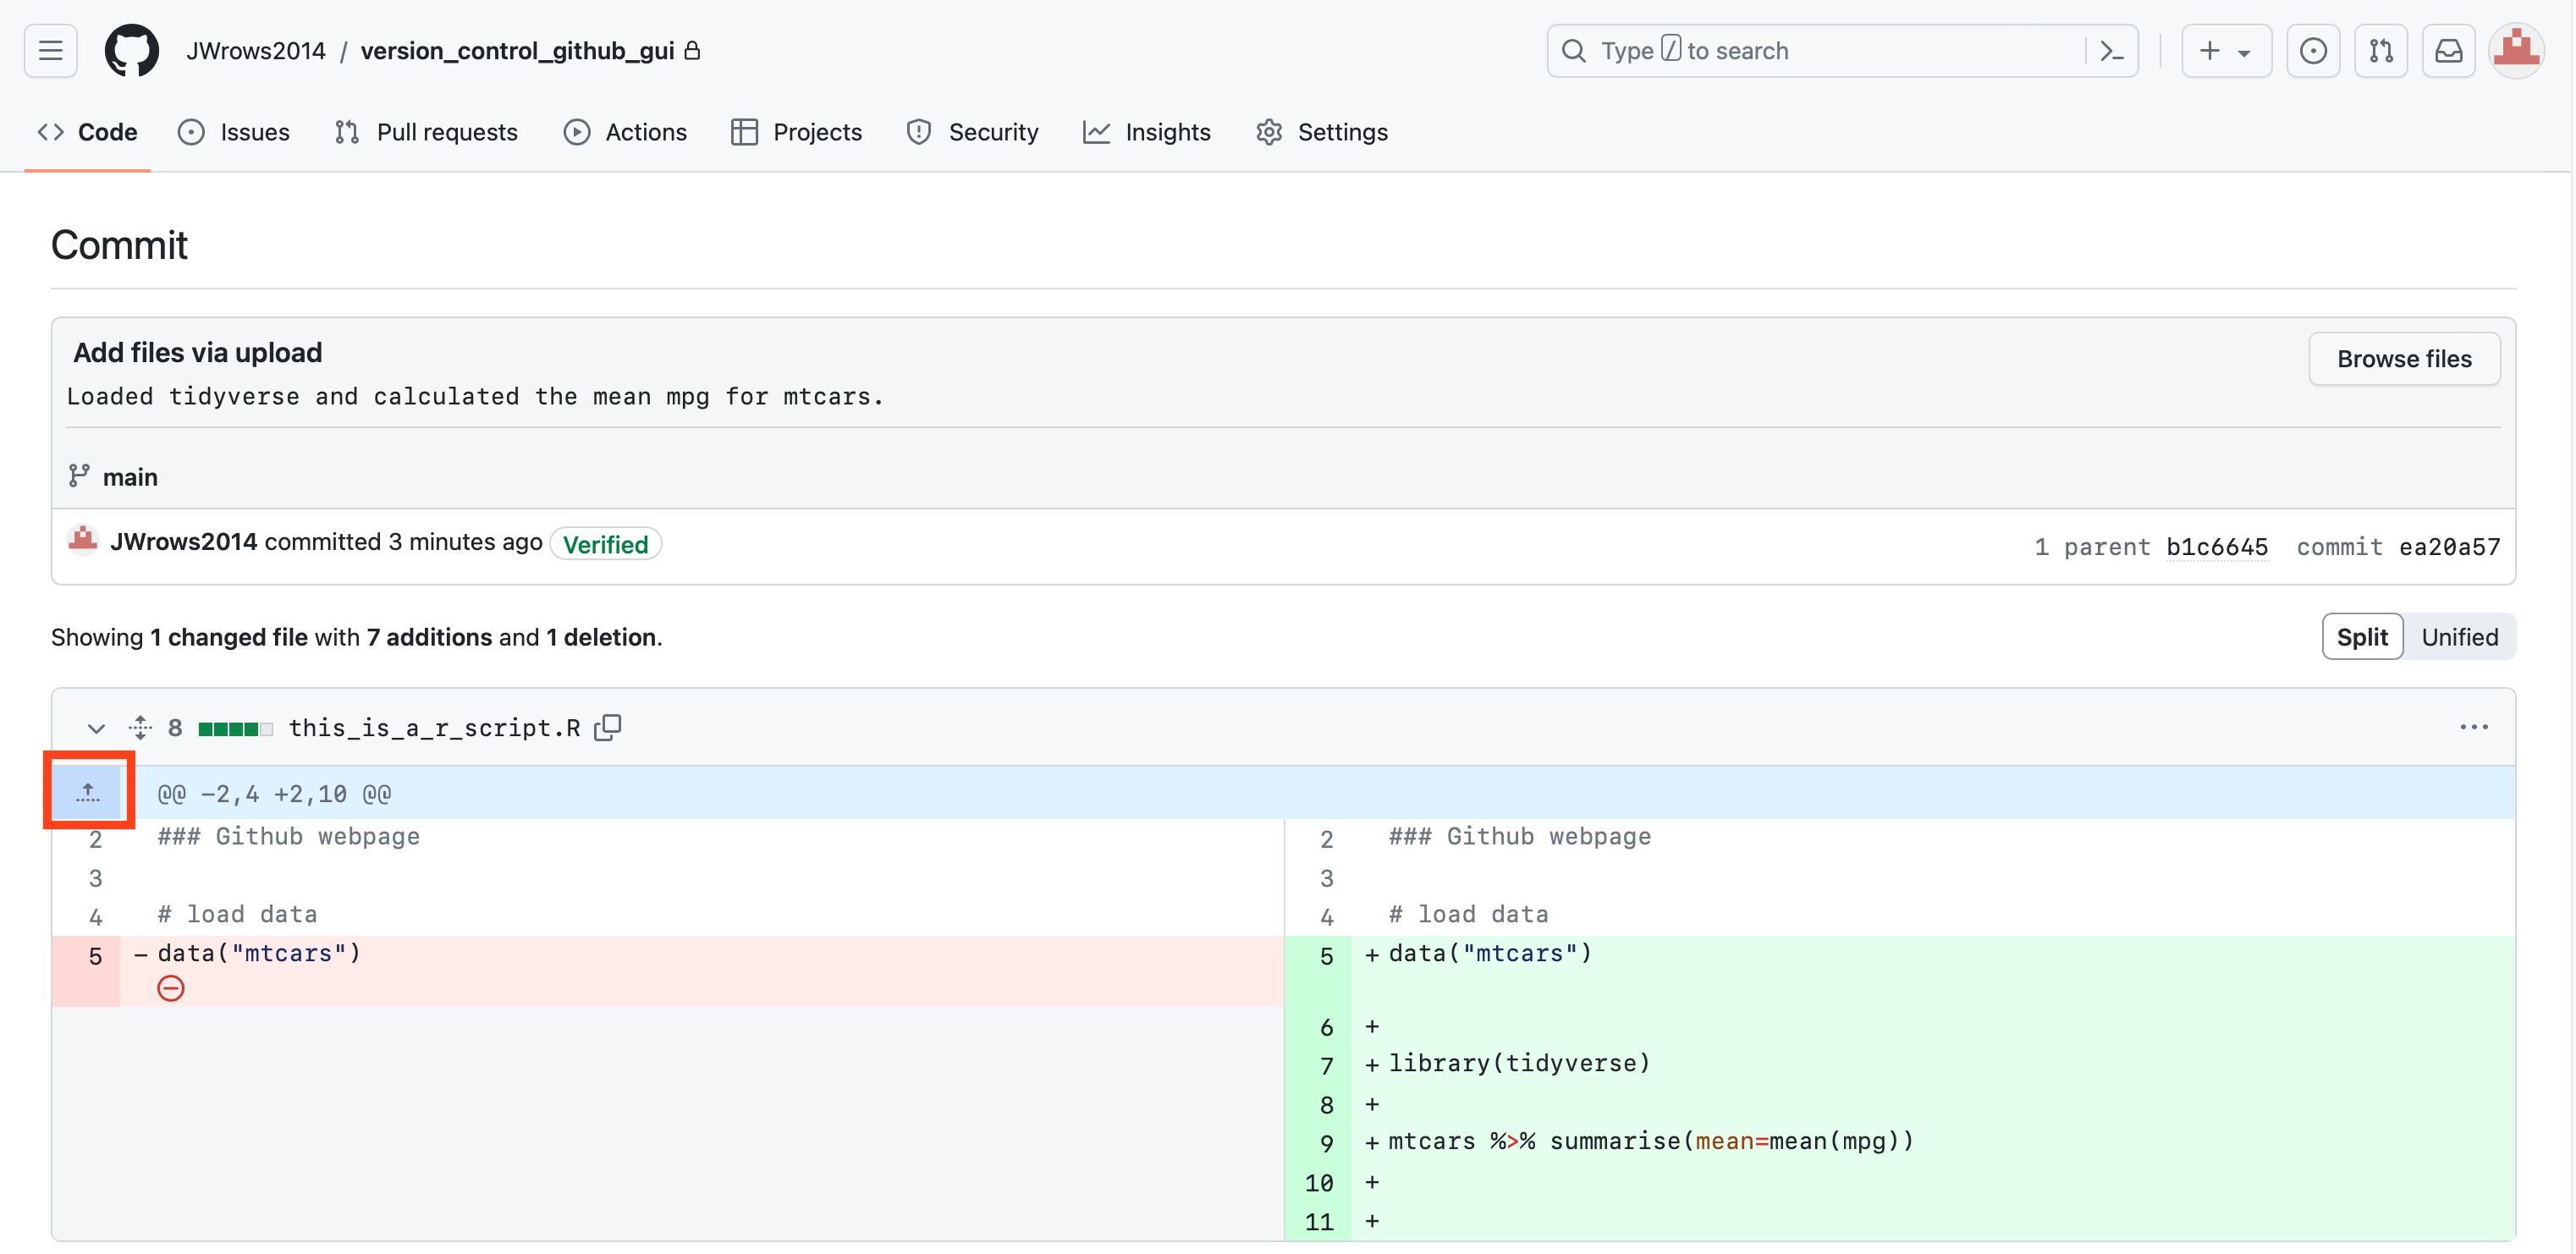
Clicking on the script will reveal the additions made. Click on "History" to compare with previous versions of this script.
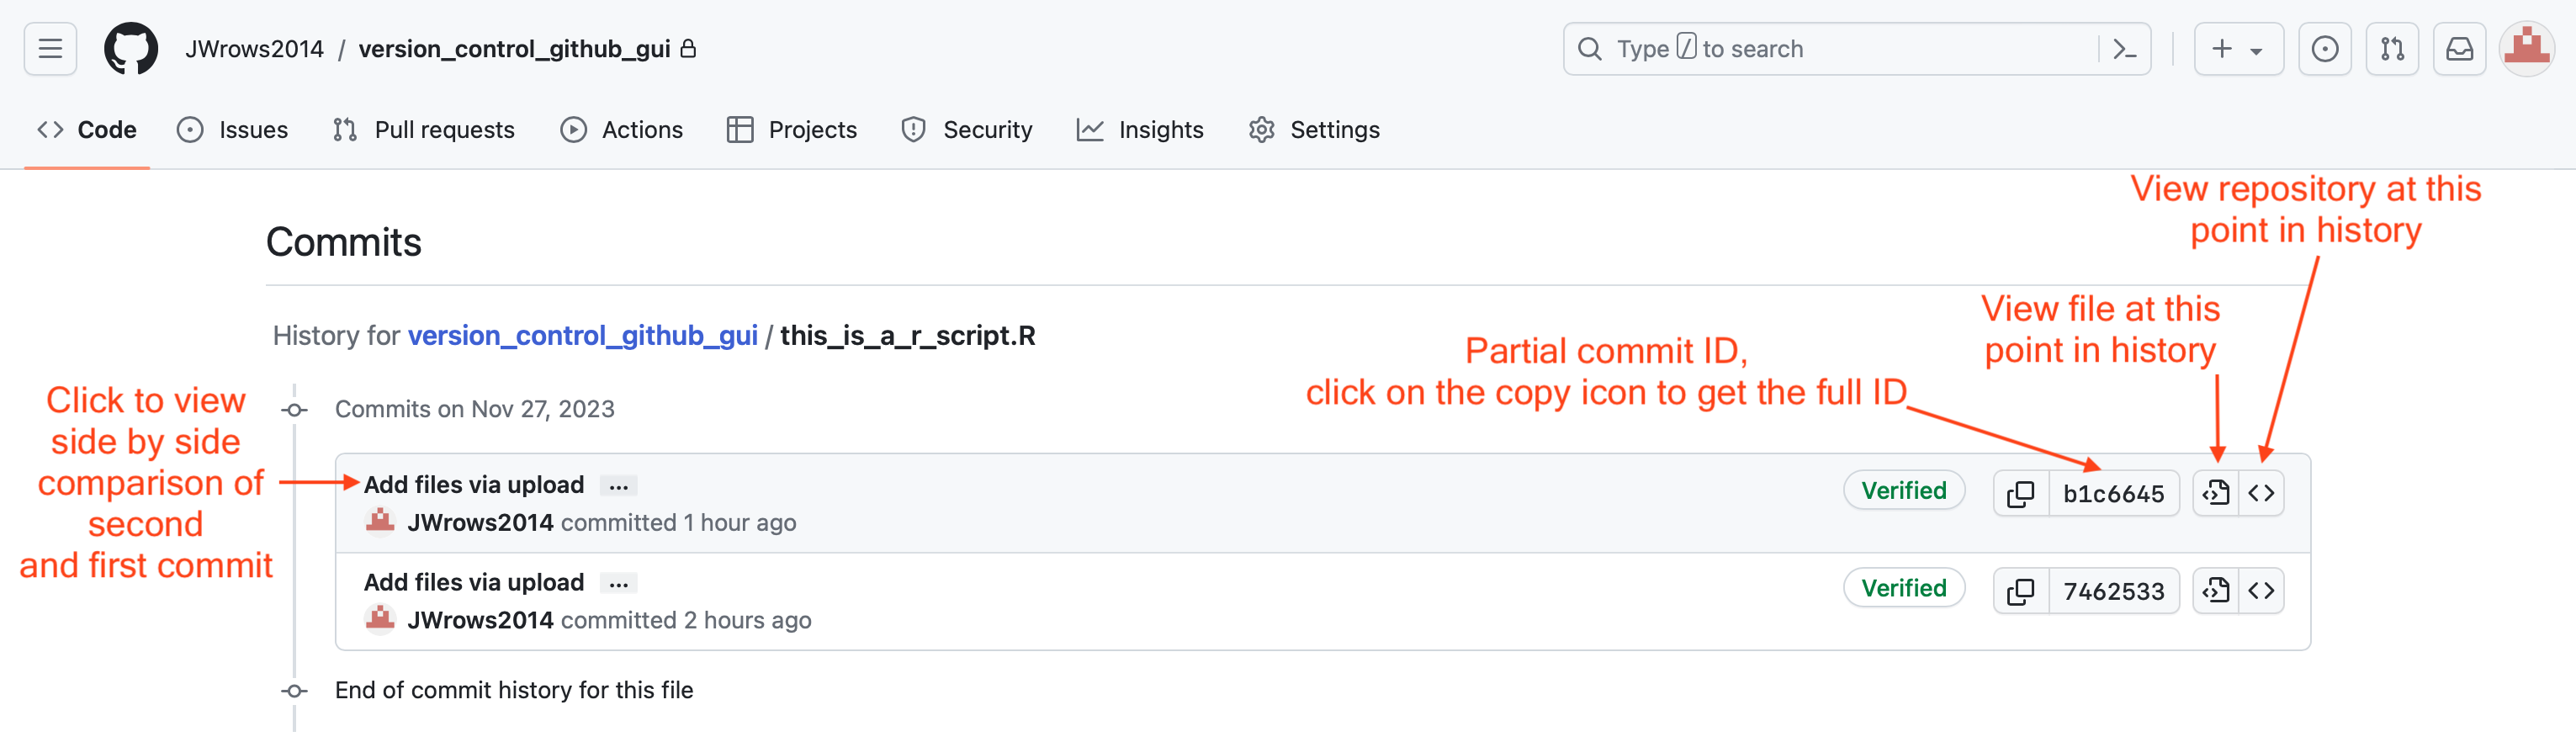
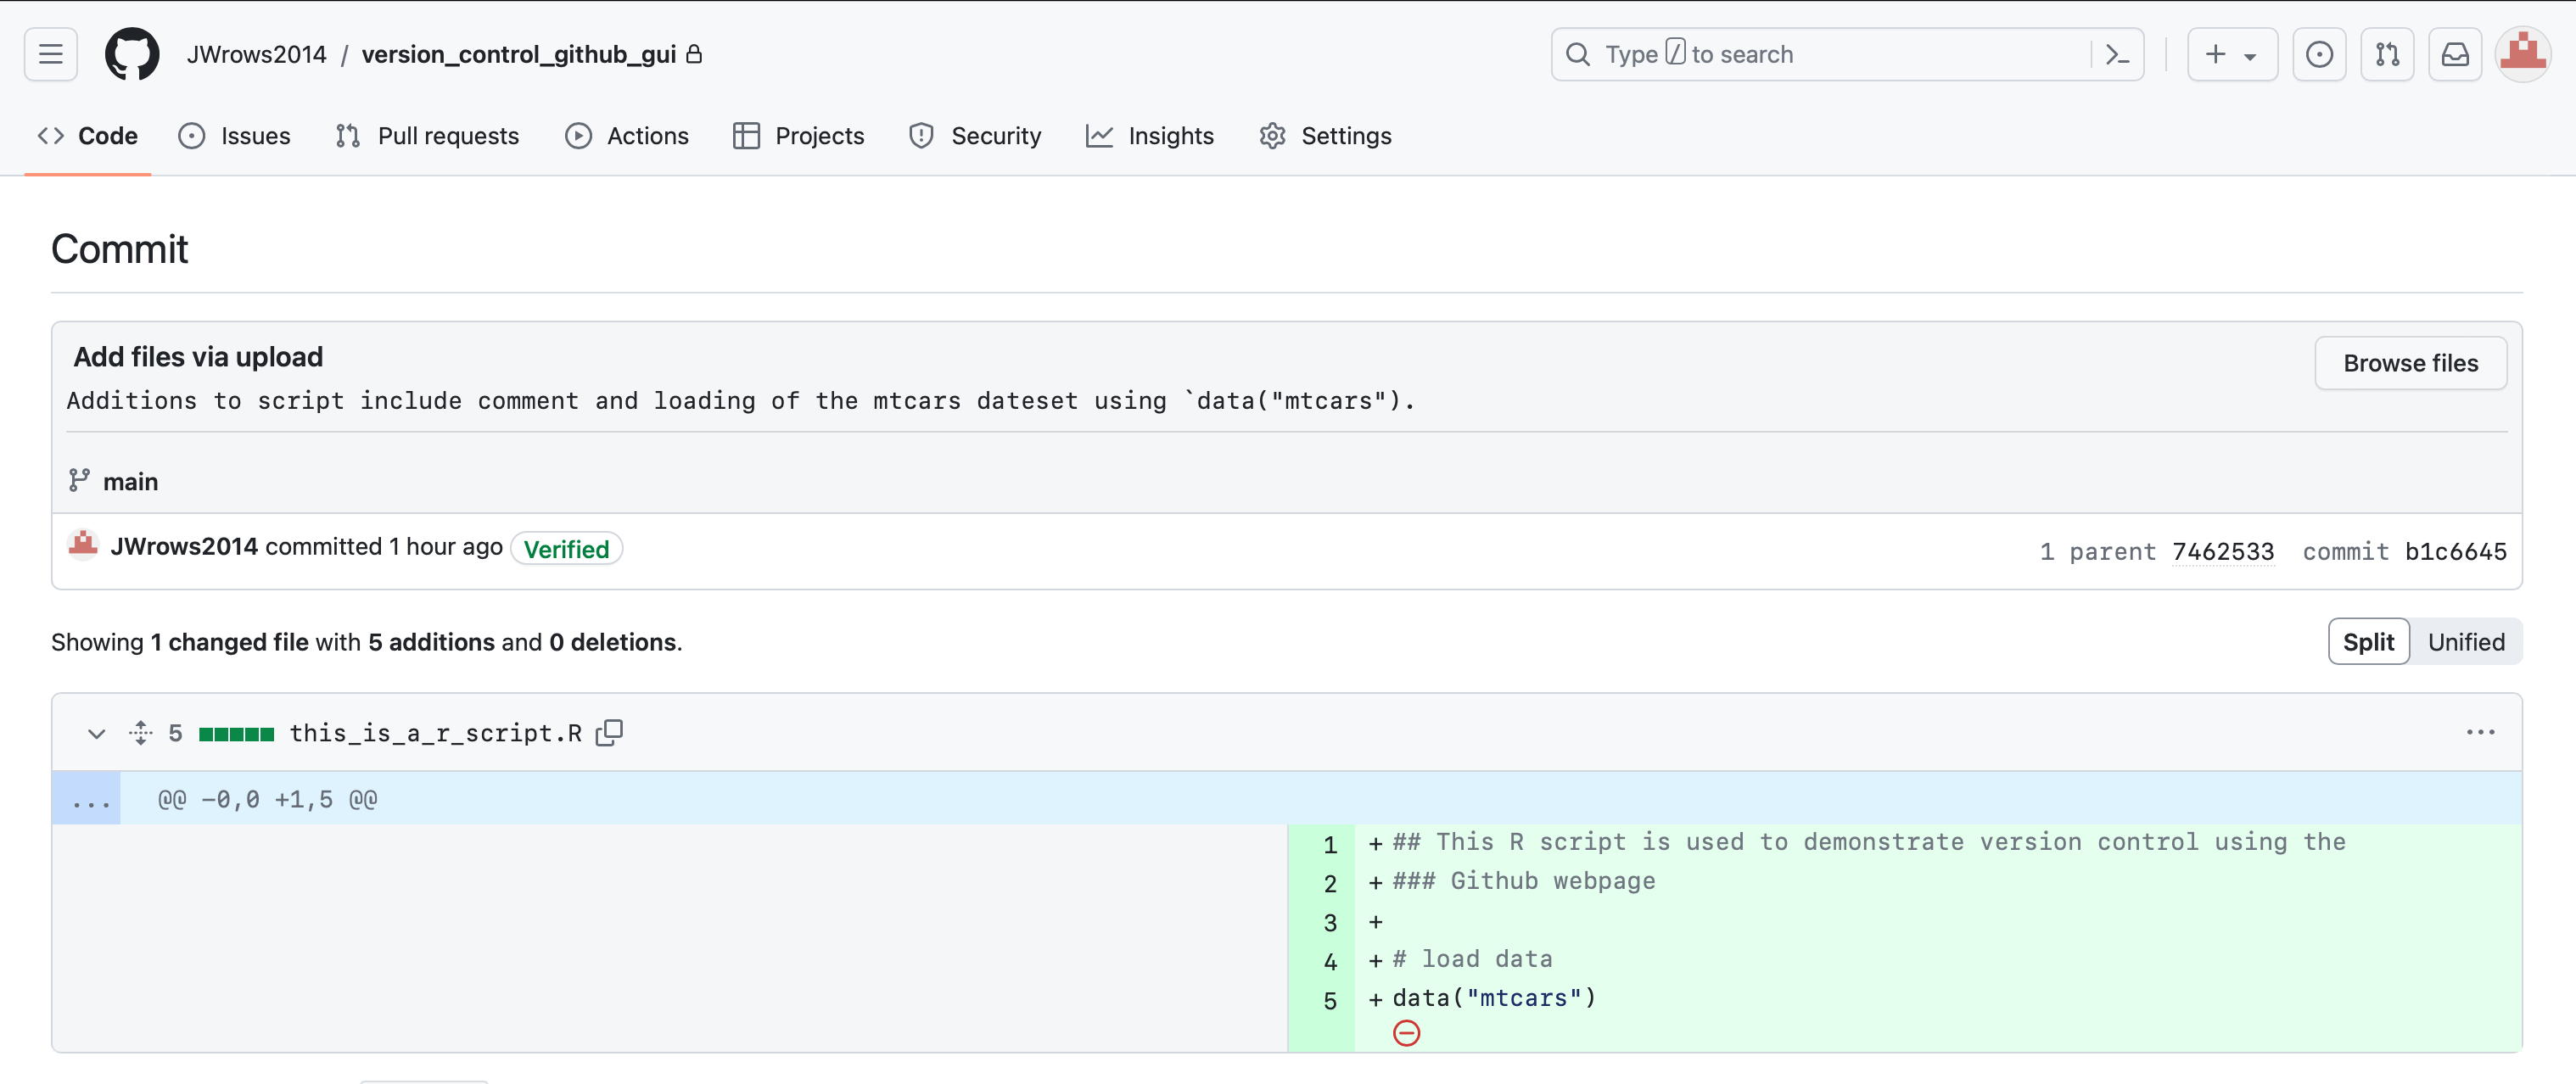
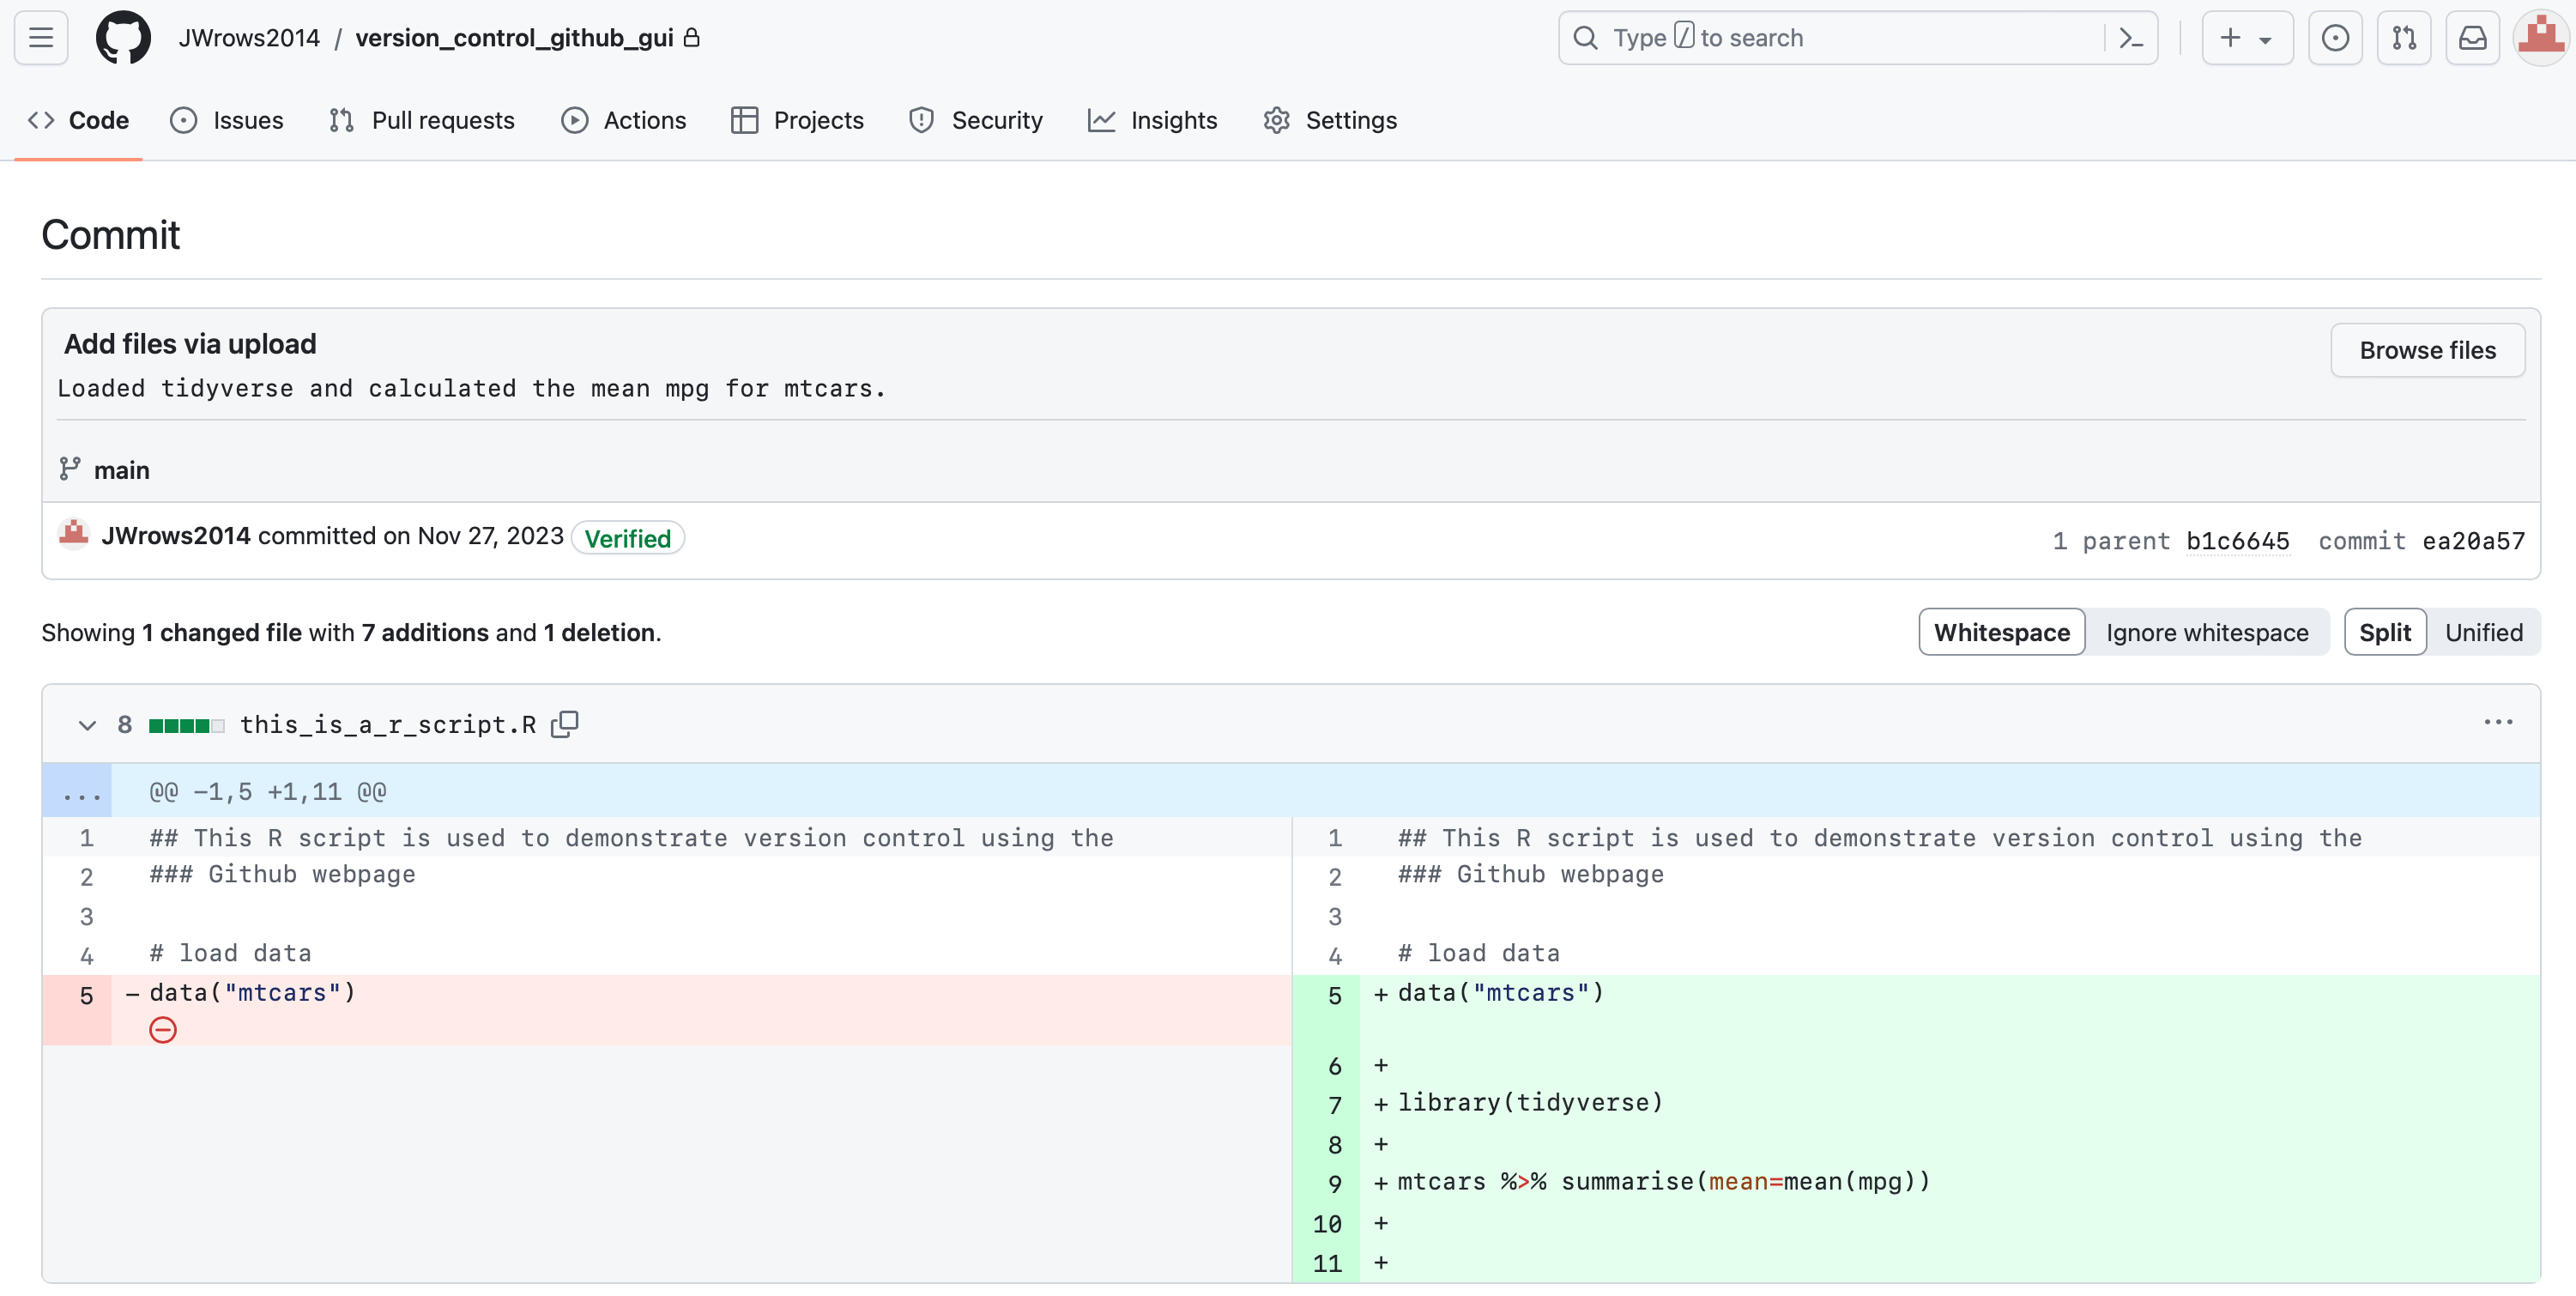
A side-by-side comparison of first and second version of this_is_a_r_script.R is shown below. Where the first version was a blank script, the second version contains comments and a line that loads the mtcars data.
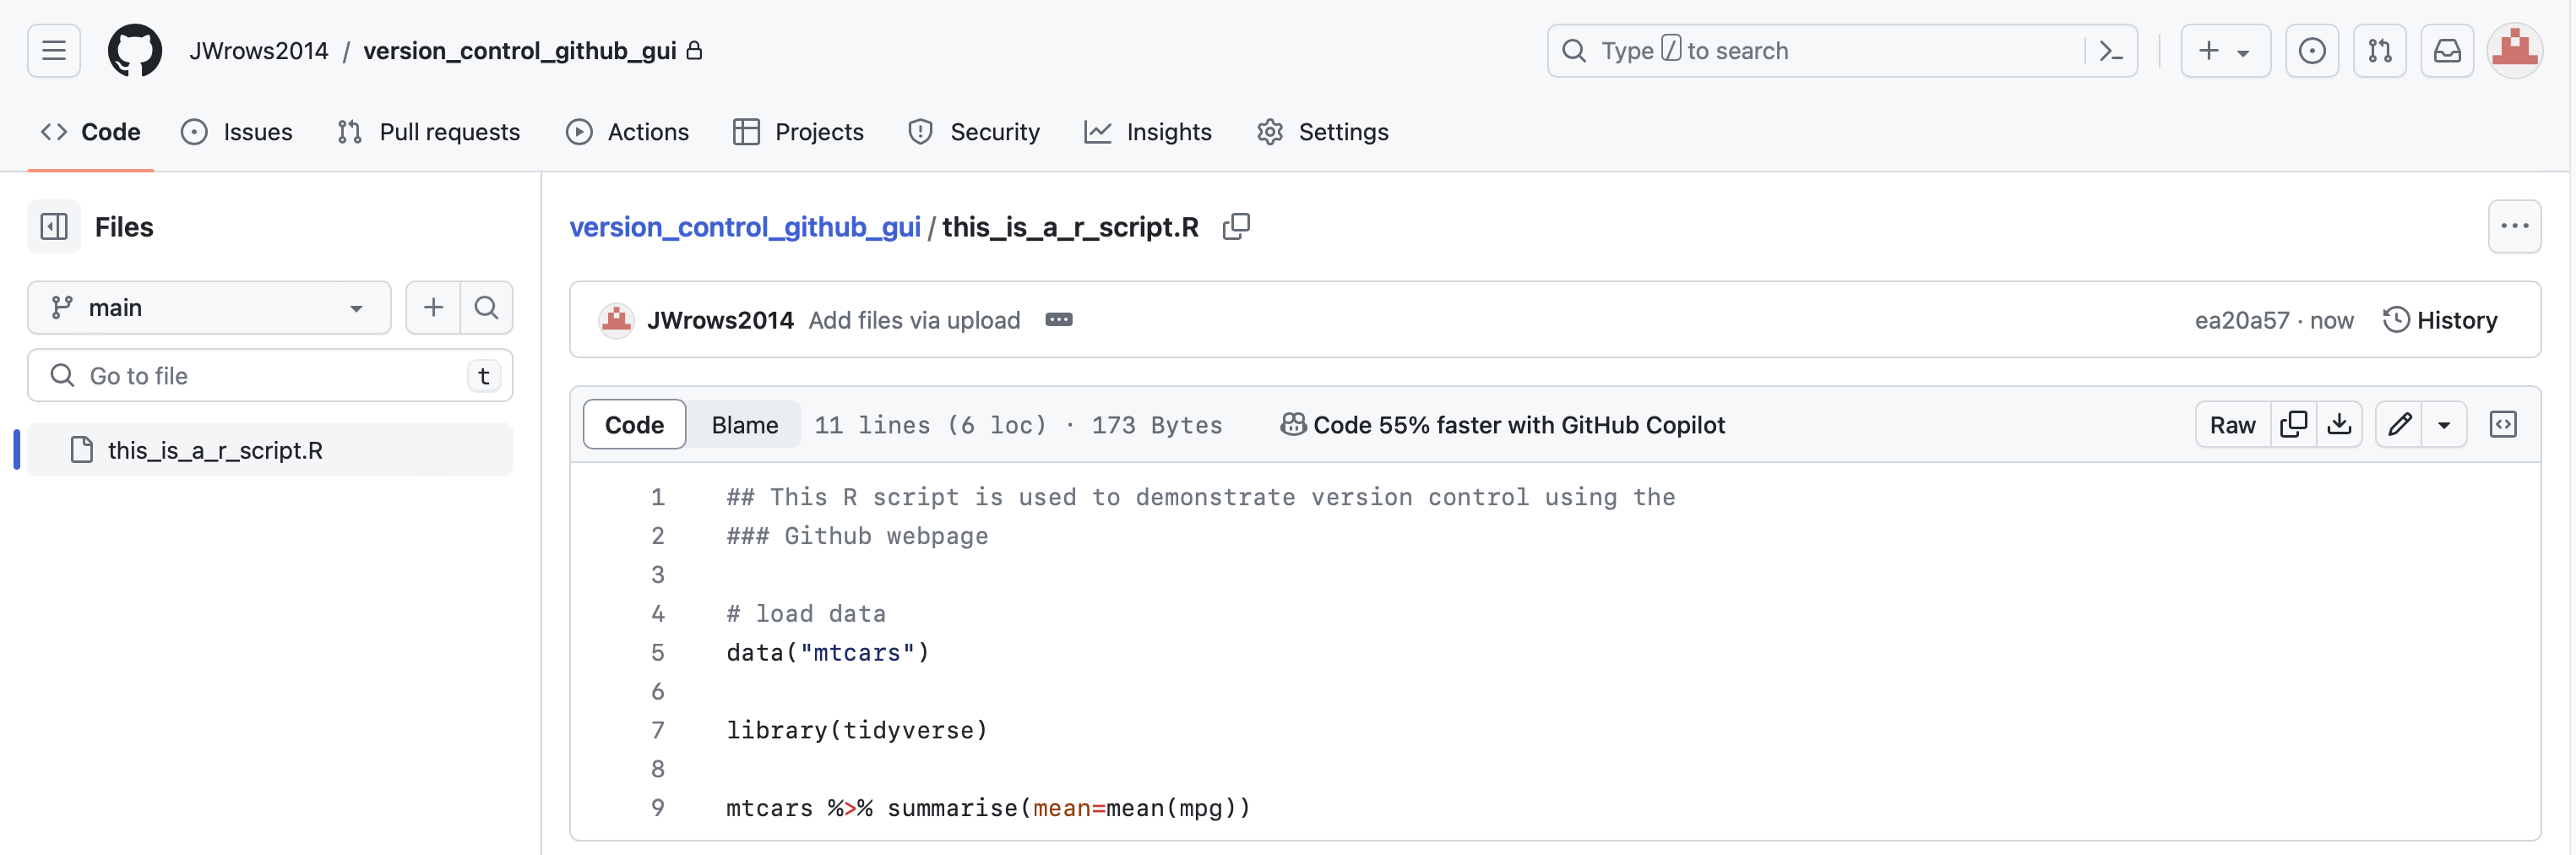
The following lines will be added to the third version of this_is_a_r_script.R. Again, revisions are made to the locally stored script and the uploaded to GitHub.
library(tidyverse)

mtcars %>% summarise(mean=mean(mpg))
Following the directions above, a side-by-side comparison between the third and second versions can be obtained. Click on the up arrow enclosed in the blue box the top left corner of the comparison pane to expand and see the entire script.
Add the following to this_is_a_r_script.R and commit.
ggplot(mtcars, aes(x=hp, y=mpg, color=cyl))+geom_point()+scale_color_continuous(low="blue", high="red")
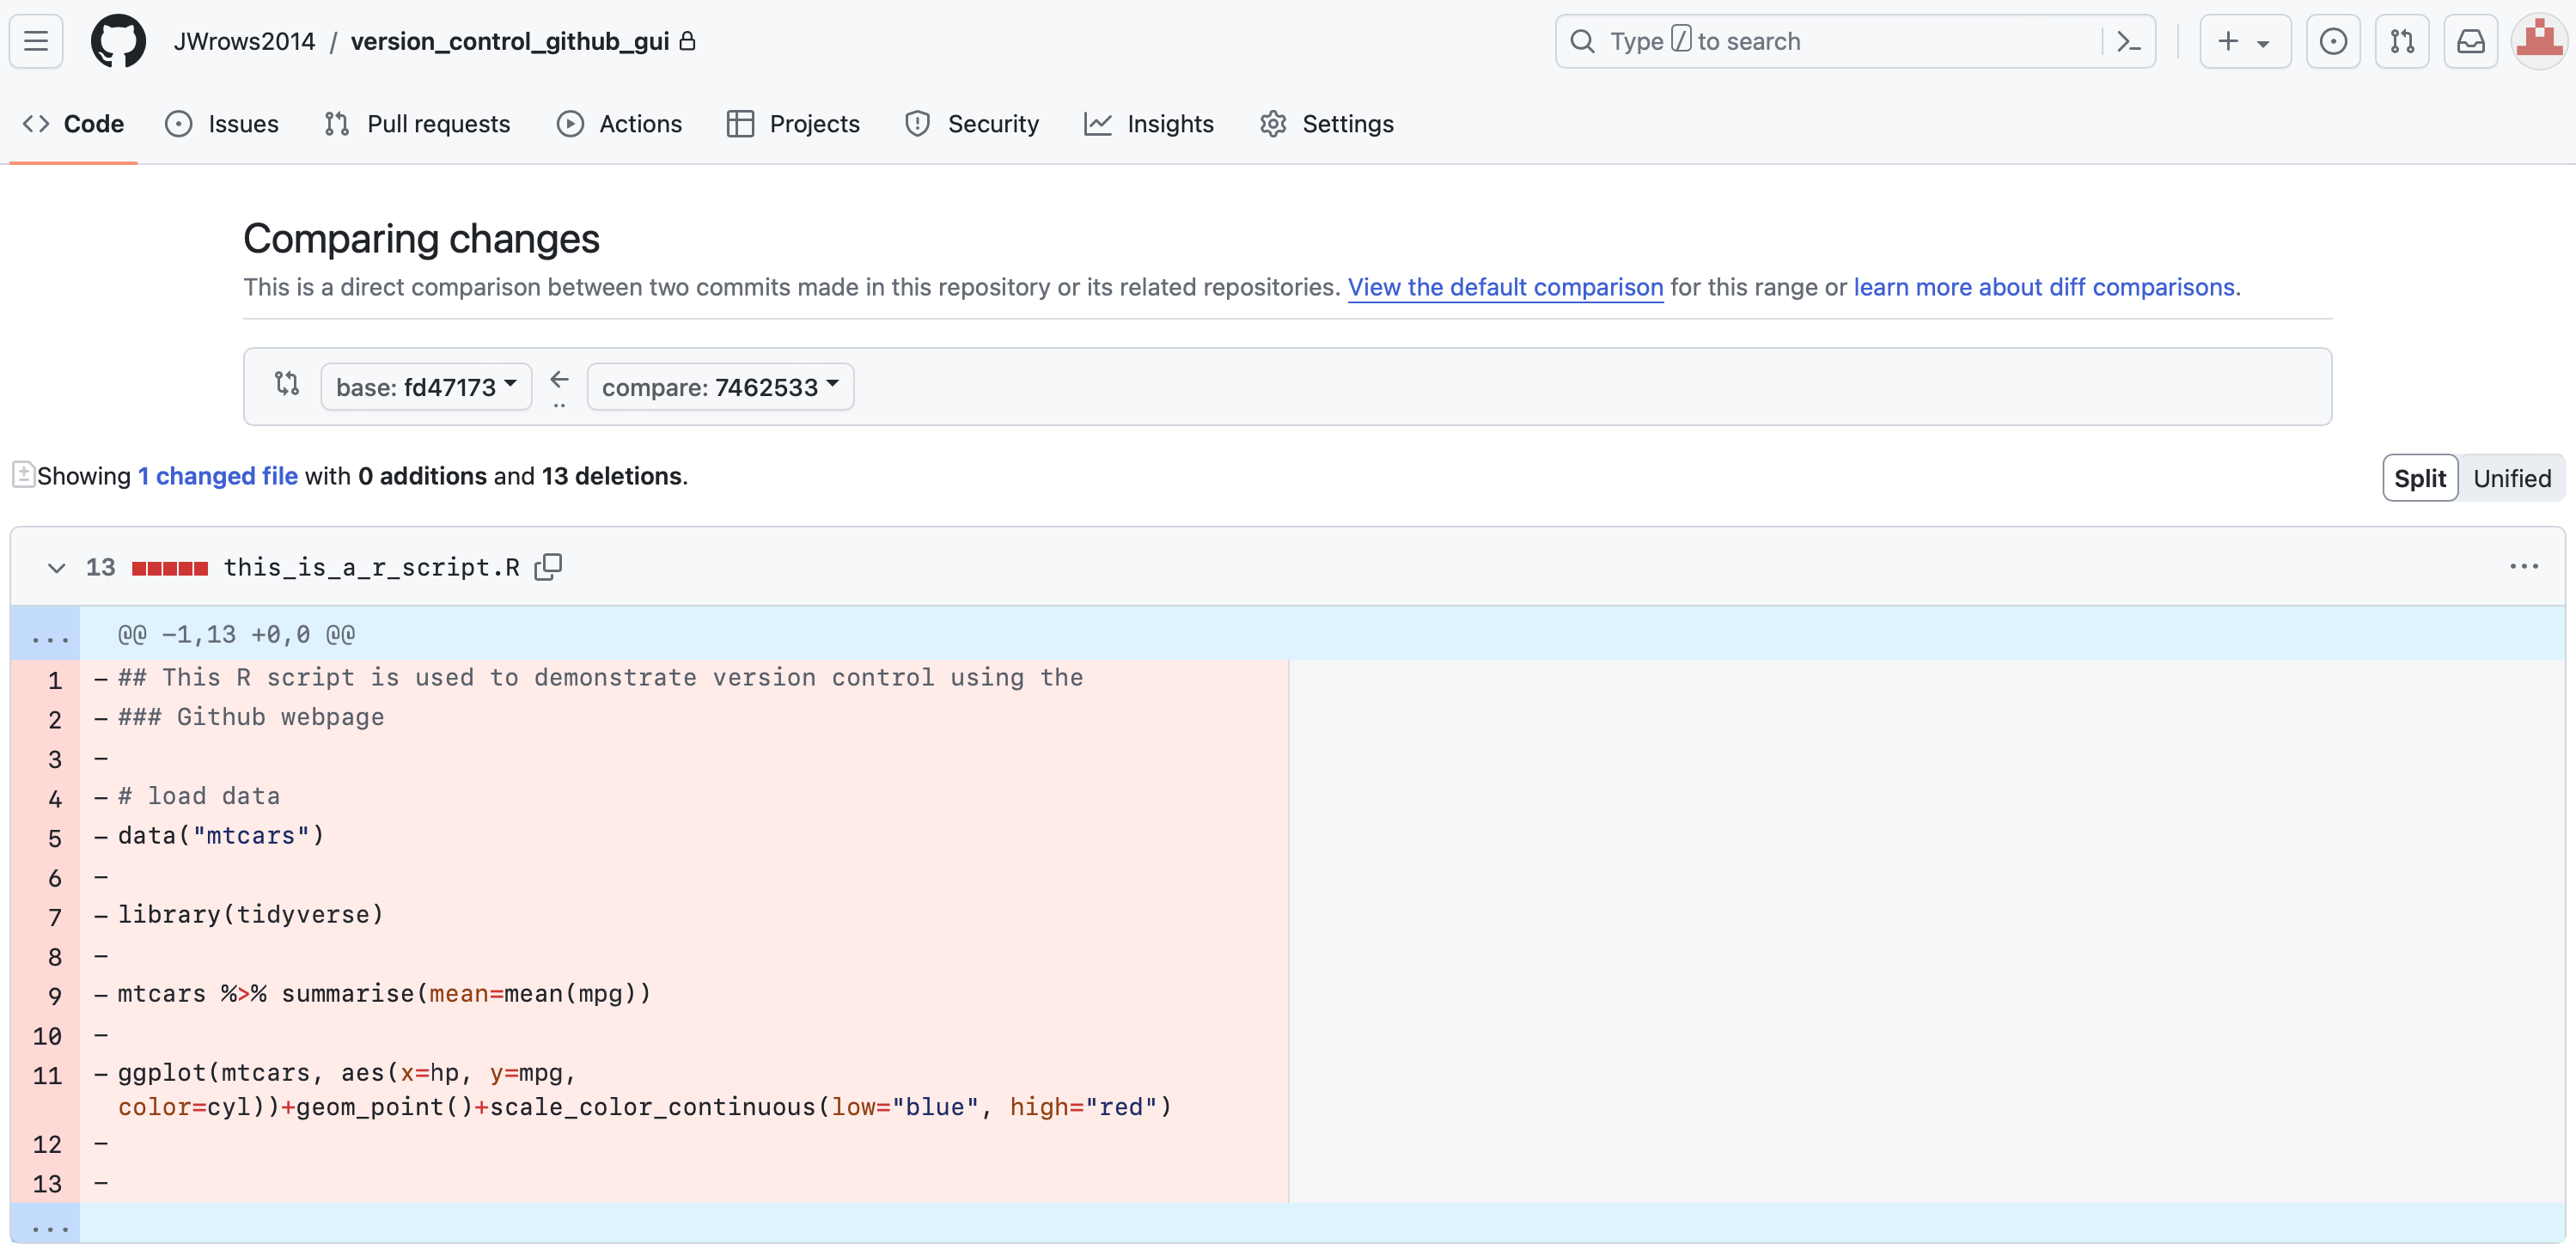
The method above compares a commit to the previous version (ie. compare between consecutive commits). Users can append compare to the URL of the repository and utilize the .. notation to compare any two commits (ie. compare between last and first). For instance fd47173 is the most recent commit for the version_control_github_gui repository while 7462533 is the first commit (the one with the blank R script). To compare these, append the commit IDs to compare separated by ".." (ie. fd47173..7462533). Below is the full URL construct.
https://github.com/JWrows2014/version_control_github_gui/compare/fd47173..7462533
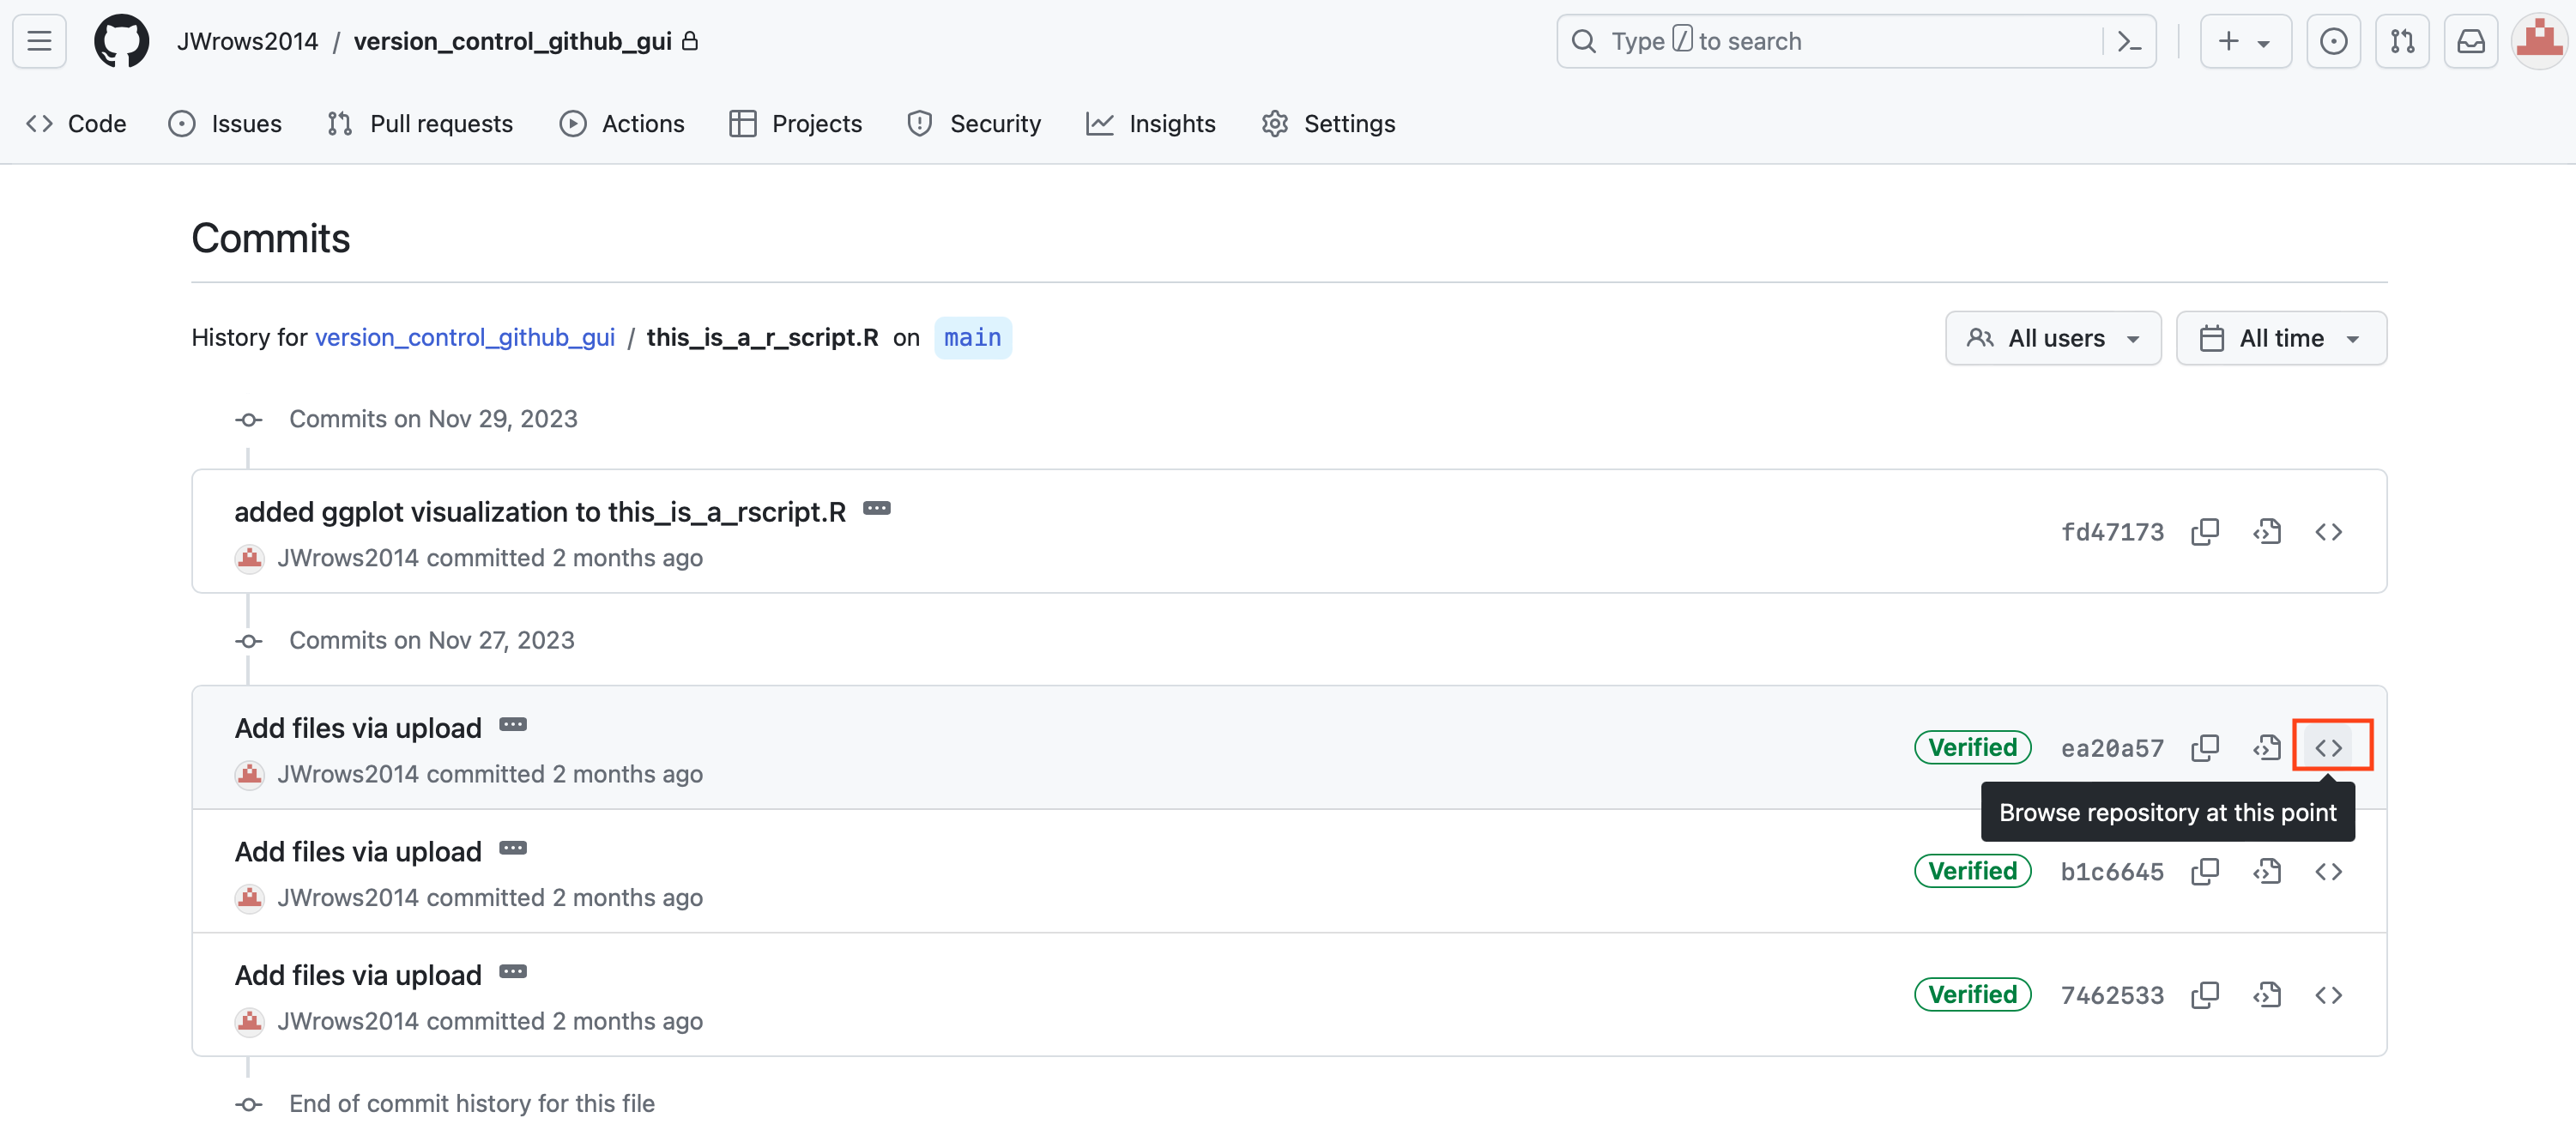
Reverting to a previous version
In the commit log, click on the "<>" button next to any commit to view the repository at that point.
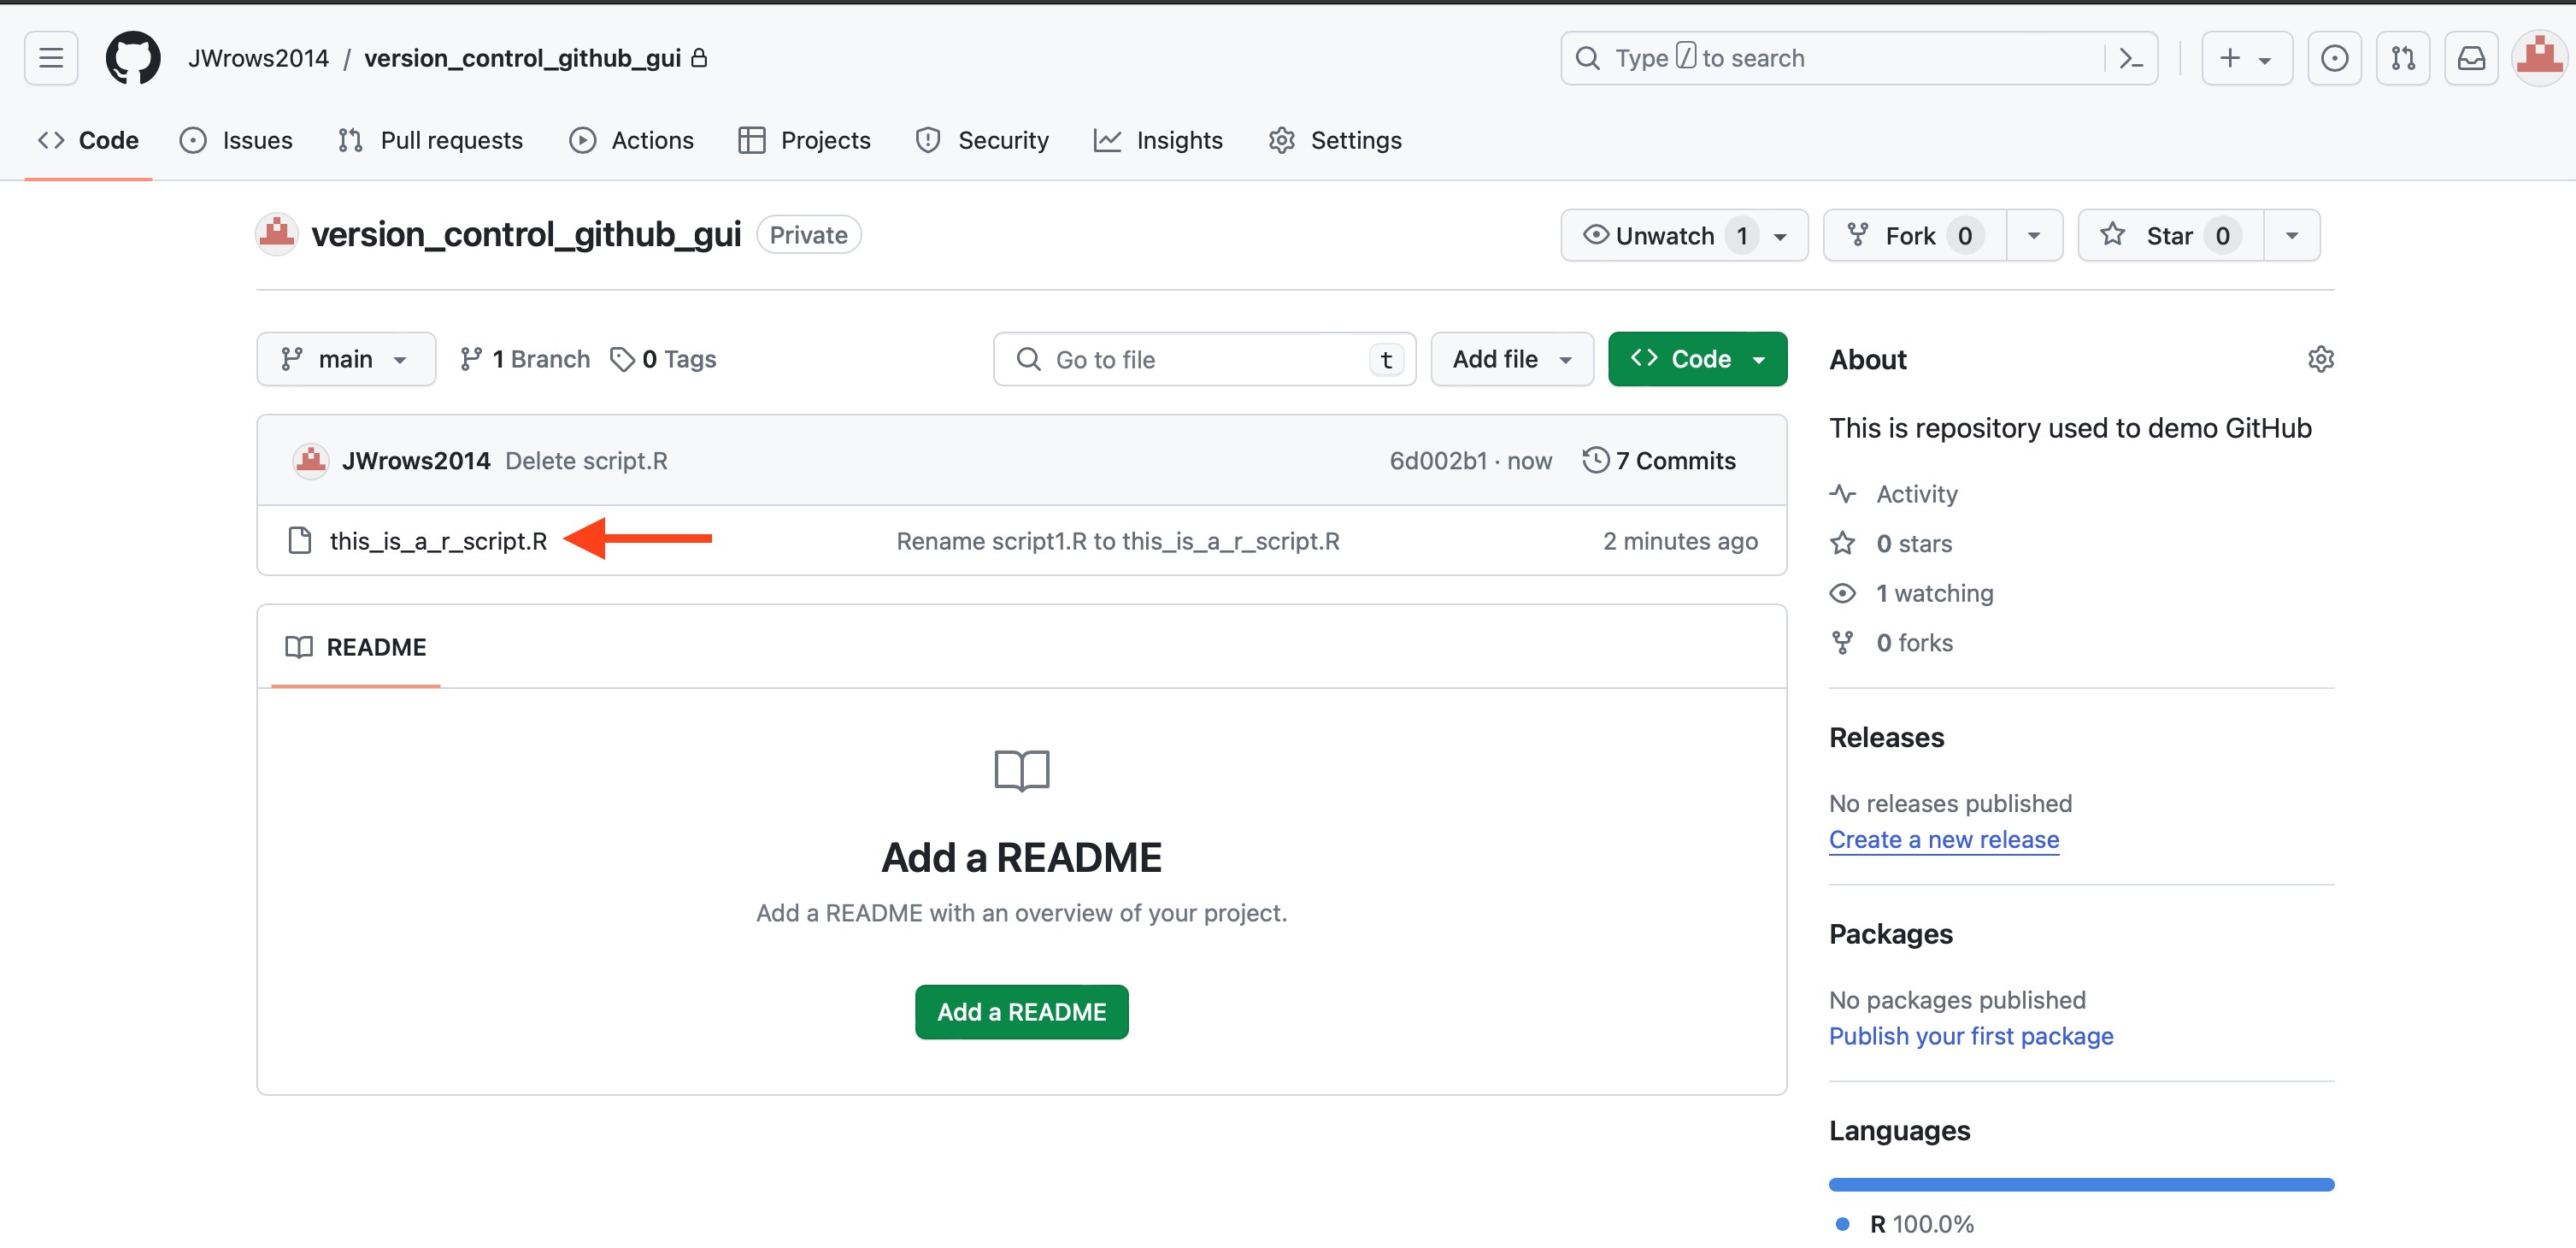
Renaming a file
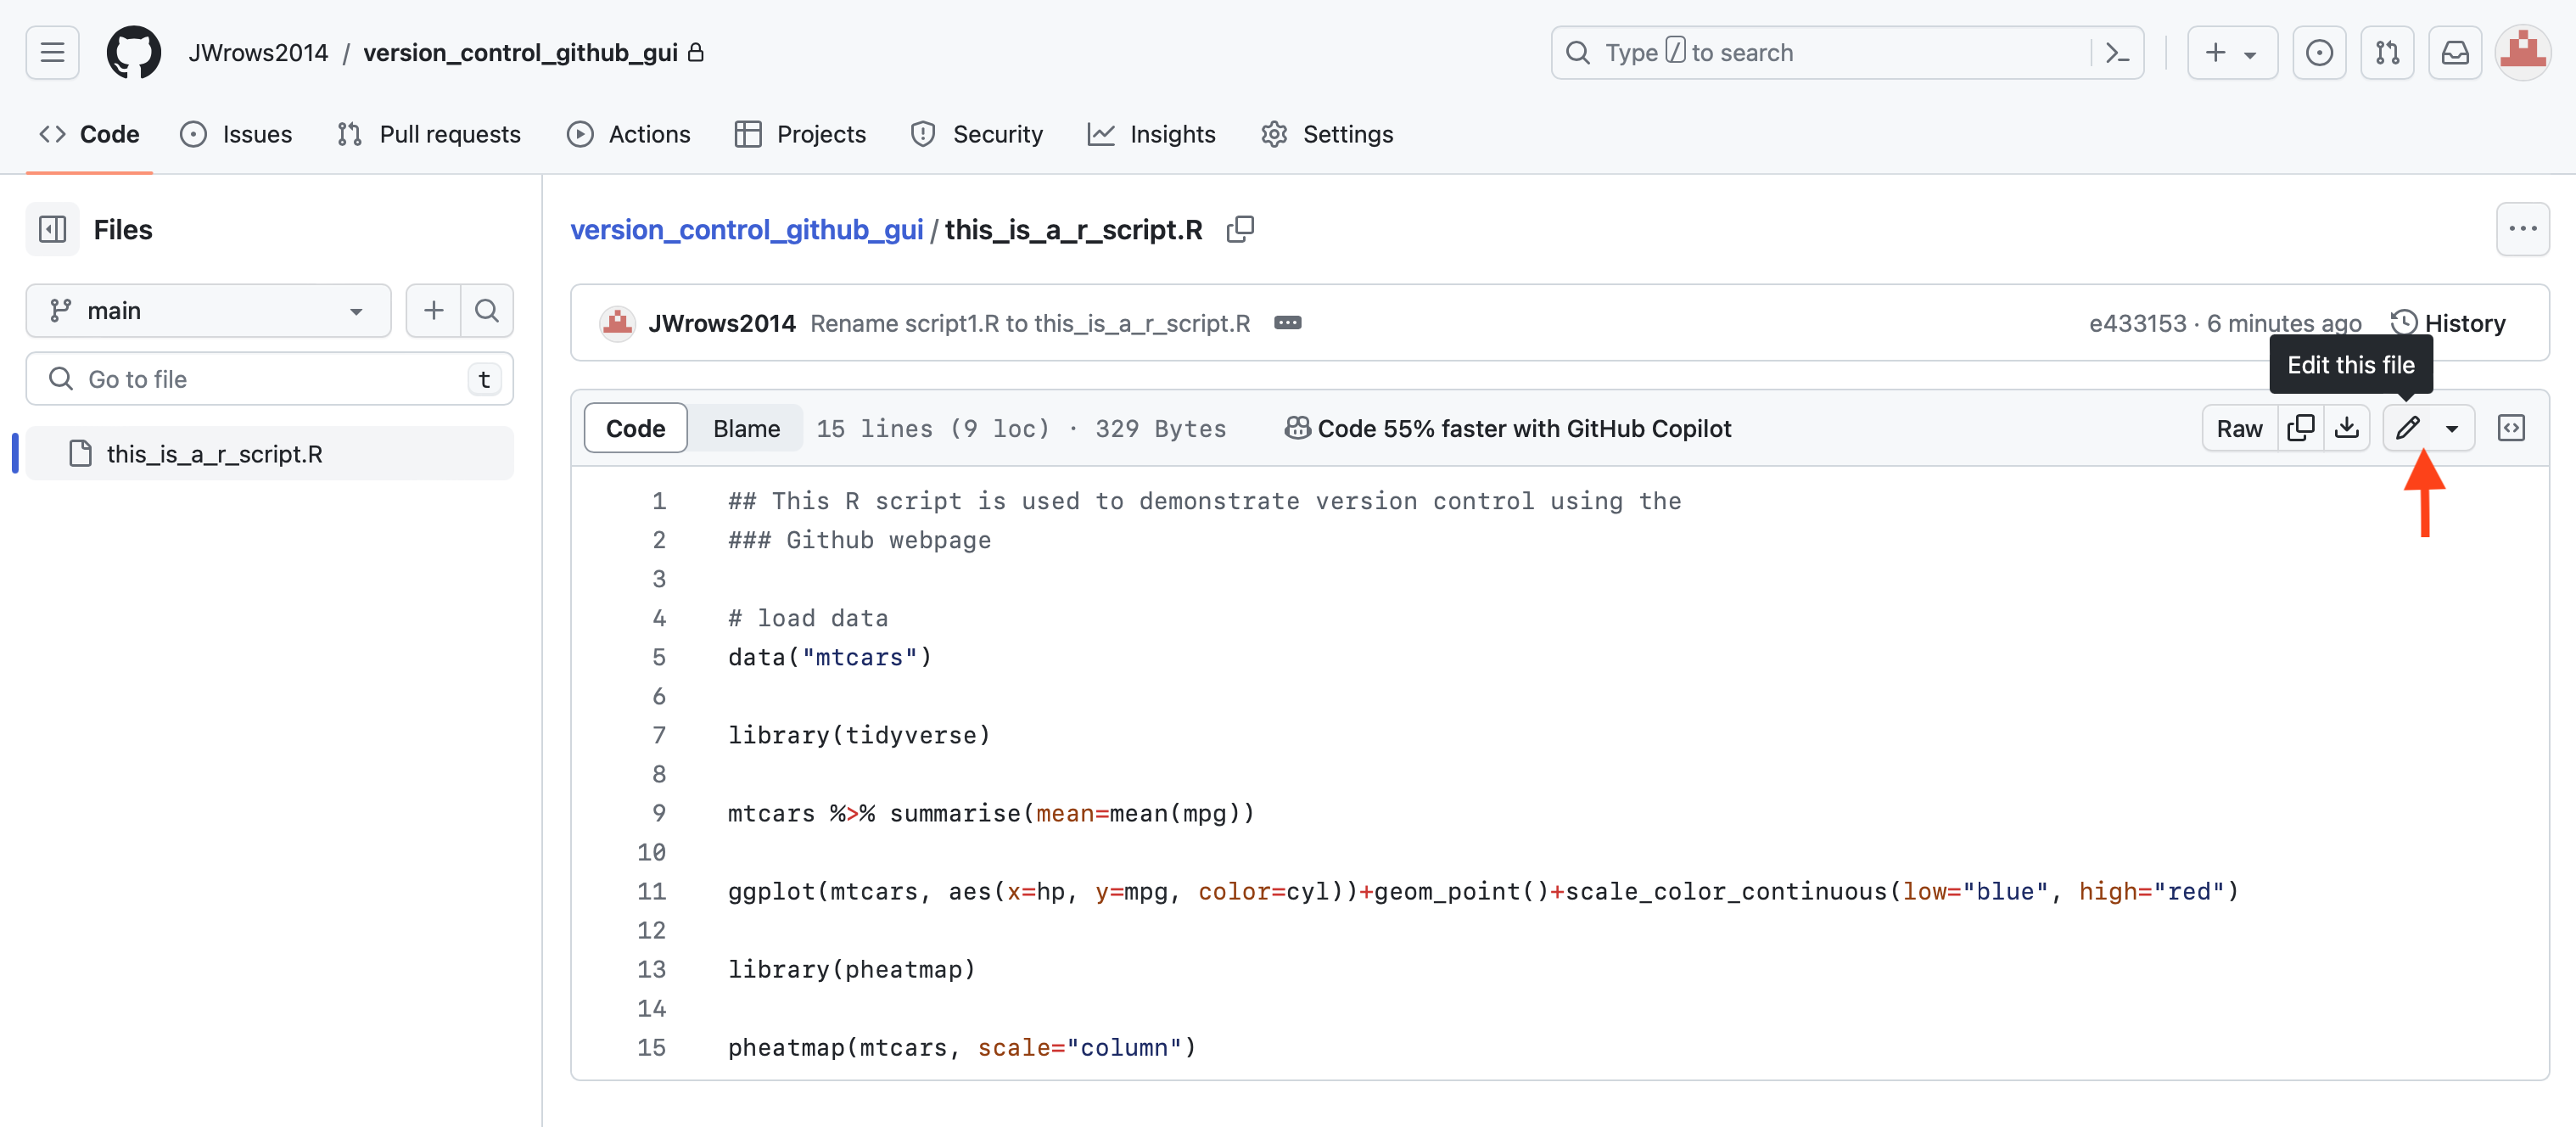
Click on the file on GitHub repository that needs to be renamed.
In the subsequent page, click on the edit button.
Next, click in the box with the filename, make the name change and click commit.
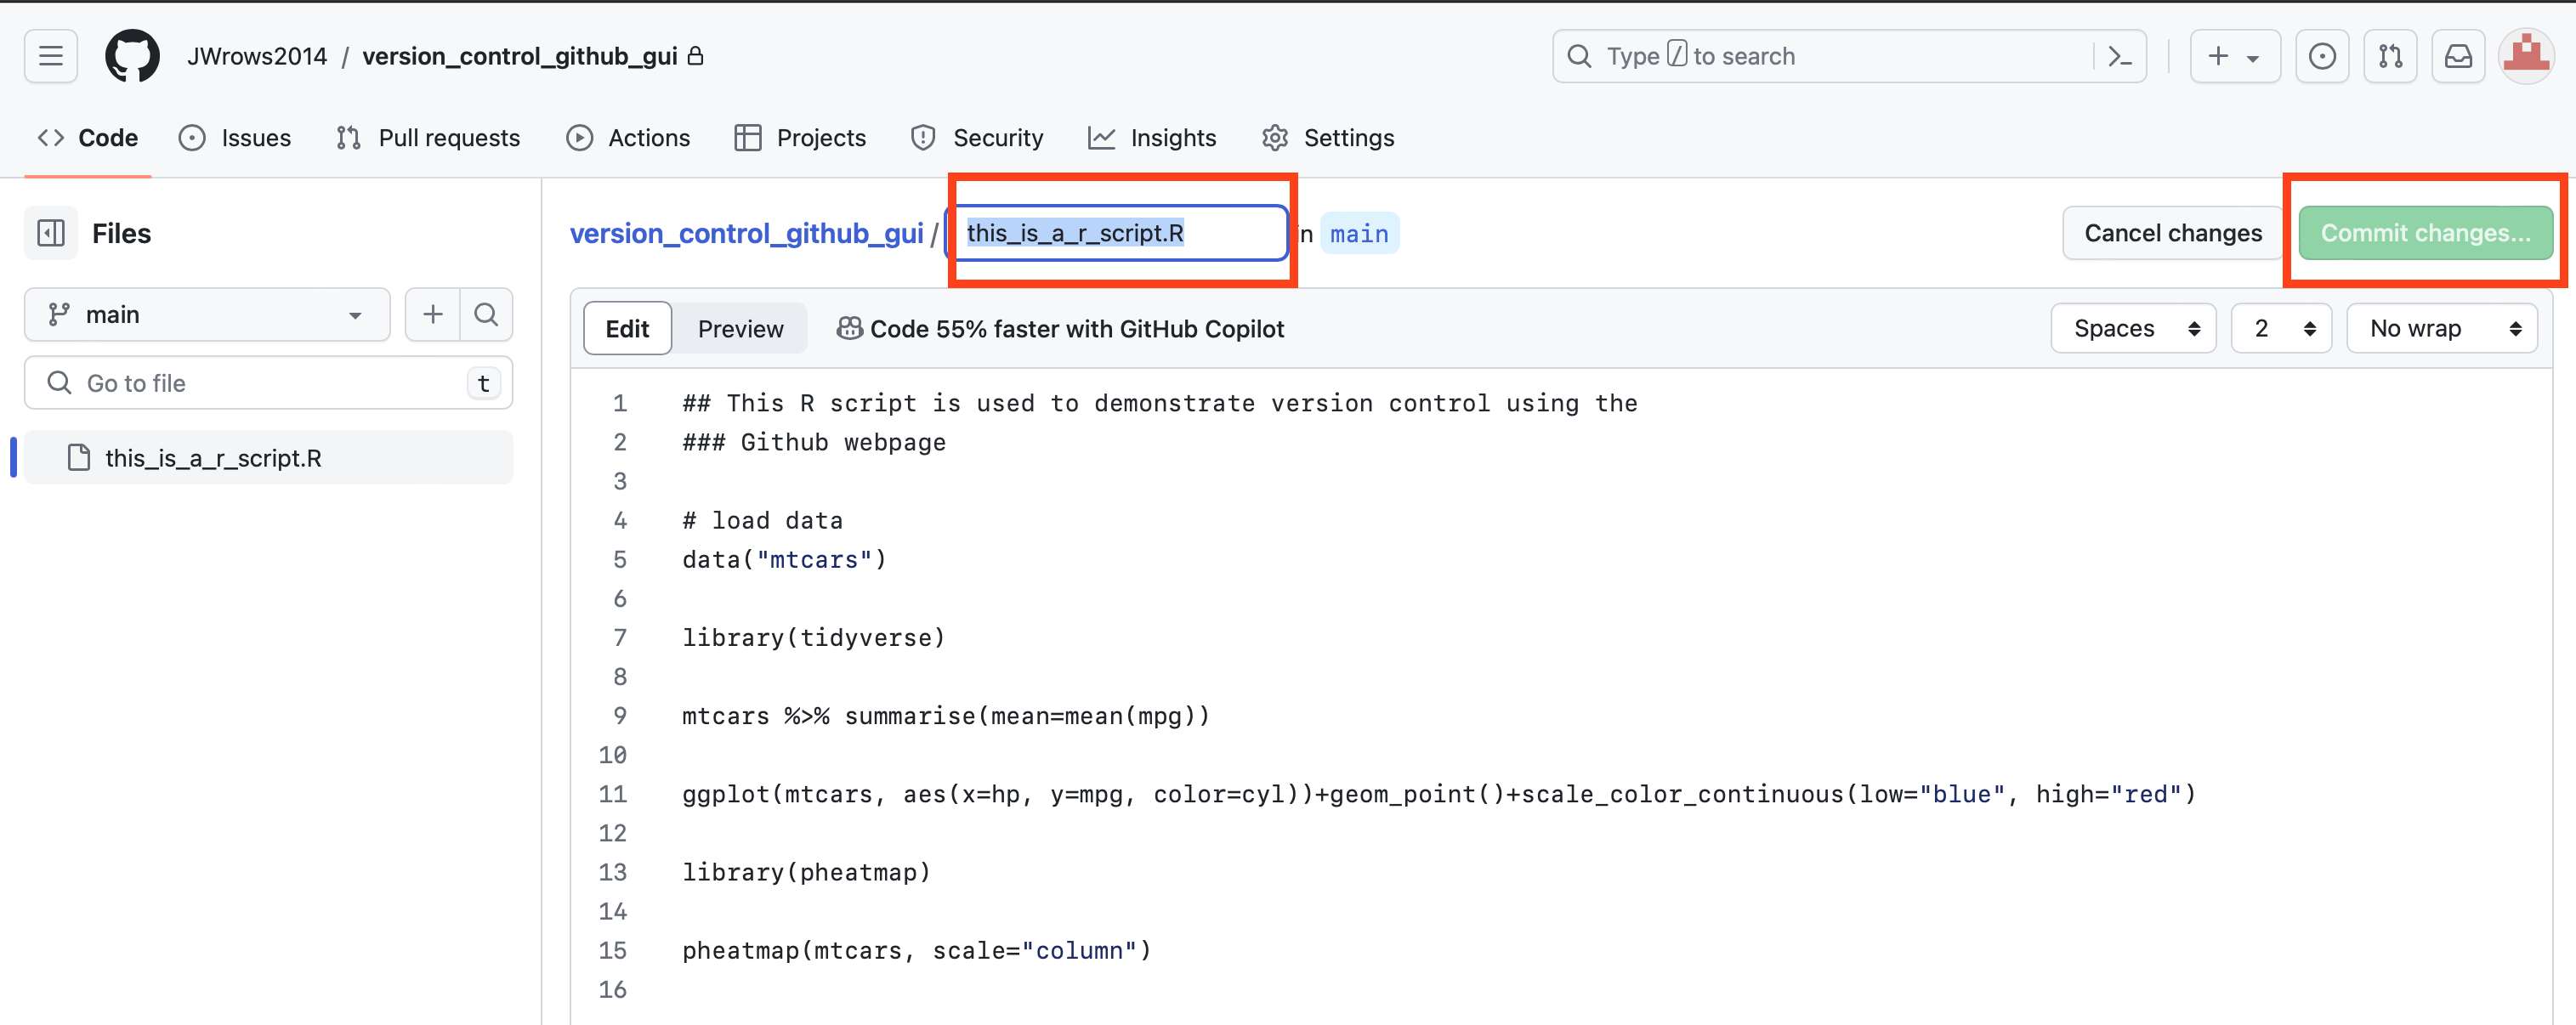
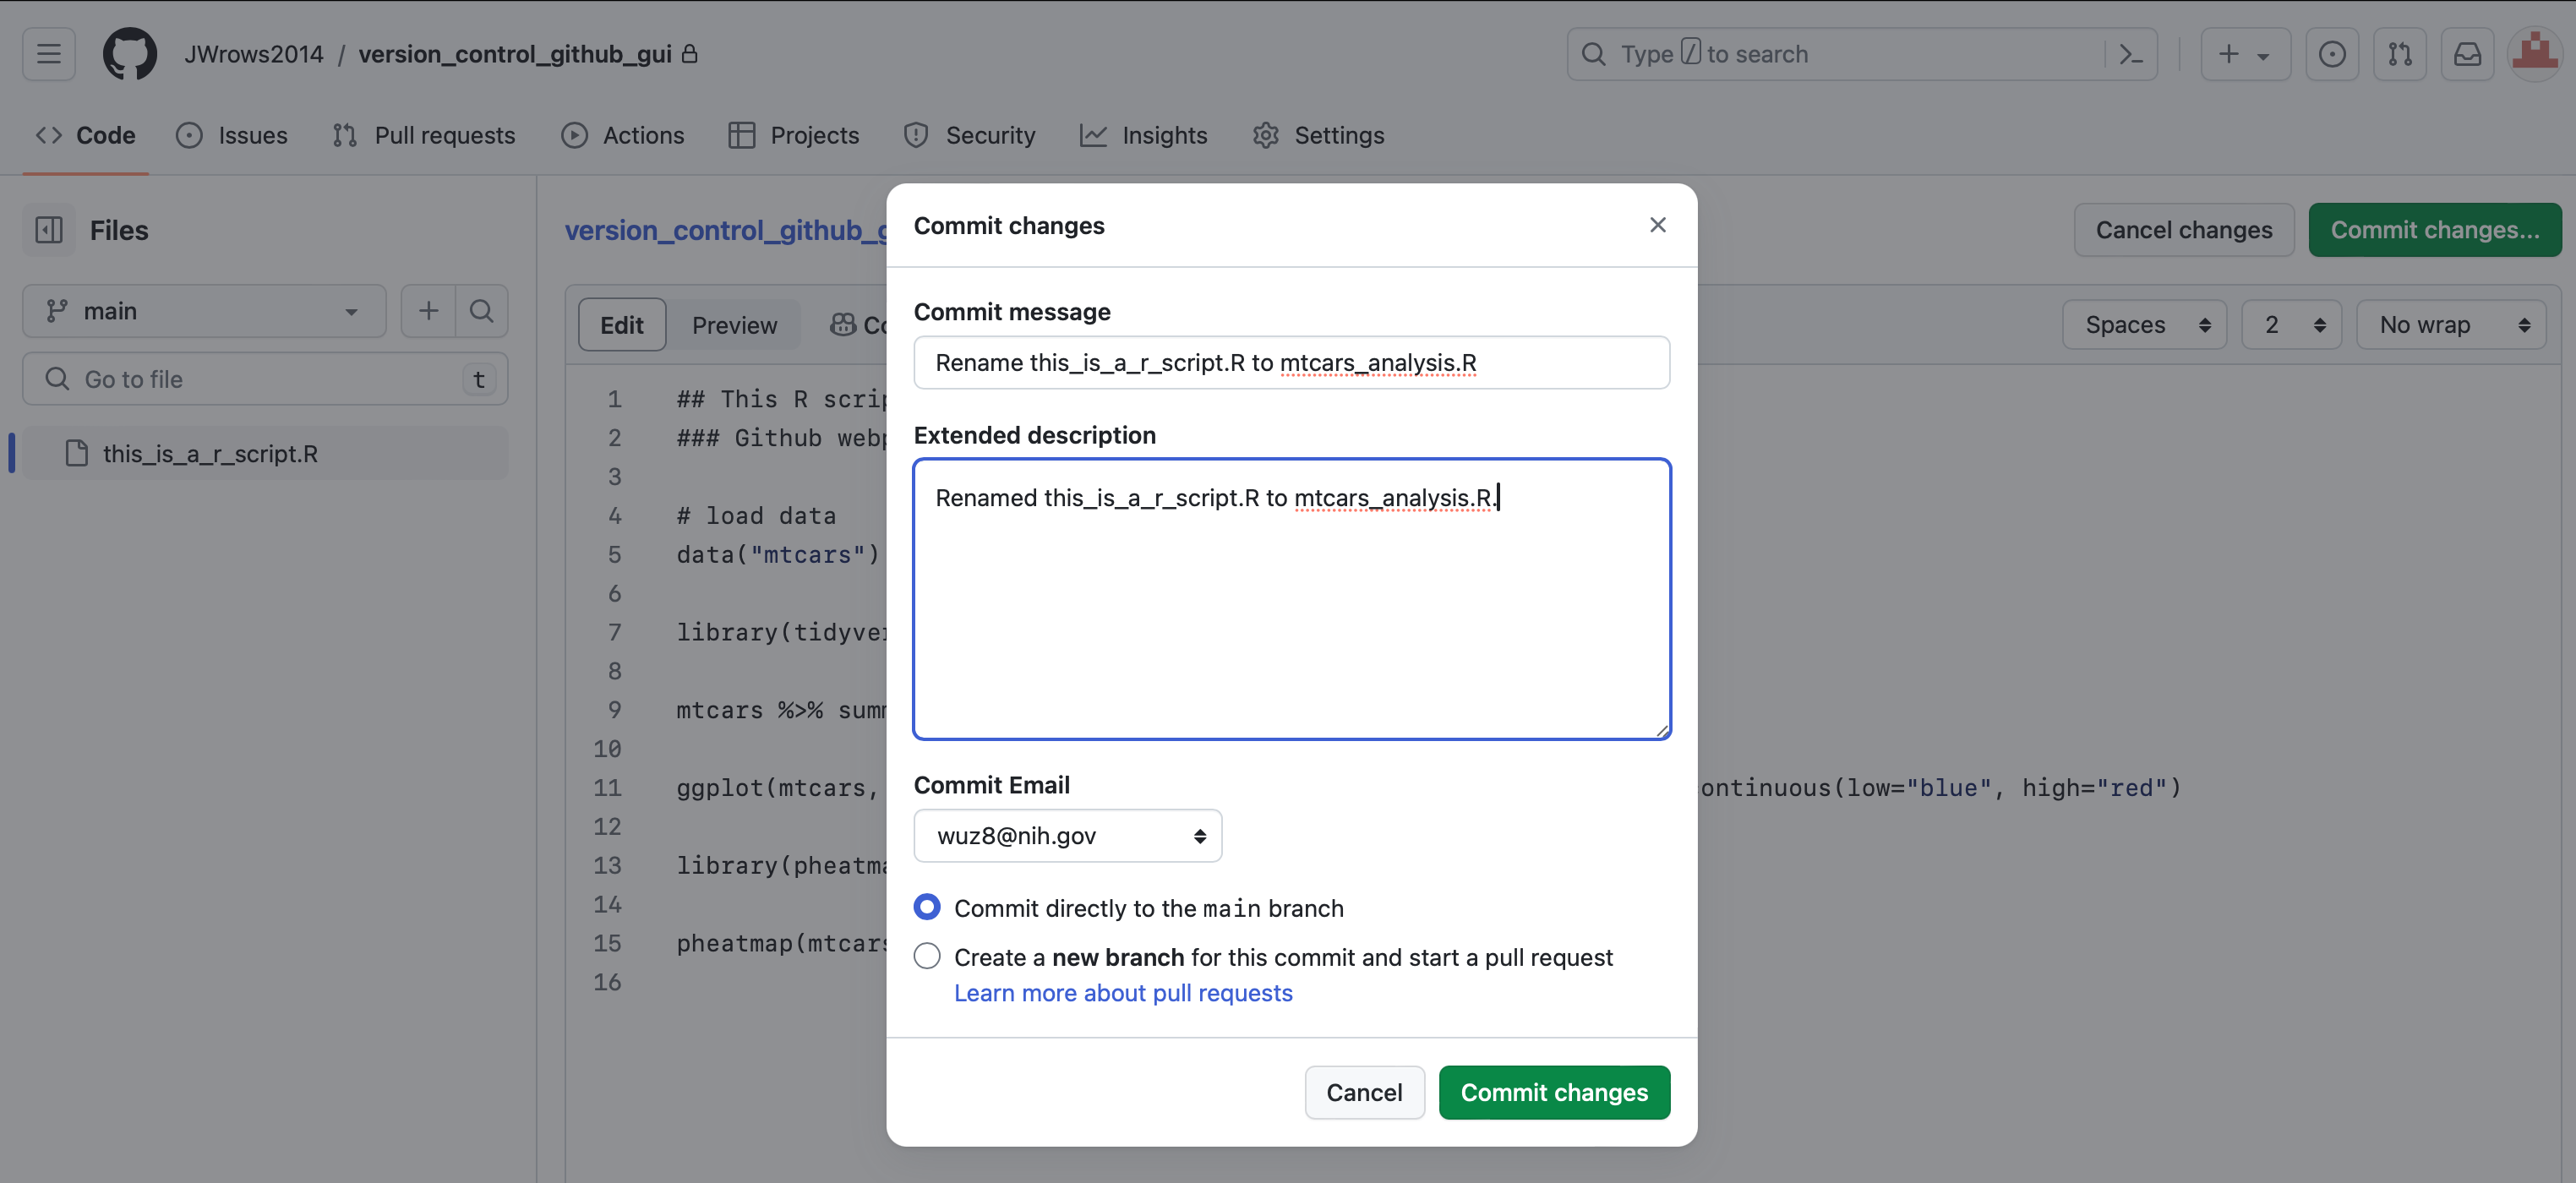
This example will change this_is_a_r_script.R to mtcars_analysis.R. Add a commit message and click on commit changes.
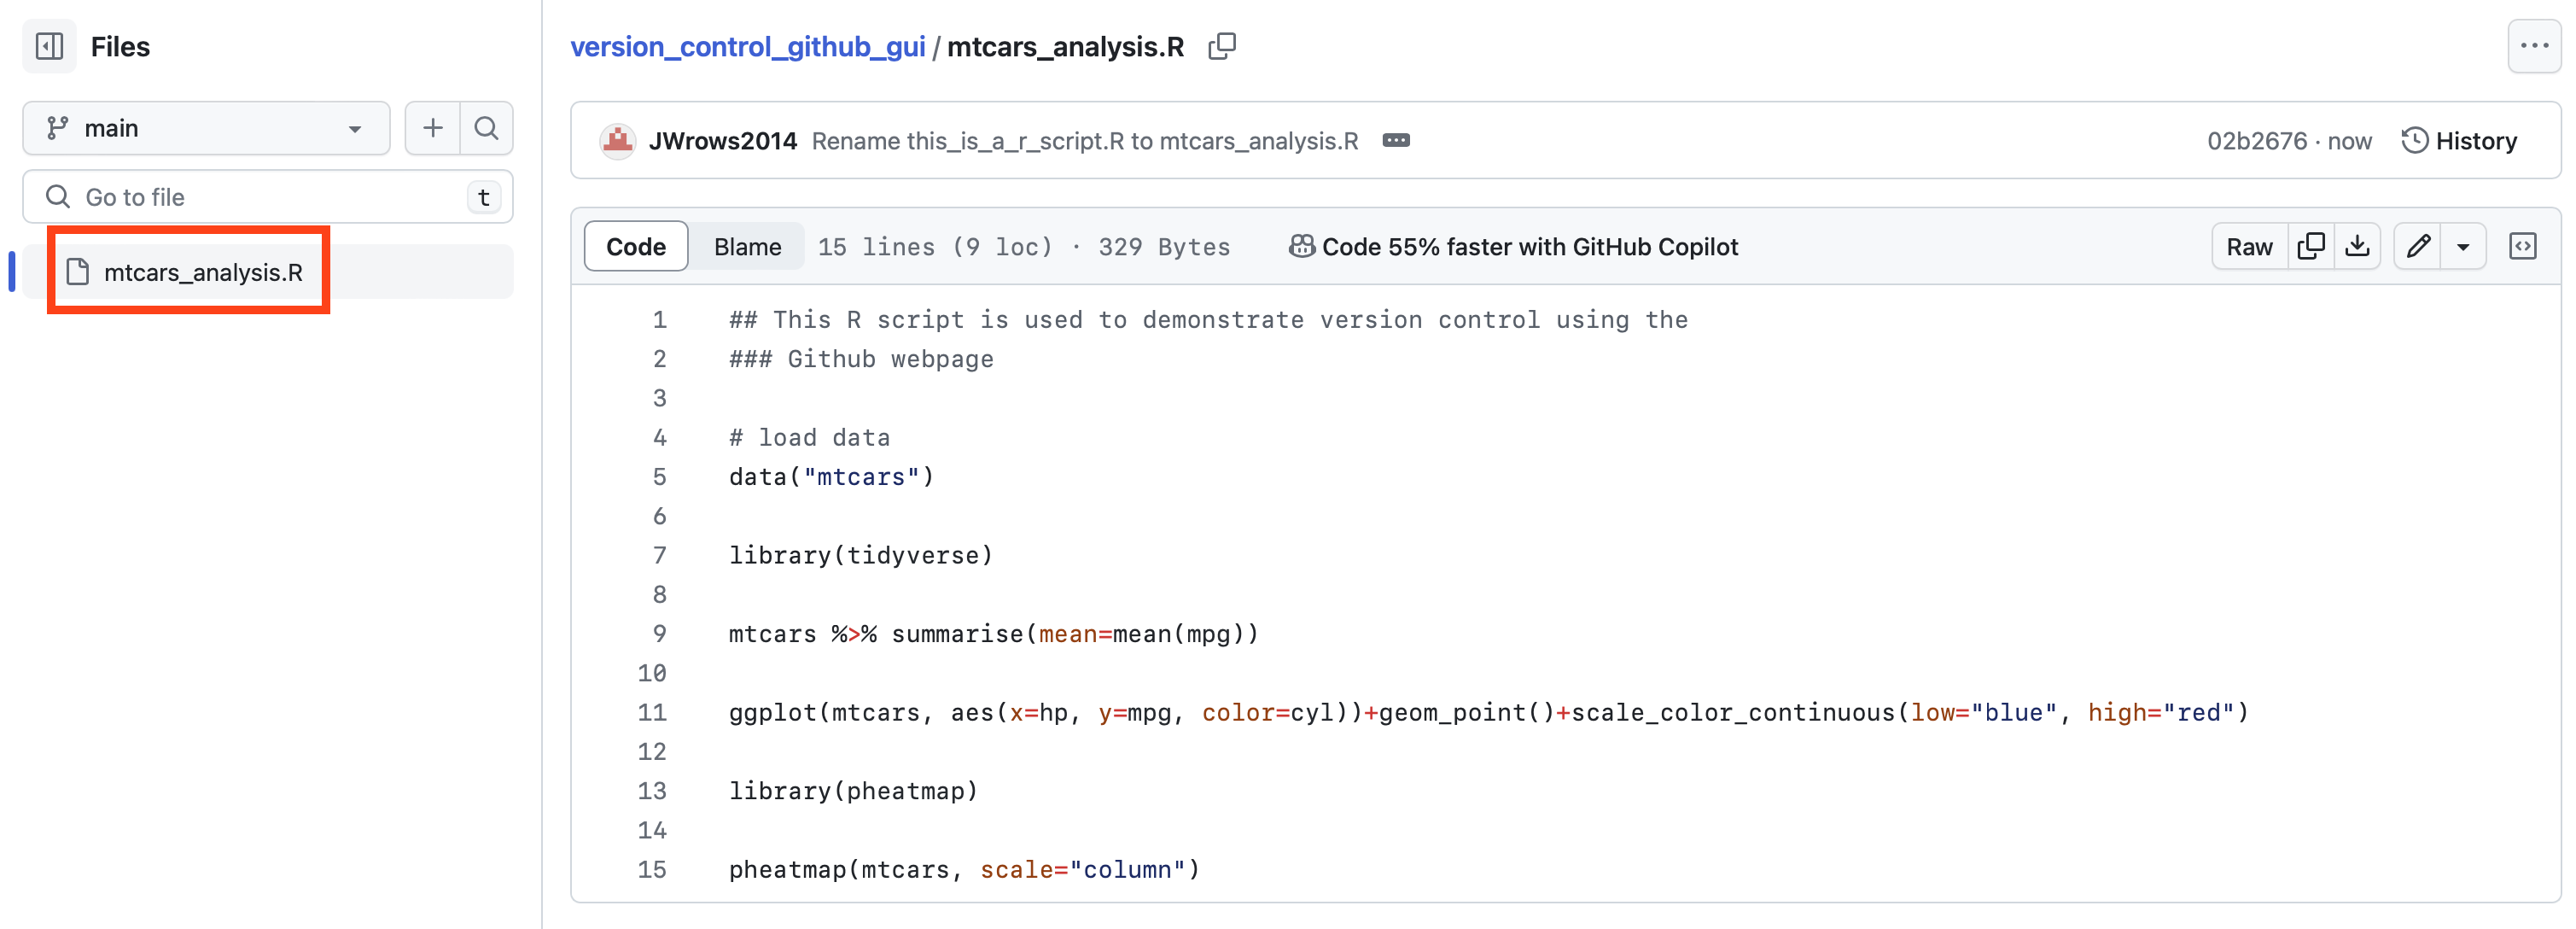
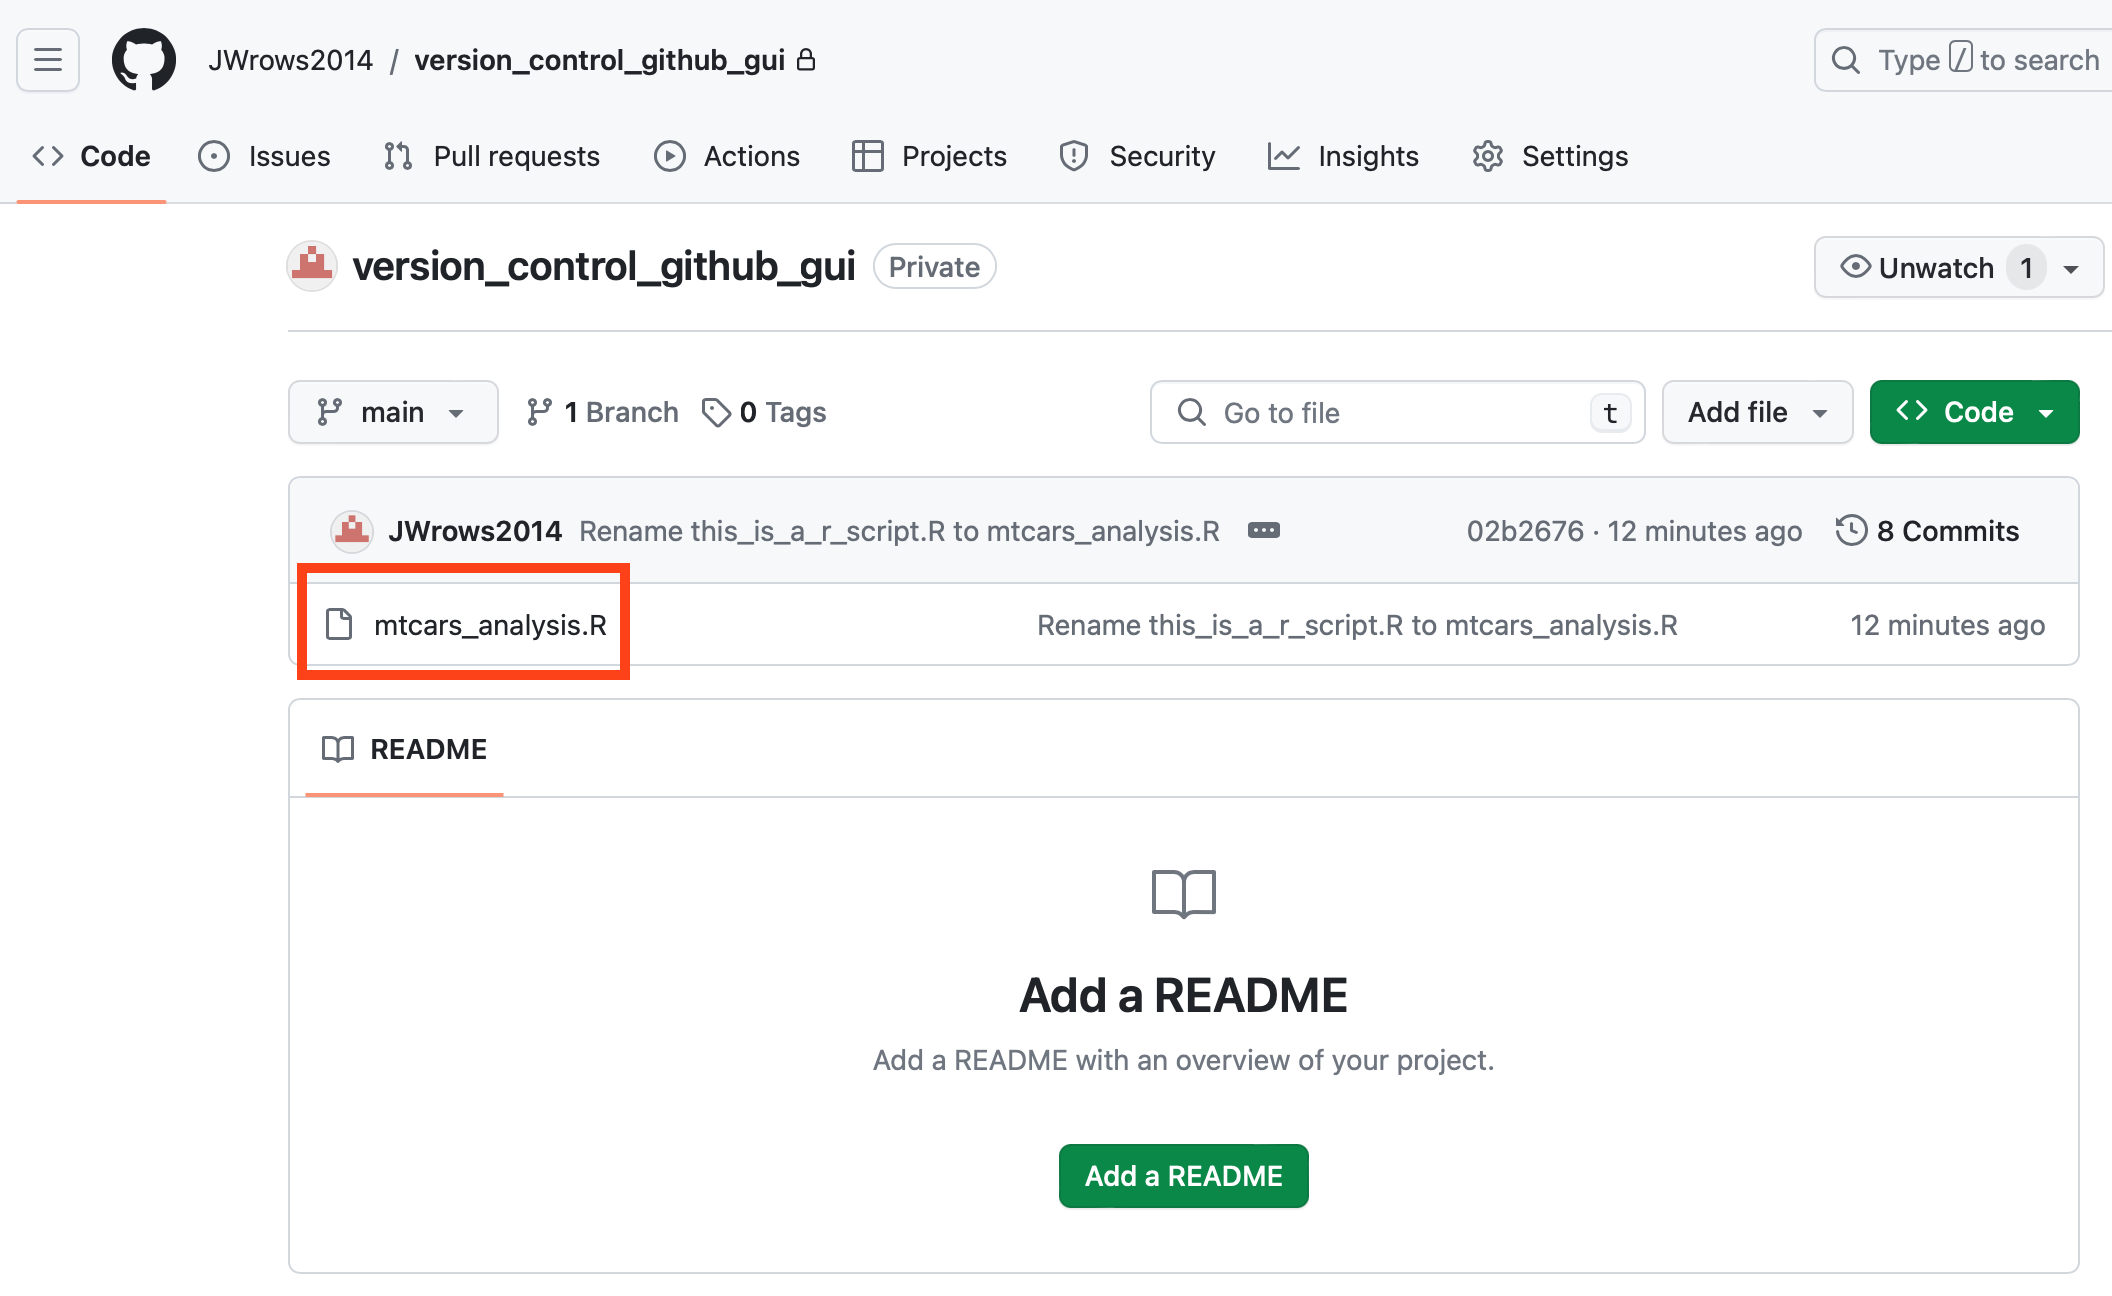
The file navigation pane shows that the script was successfully renamed.
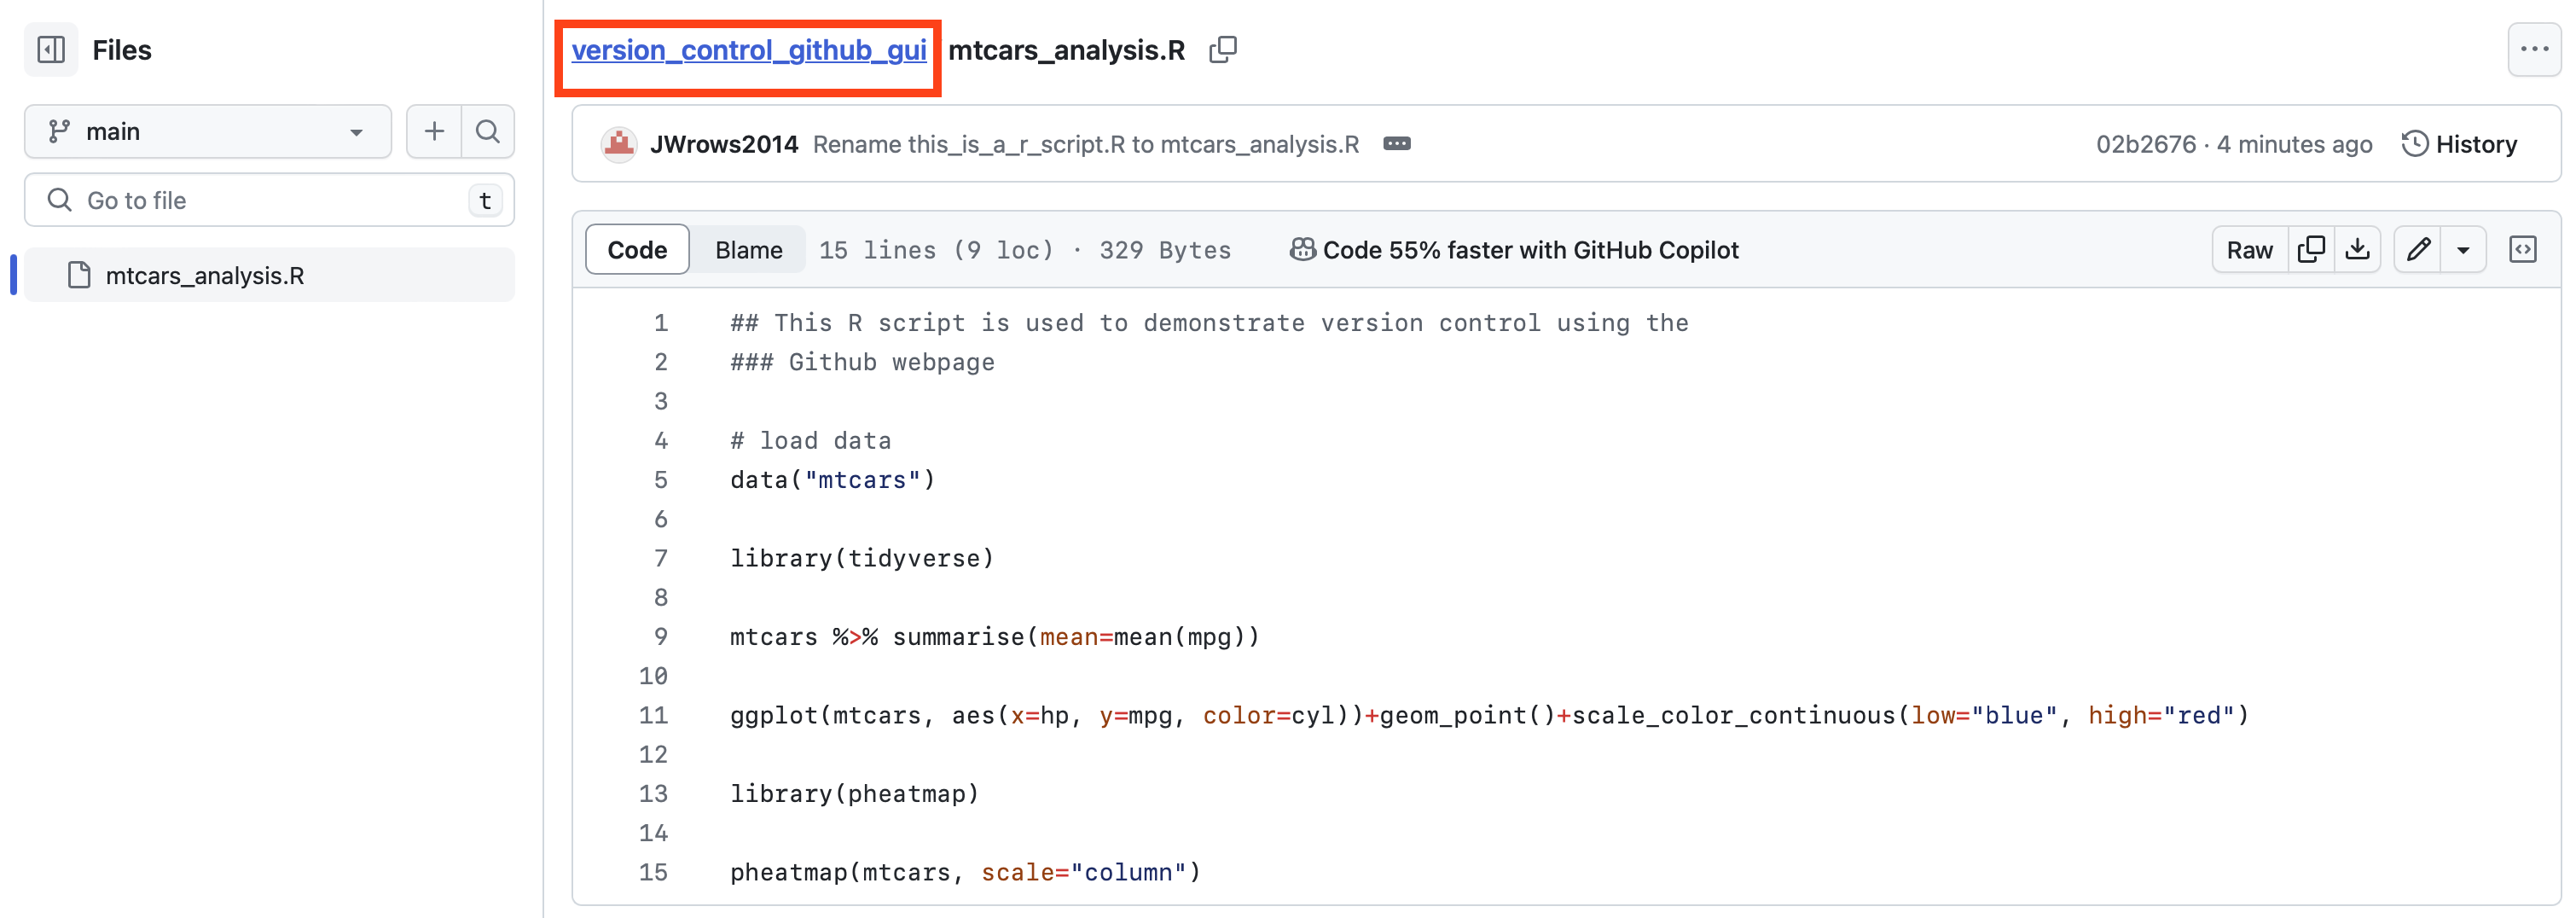
Click on the link to the repository view, which will display the script with a new name.

Copy a repository to local
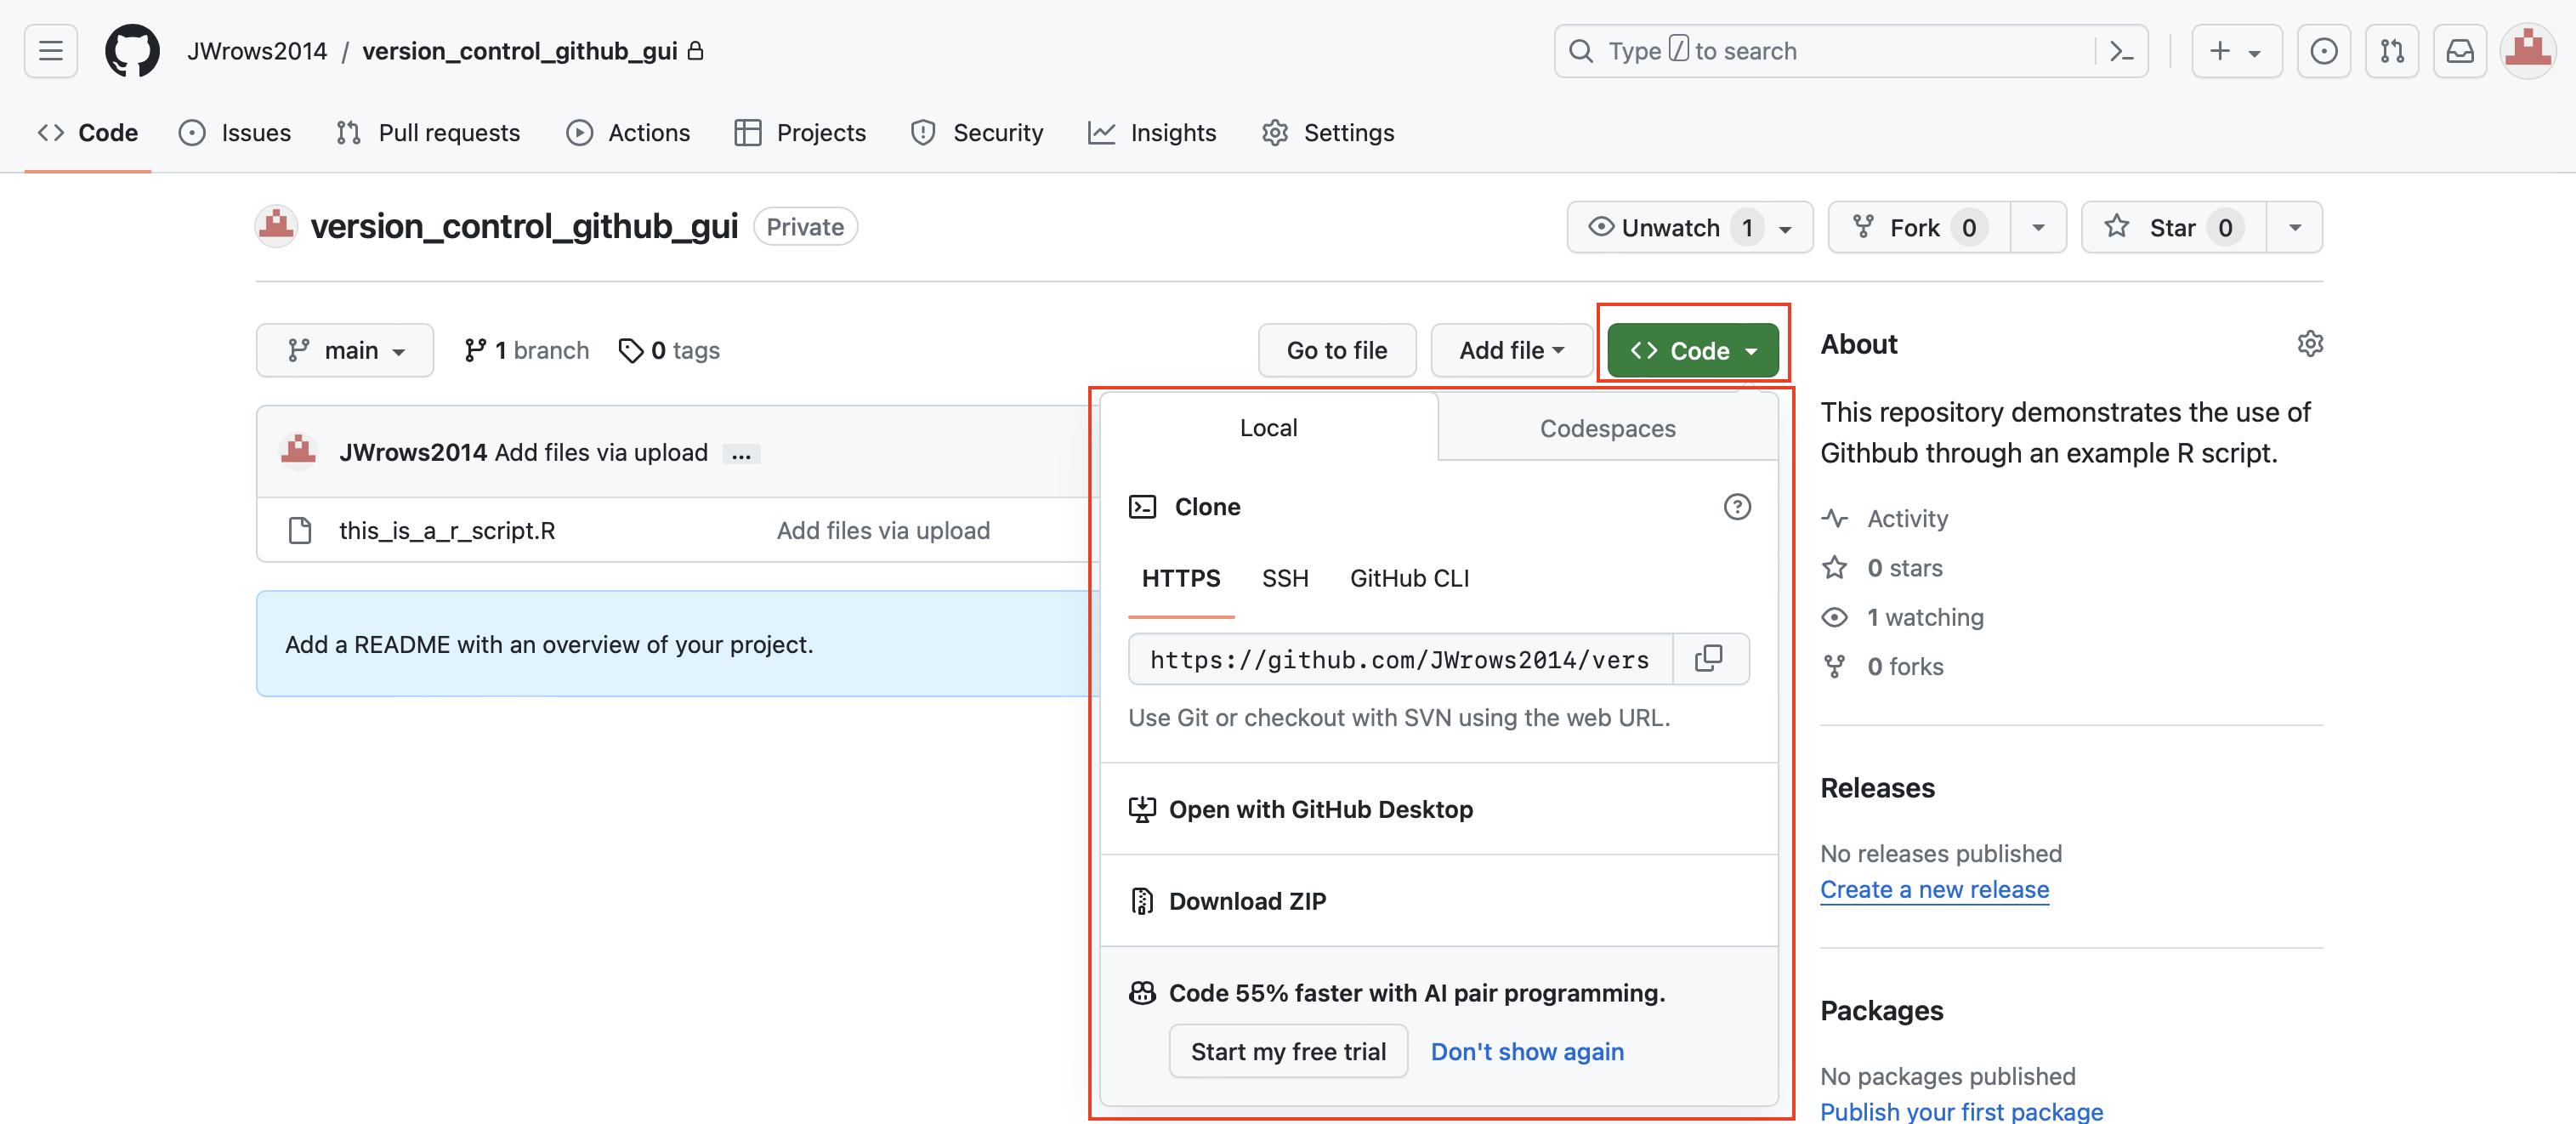
To copy a repository to local computer, click on the button labeled "<> Code", which then presents options to copy via command line using the repository URL, GitHub desktop app, or download as a zip file.
Branches
Definition
"Branches allow you to develop features, fix bugs, or safely experiment with new ideas in a contained area of your repository." -- GitHub
 Example of branches in a repository. There is main branch and as development of code proceeds, the branches "Little Feature" and "Big Feature" are created, to allow for their own development without affecting the content in the main. Contents of "Little Feature" and "Big Feature" may be merged back into main. This image is known as a commit graph where the nodes represent commits. Source: https://www.atlassian.com/git/tutorials/using-branches
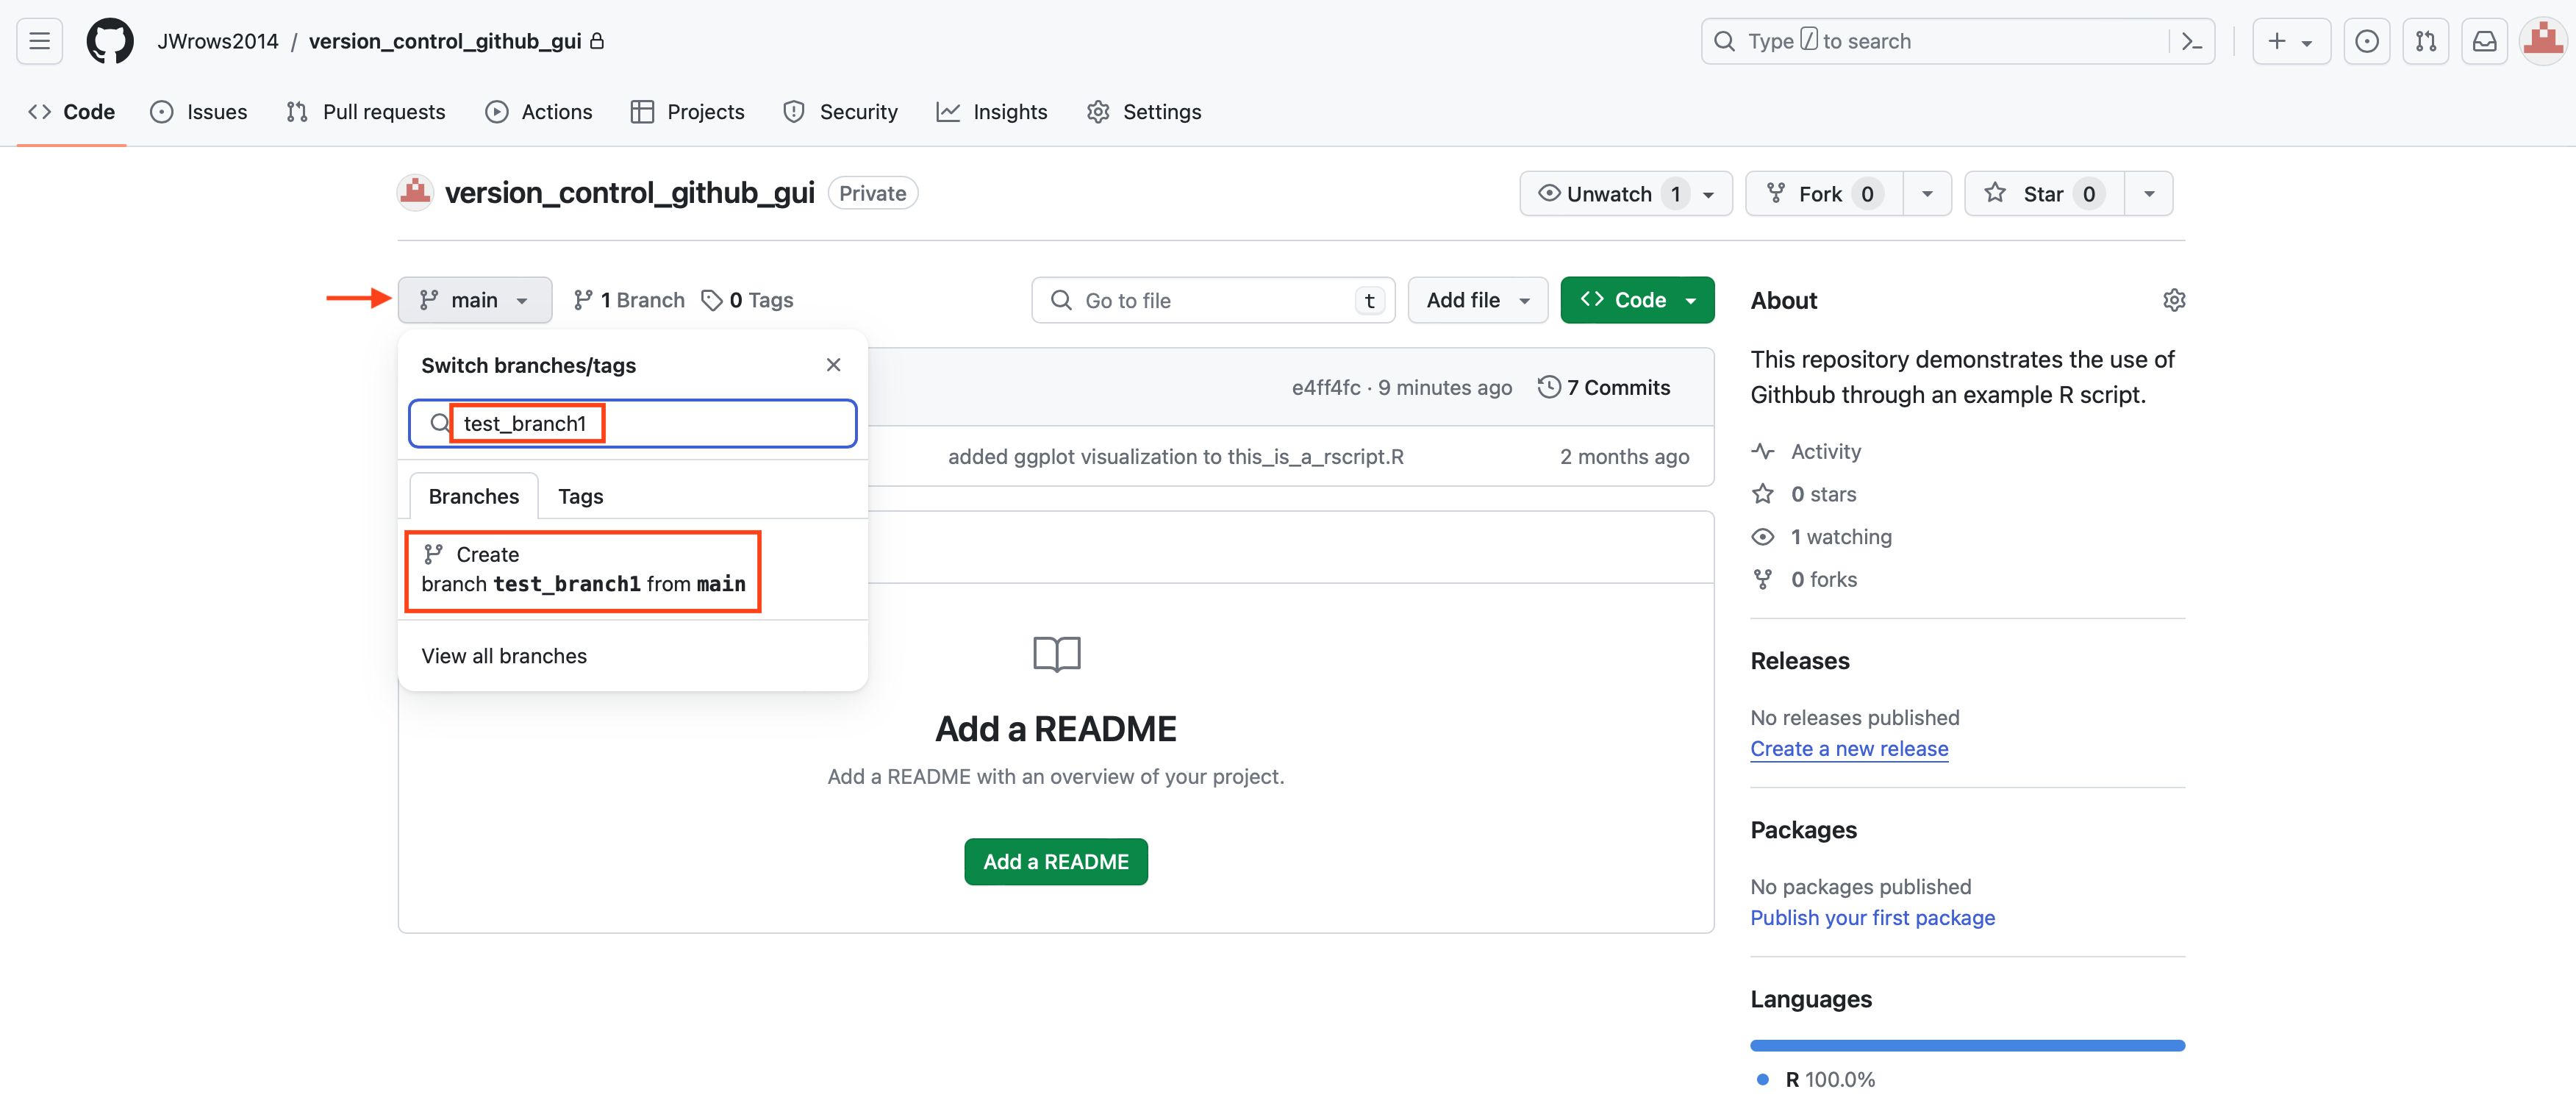
To create a branch on GitHub, click on the "main" button and type a branch name in the search box (ie. test_branch1). If the branch does not exist, then users will have the option to create it by hitting the "Create" icon.
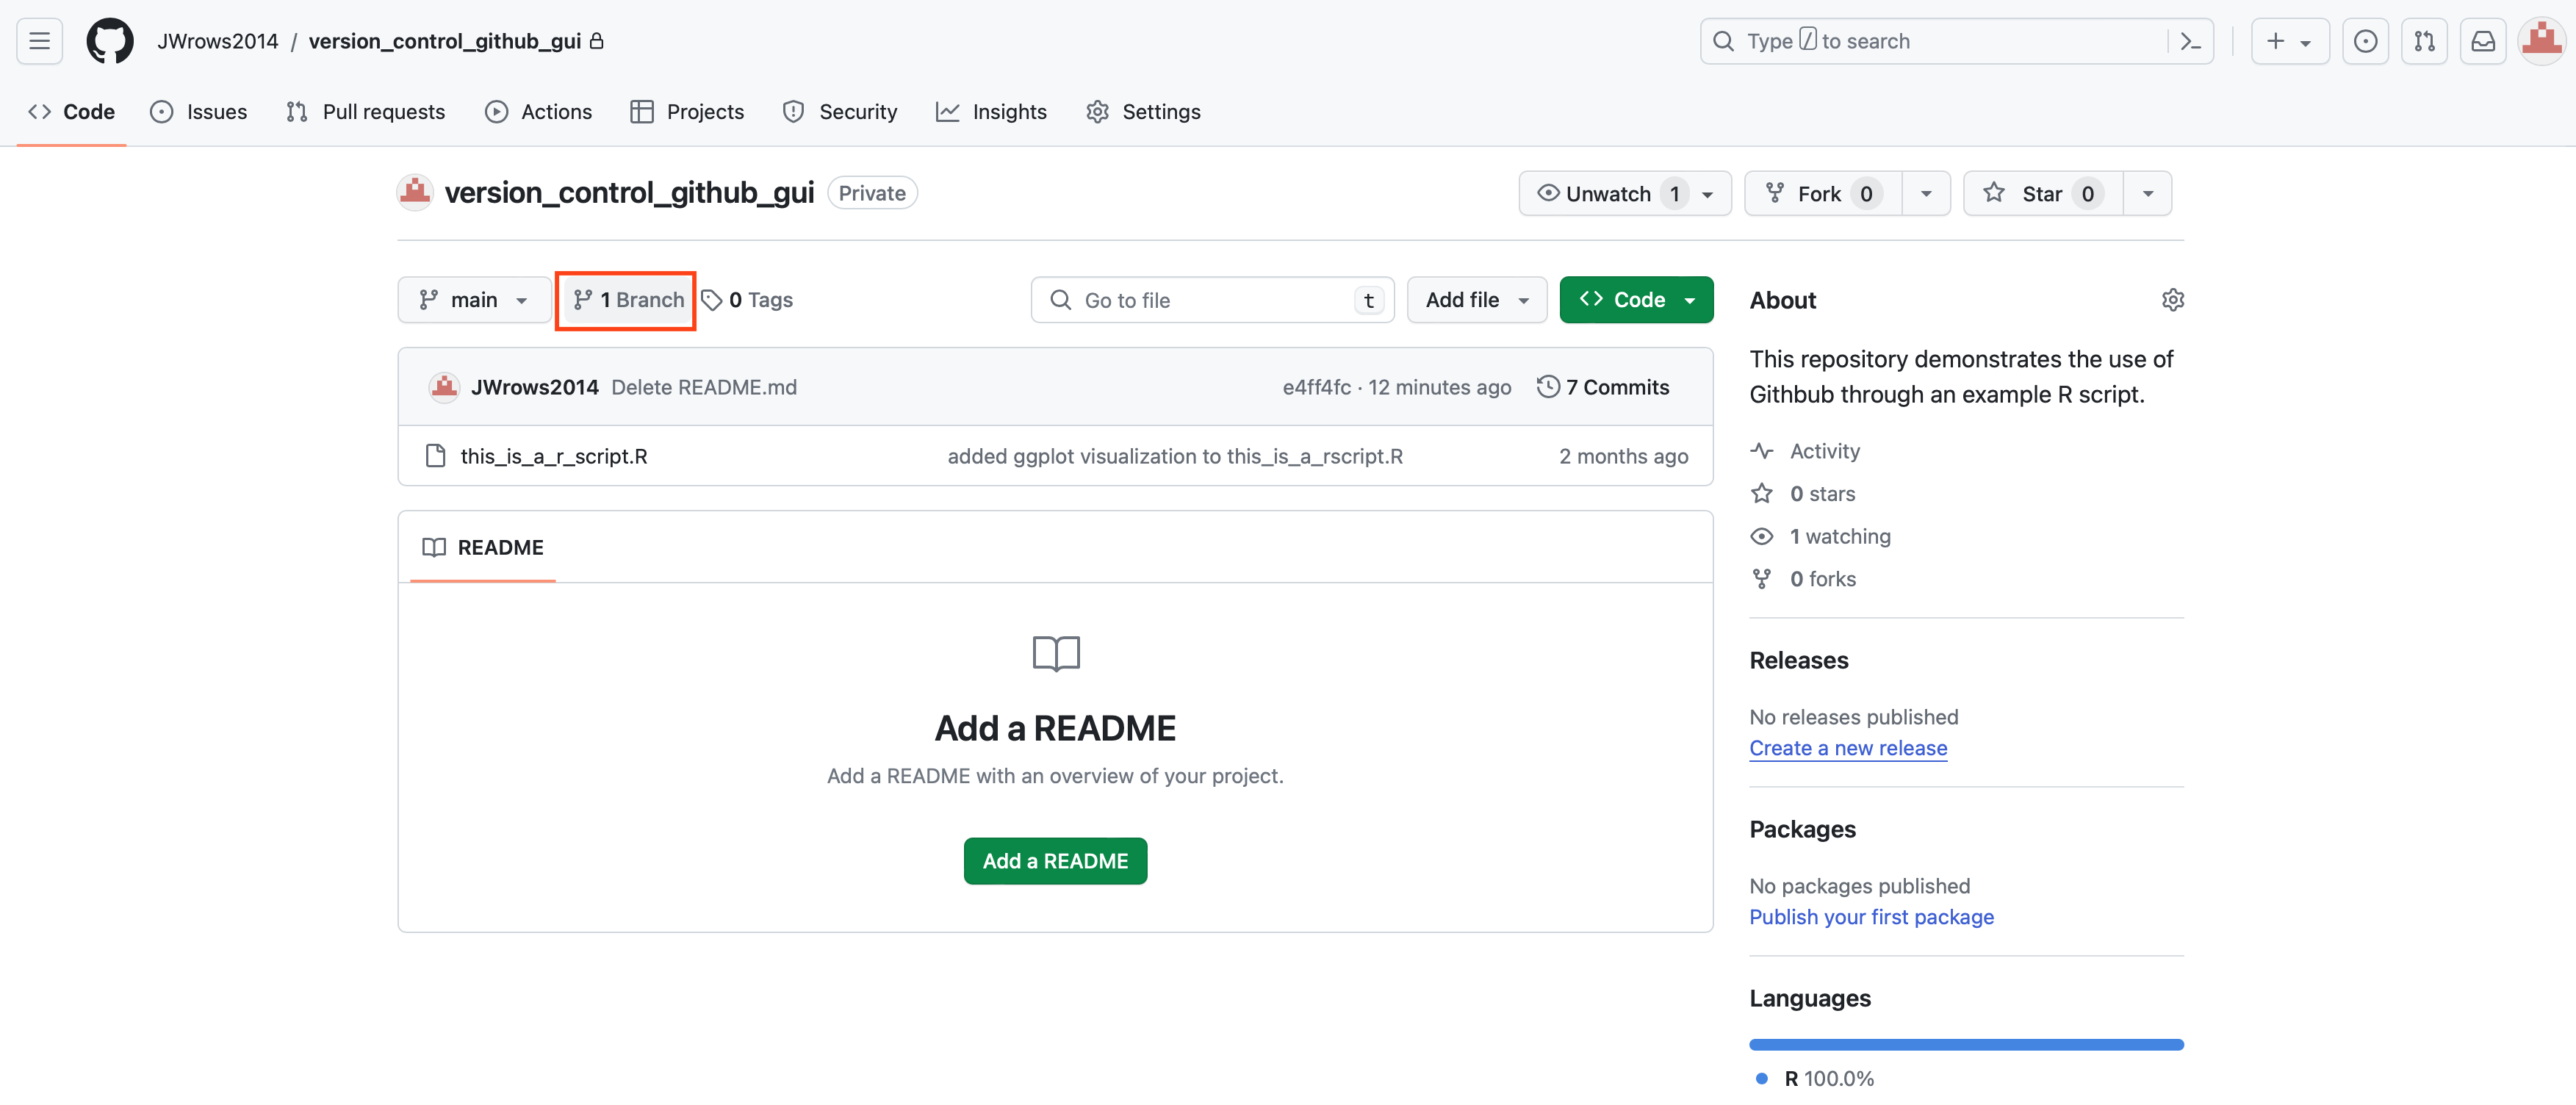
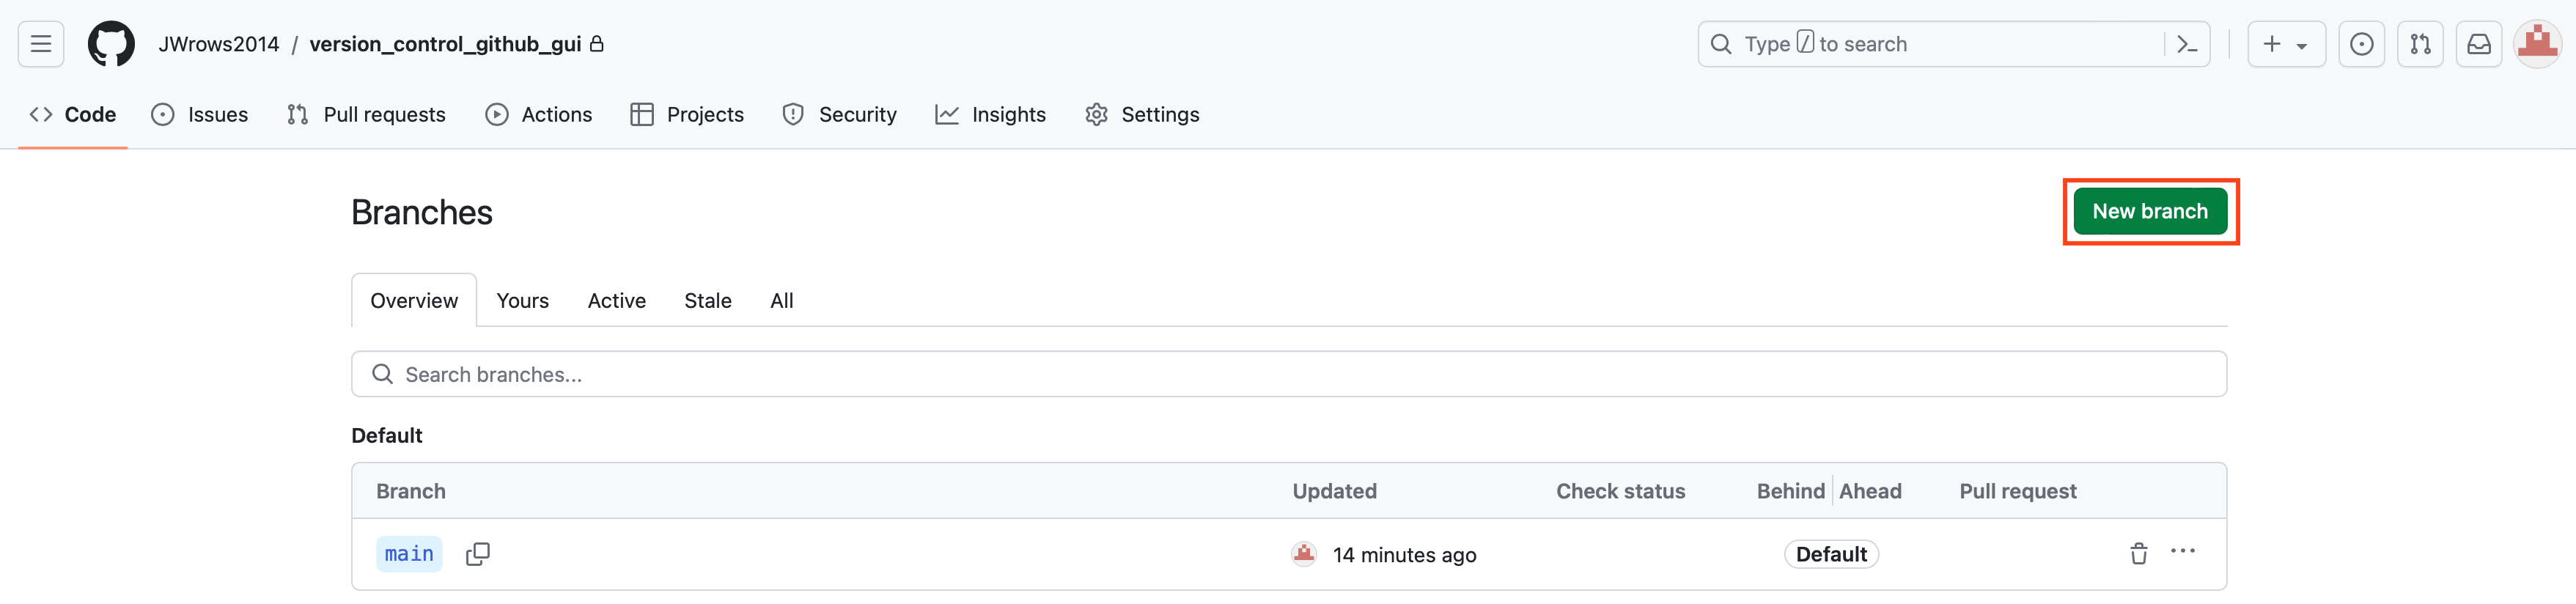
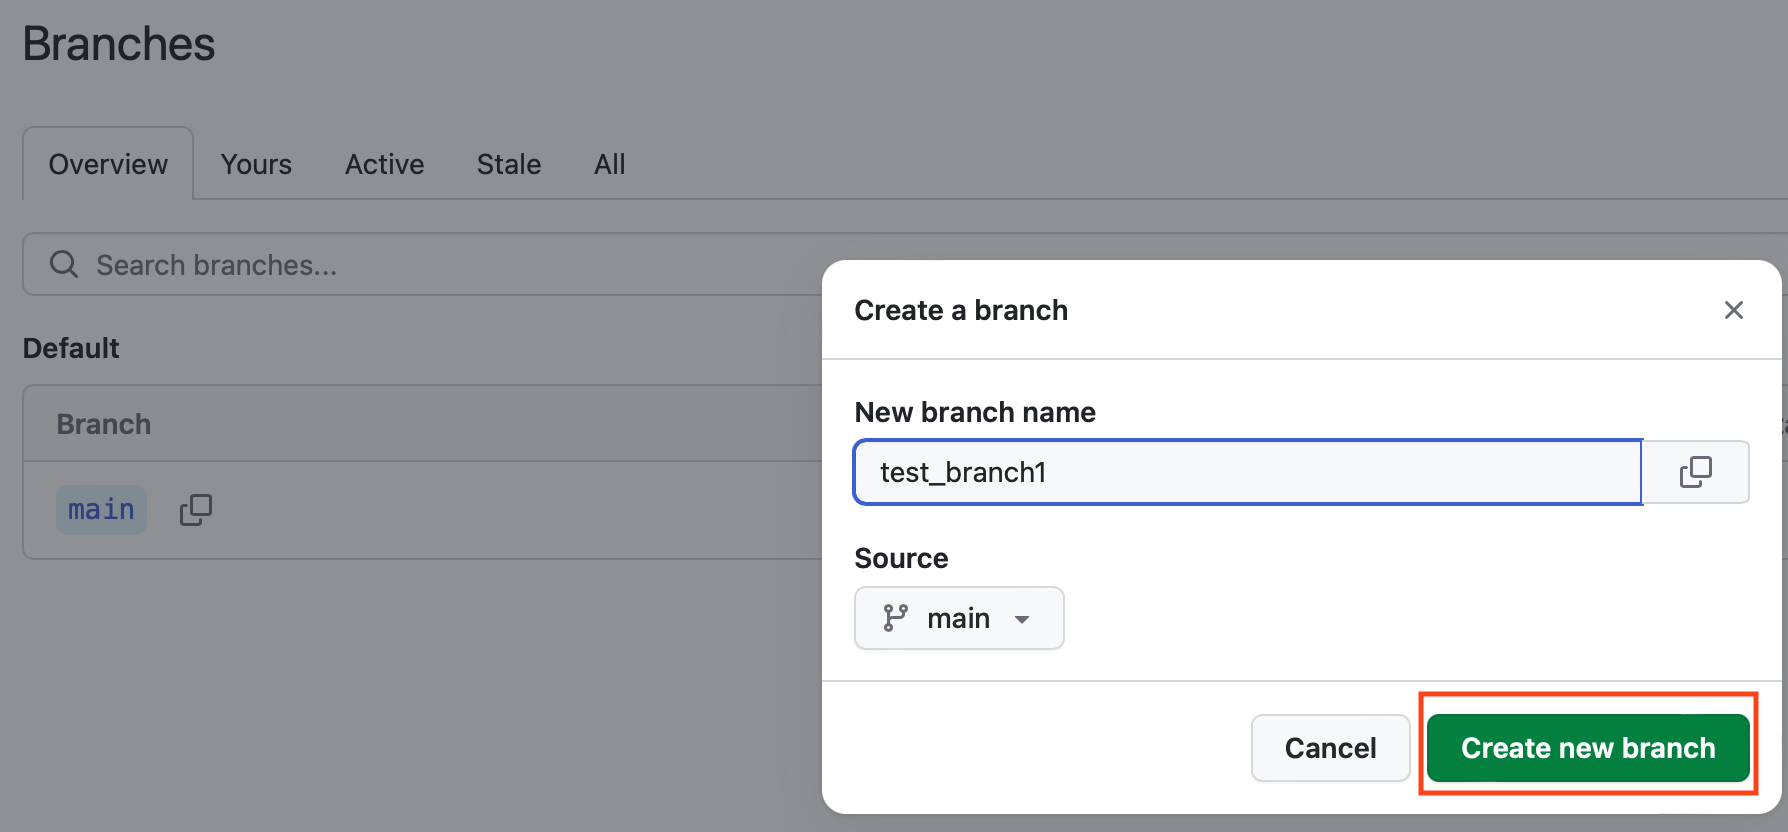
Alternatively, click on "Branch" and then the green "New branch" icon at the next page. The new branch will be named test_branch1. Hit the green button labeled "Create new branch" when ready.
Go back to the repository and click main to confirm that test_branch1 was added.

Pull request and merging two branches
Definition
"A pull request is a proposal to merge a set of changes from one branch into another. In a pull request, collaborators can review and discuss the proposed set of changes before they integrate the changes into the main codebase. Pull requests display the differences, or diffs, between the content in the source branch and the content in the target branch." -- GitHub
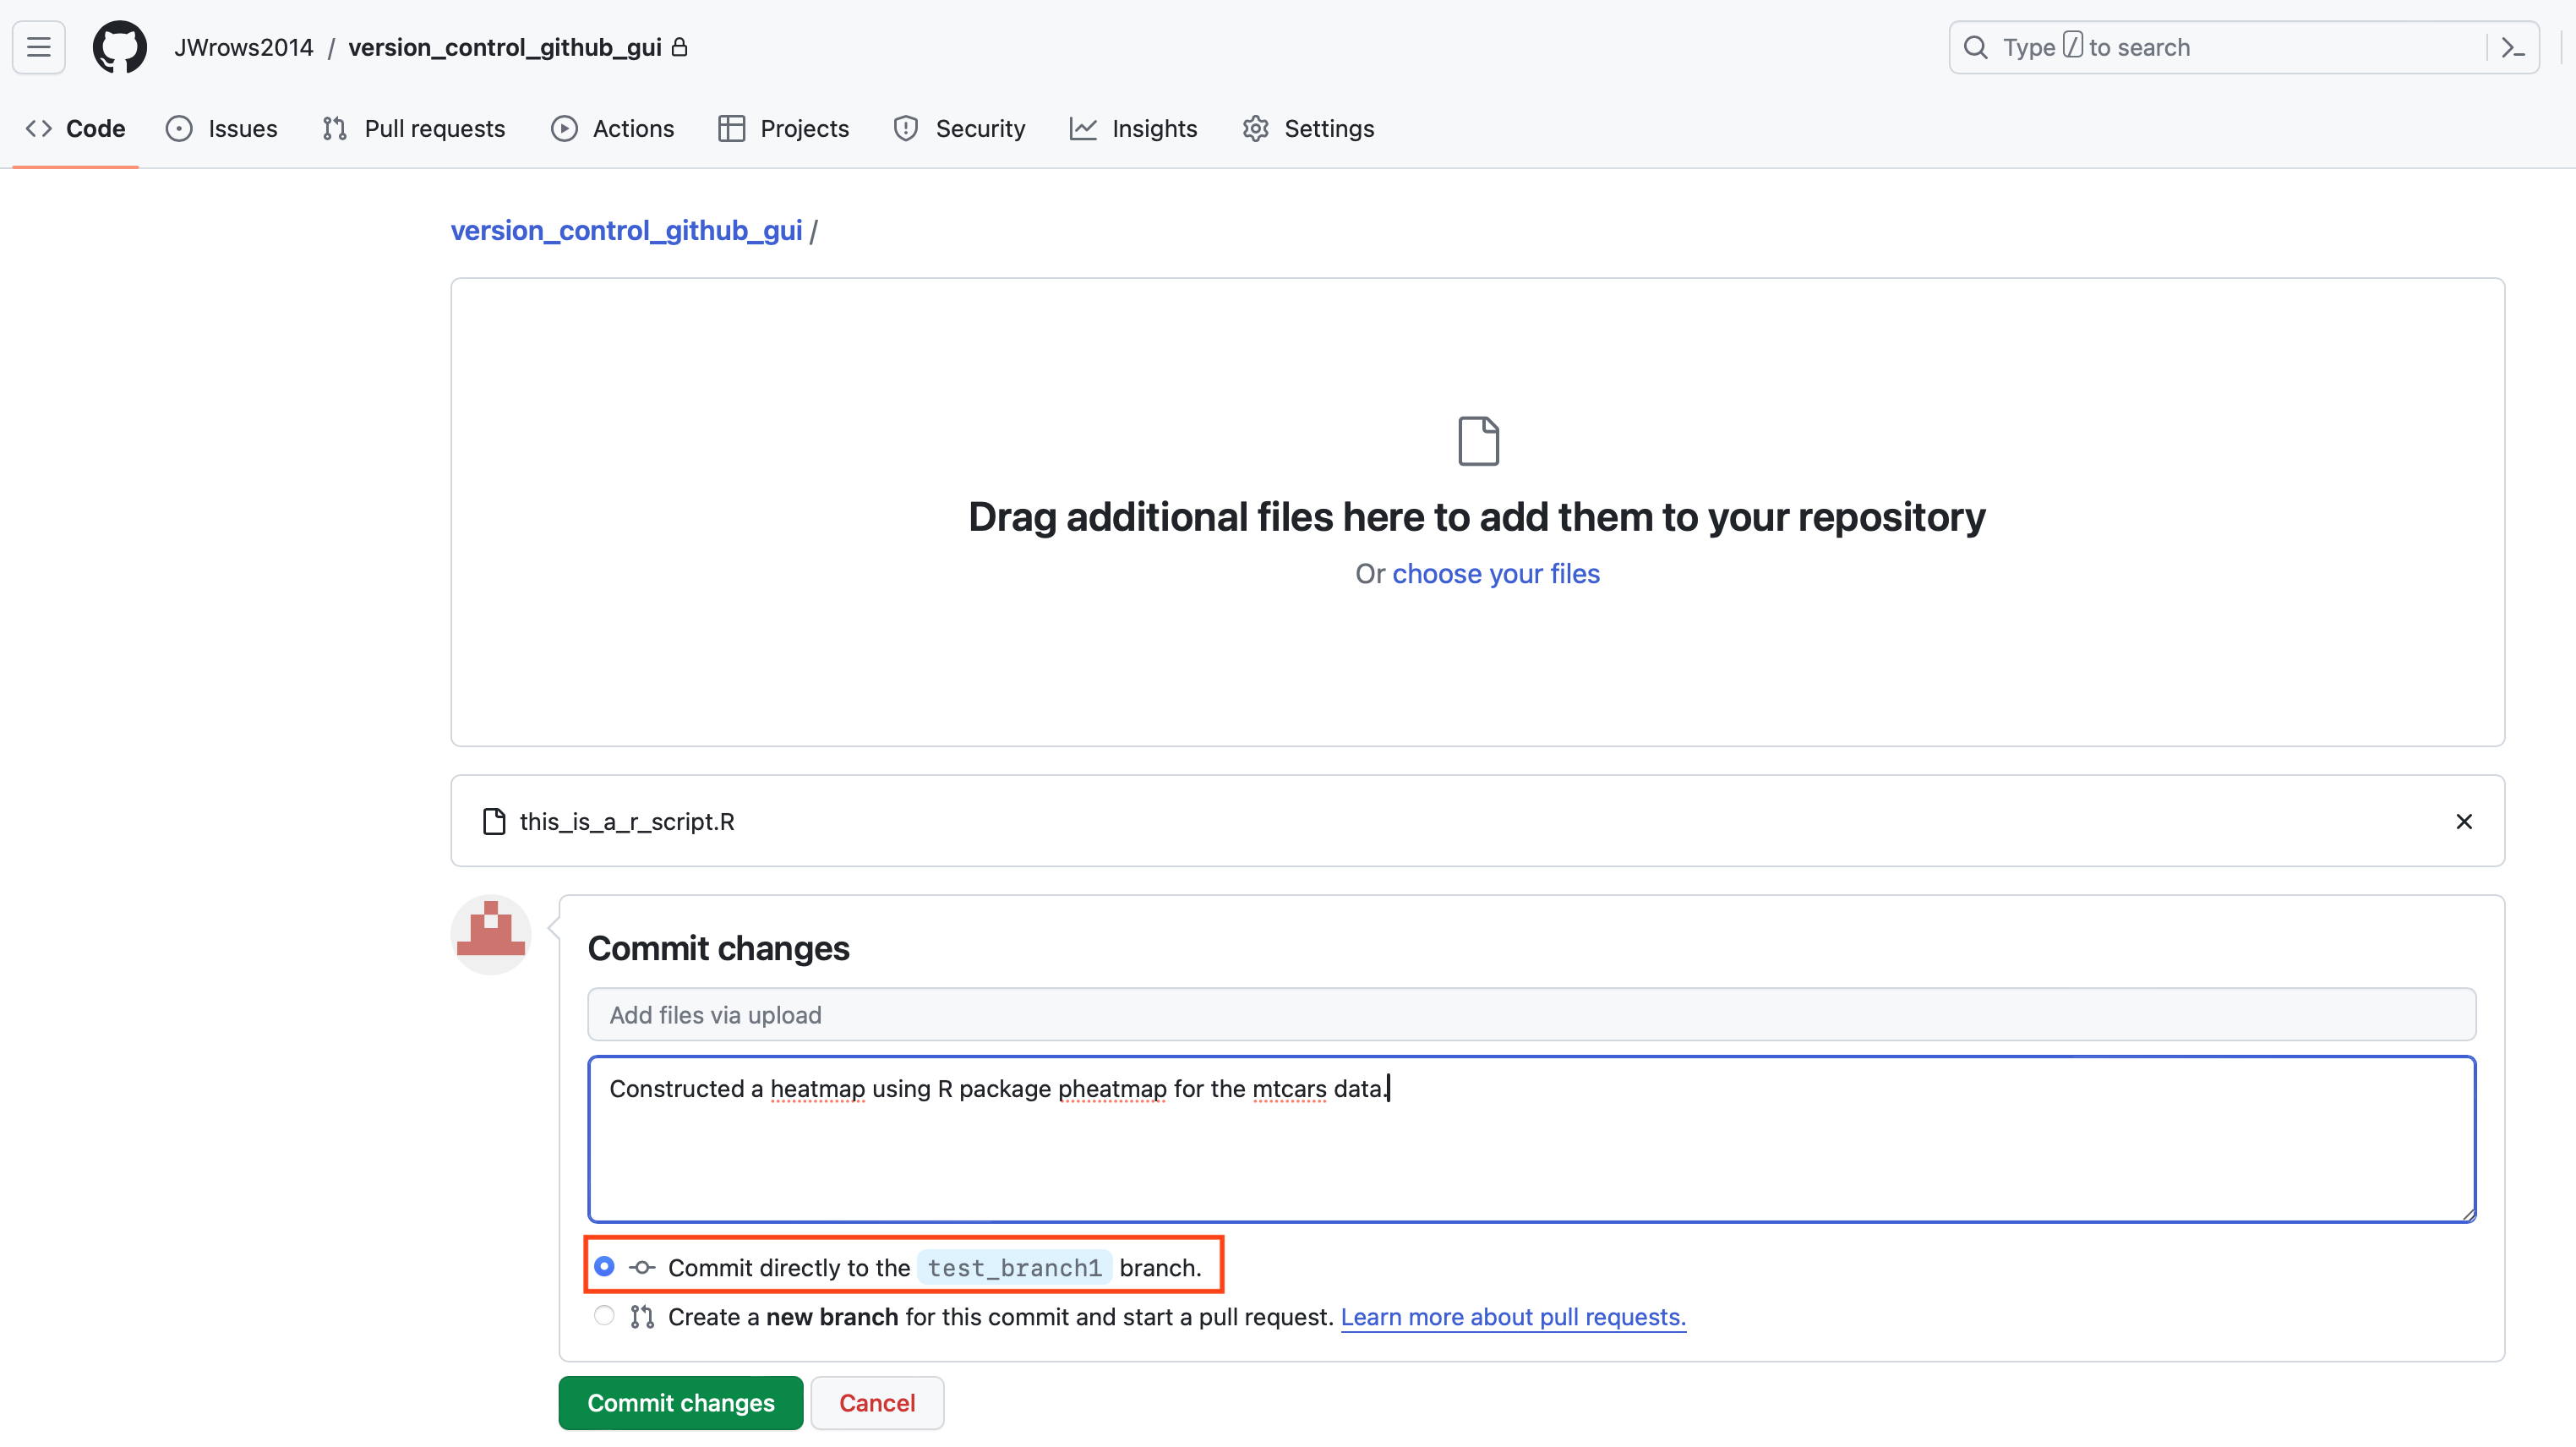
Add the following code to this_is_a_r_script.R, which draws a heatmap of the mtcars data using the R package pheatmap.
library(pheatmap)

pheatmap(mtcars, scale="column")
After making the additions, upload this_is_a_r_script.R to test_branch1. Select "Commit directly to test_branch1" under the commit message box.
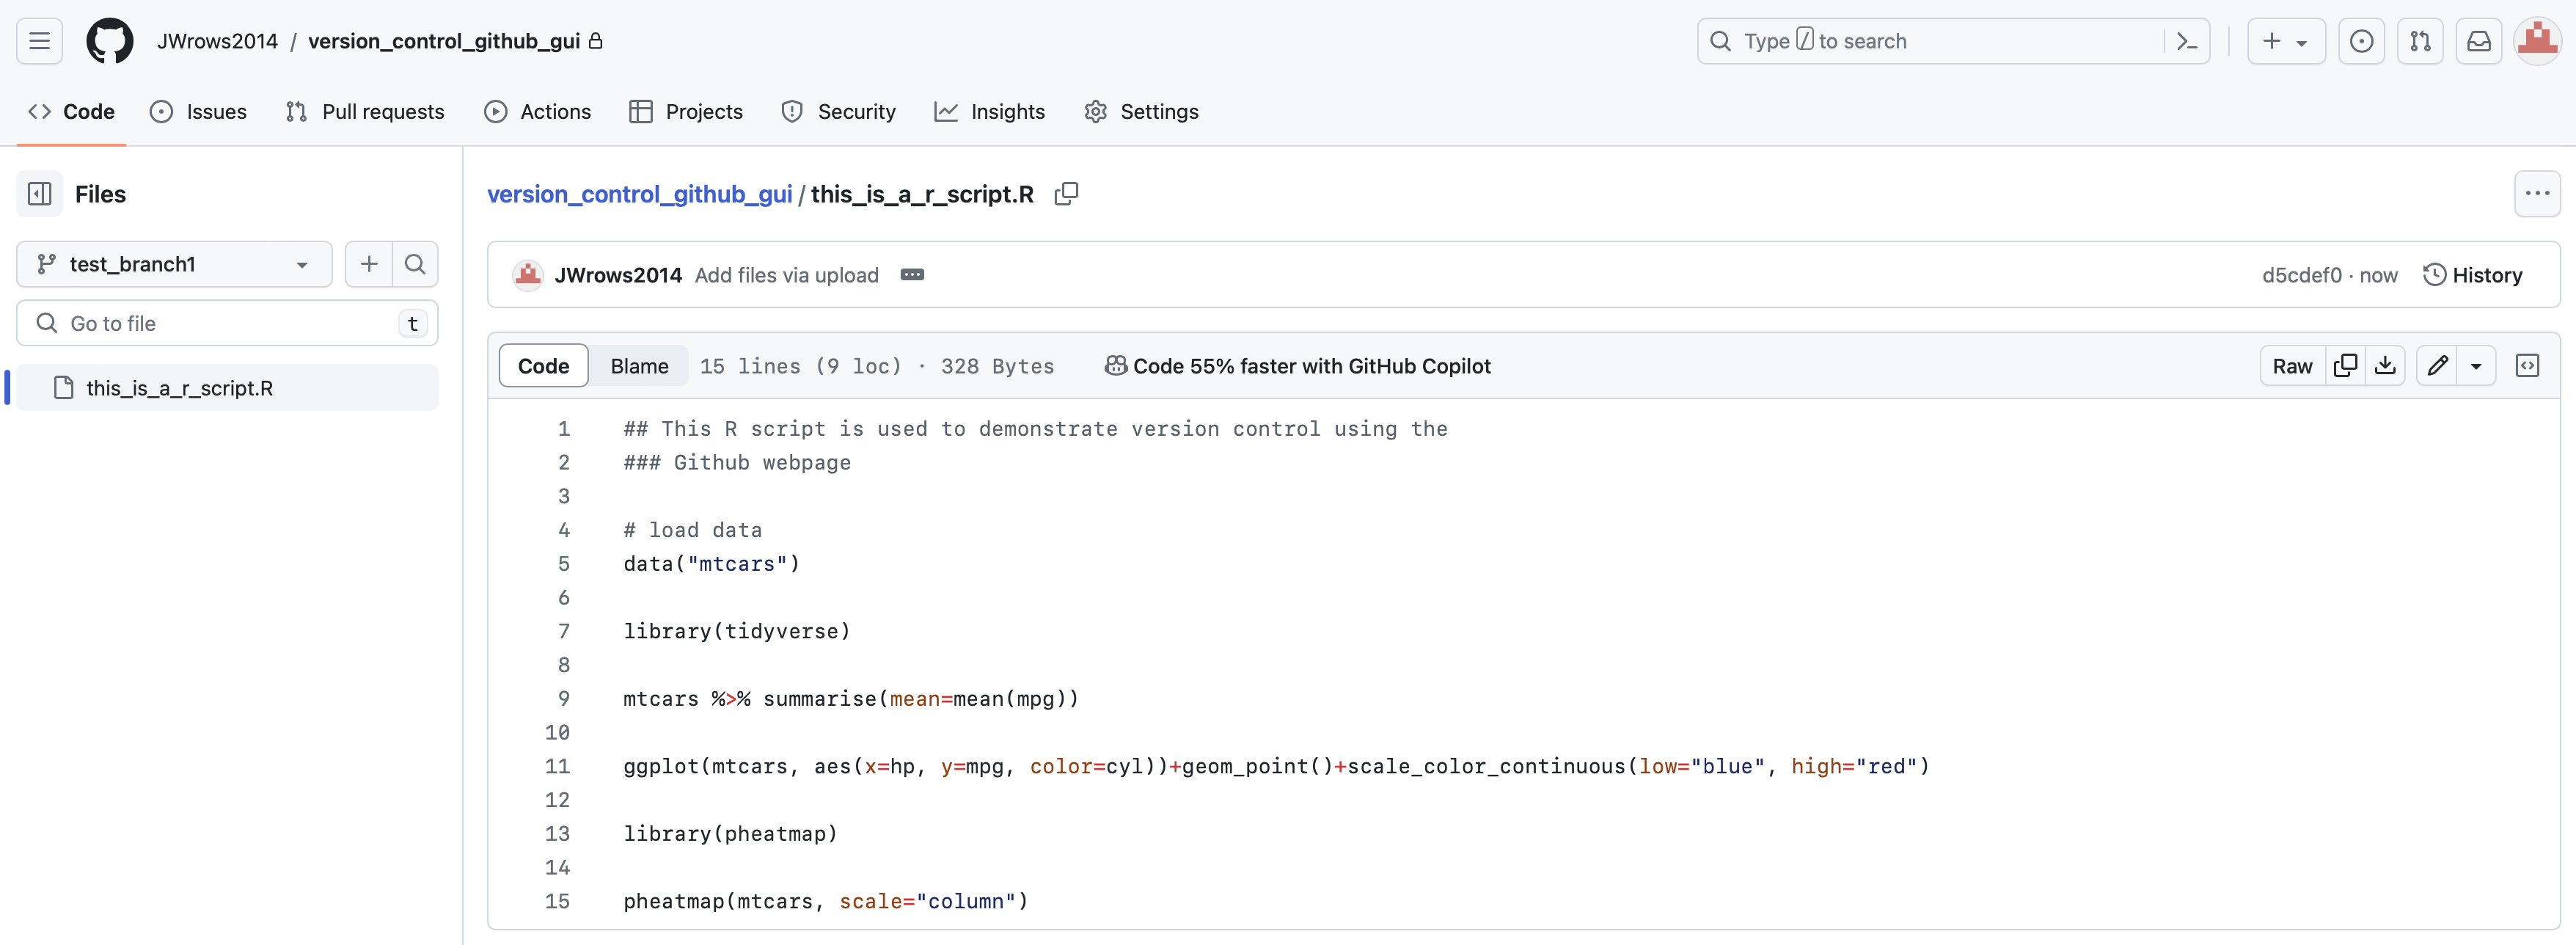
Going back to the repository and clicking on the script will reveal the additions to the script in test_branch1, which are not in the script on the main branch.
The repository view indicates that test_branch1 is one commit ahead of the main branch because the additions to this_is_a_r_script.R has not been pushed to main yet.
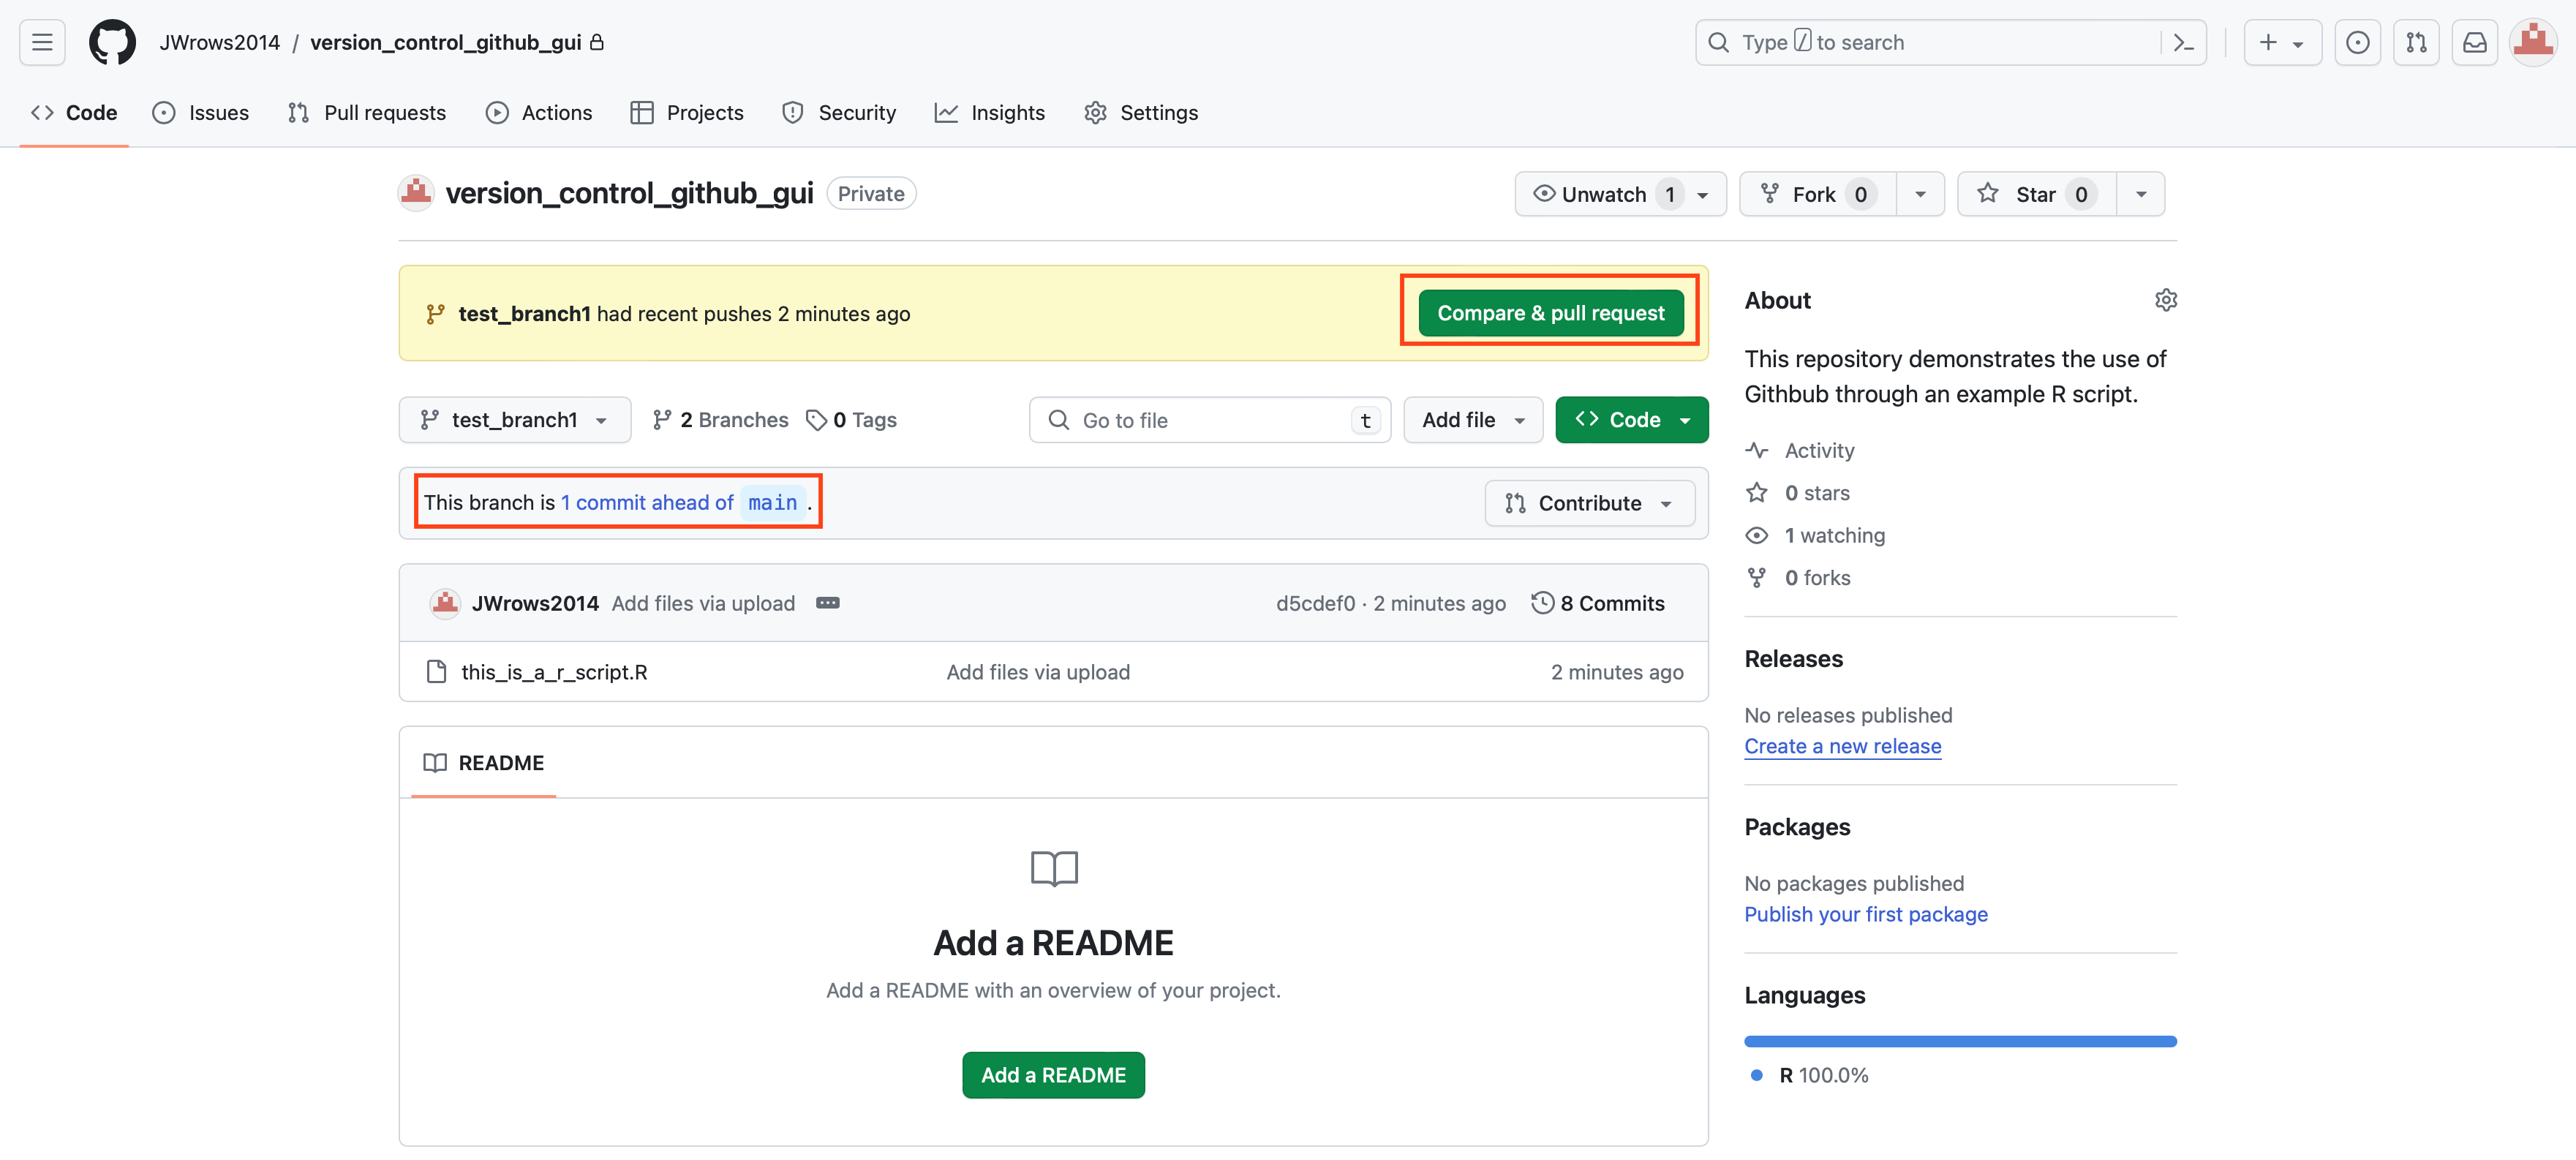
Clicking on the "1 commit ahead of main" link will pull up the comparison between the script in the main branch and that in test_branch1.
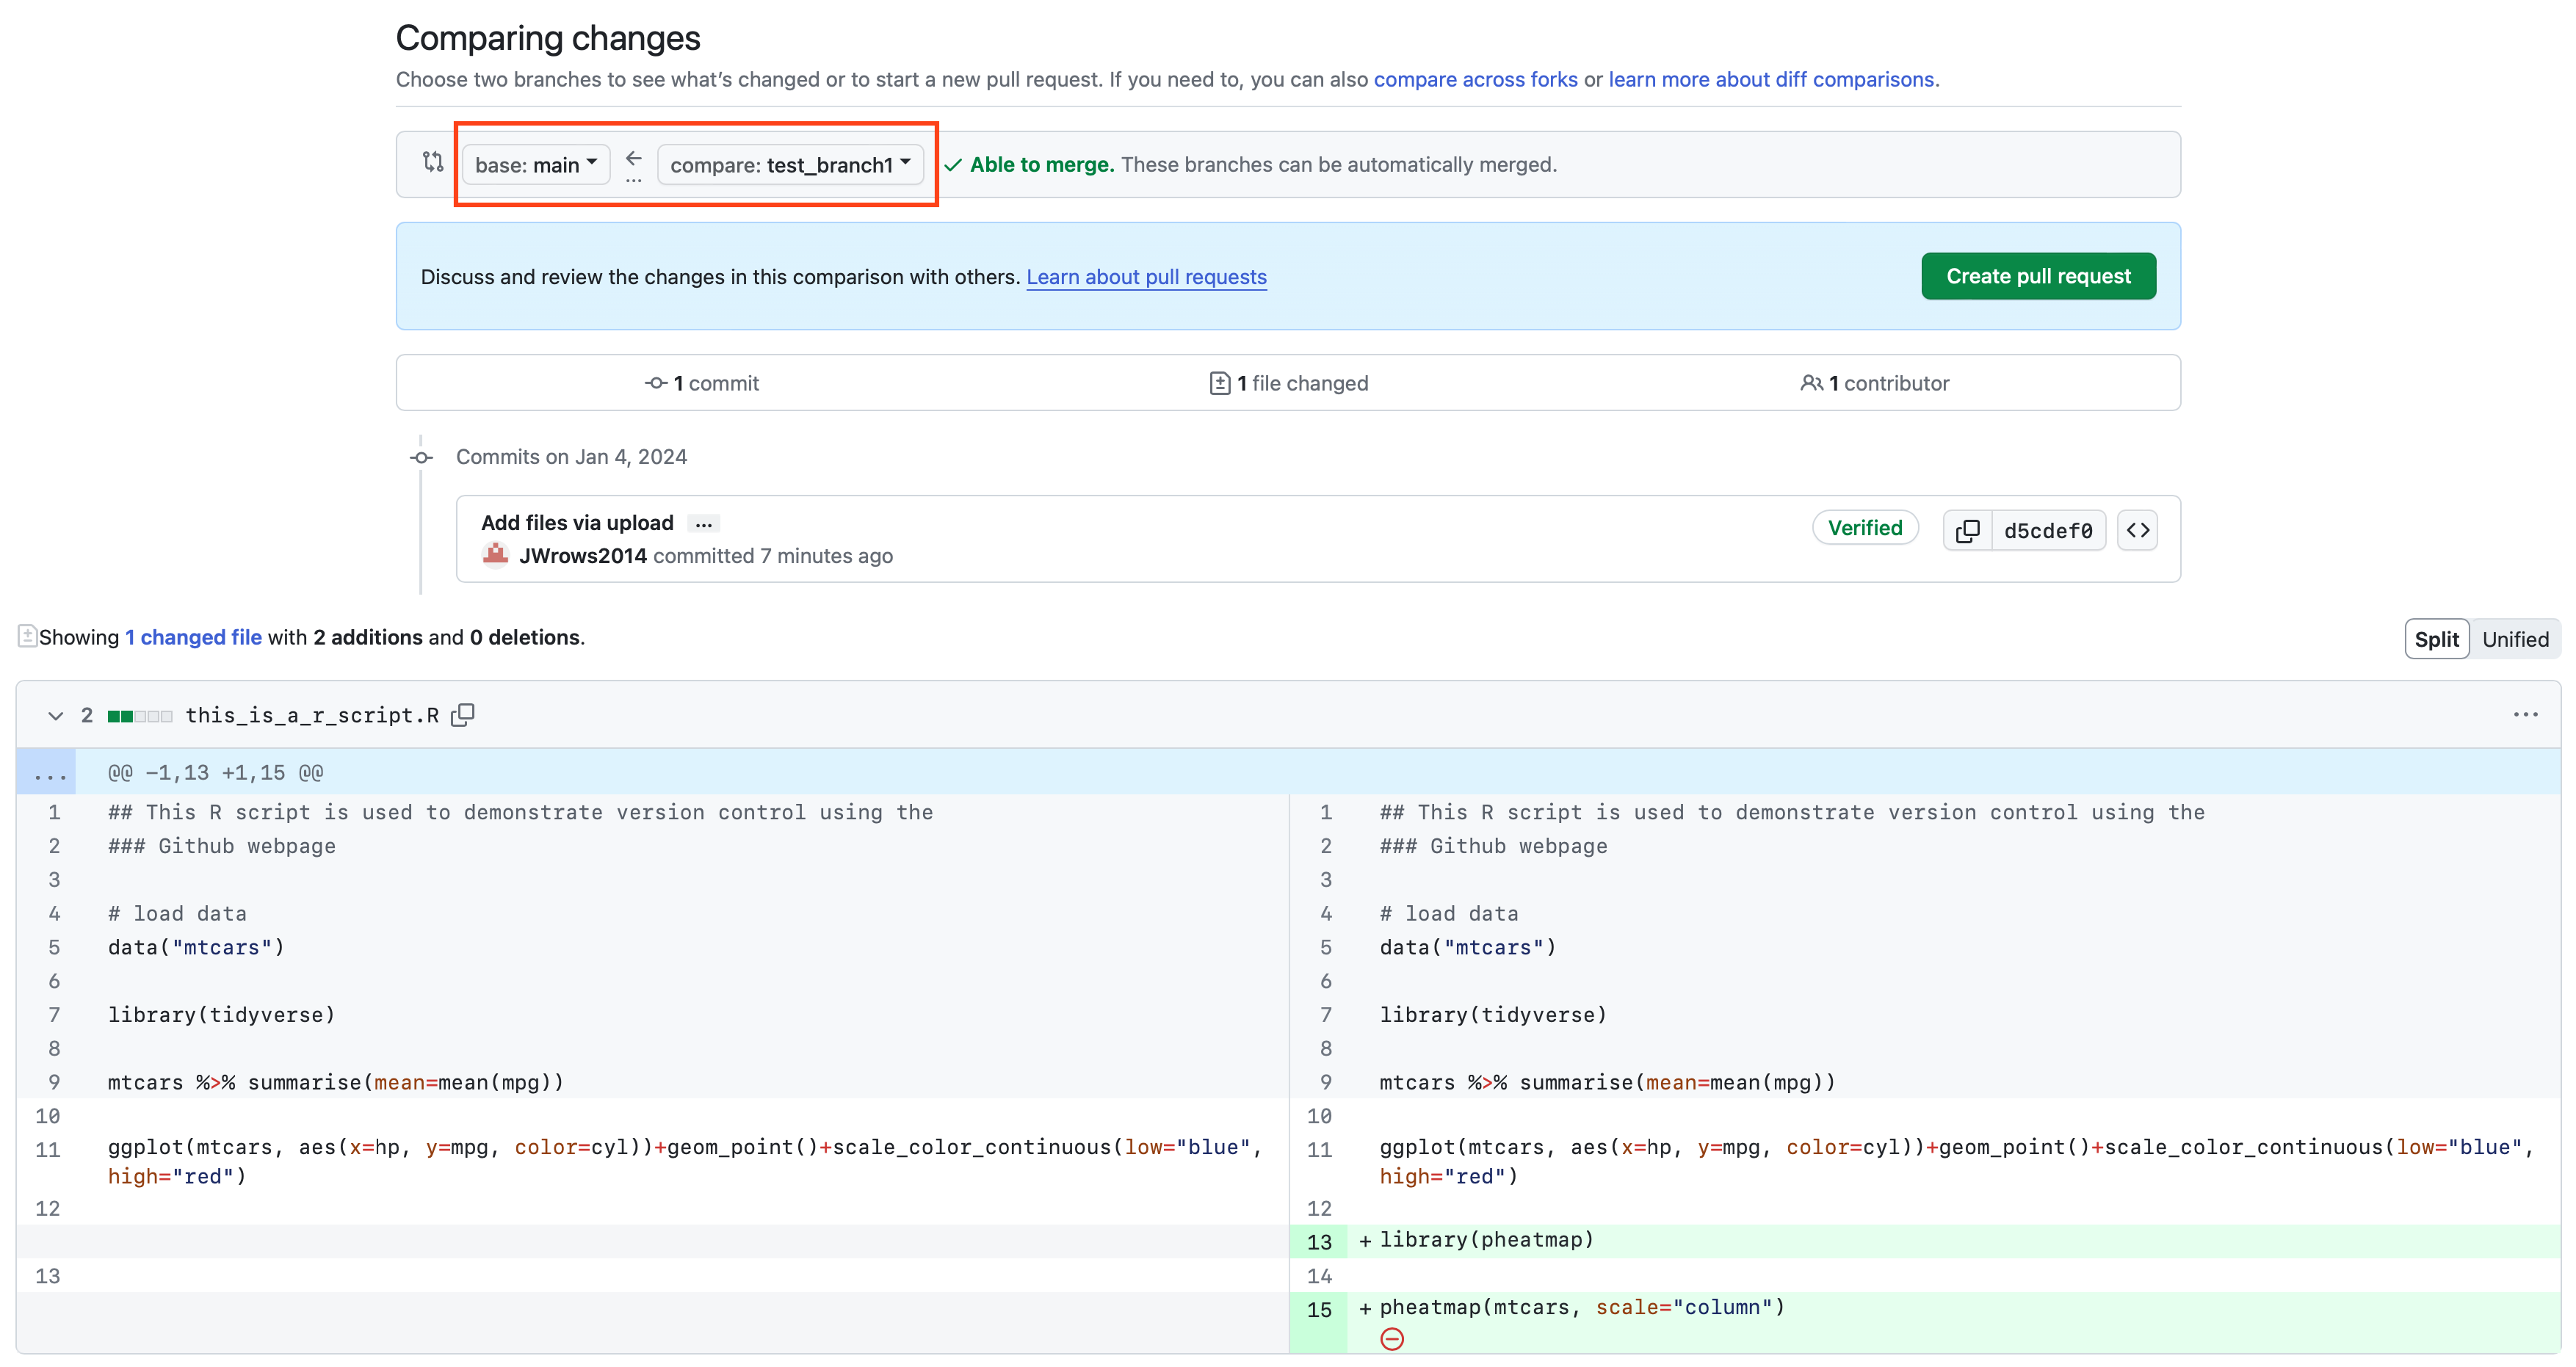
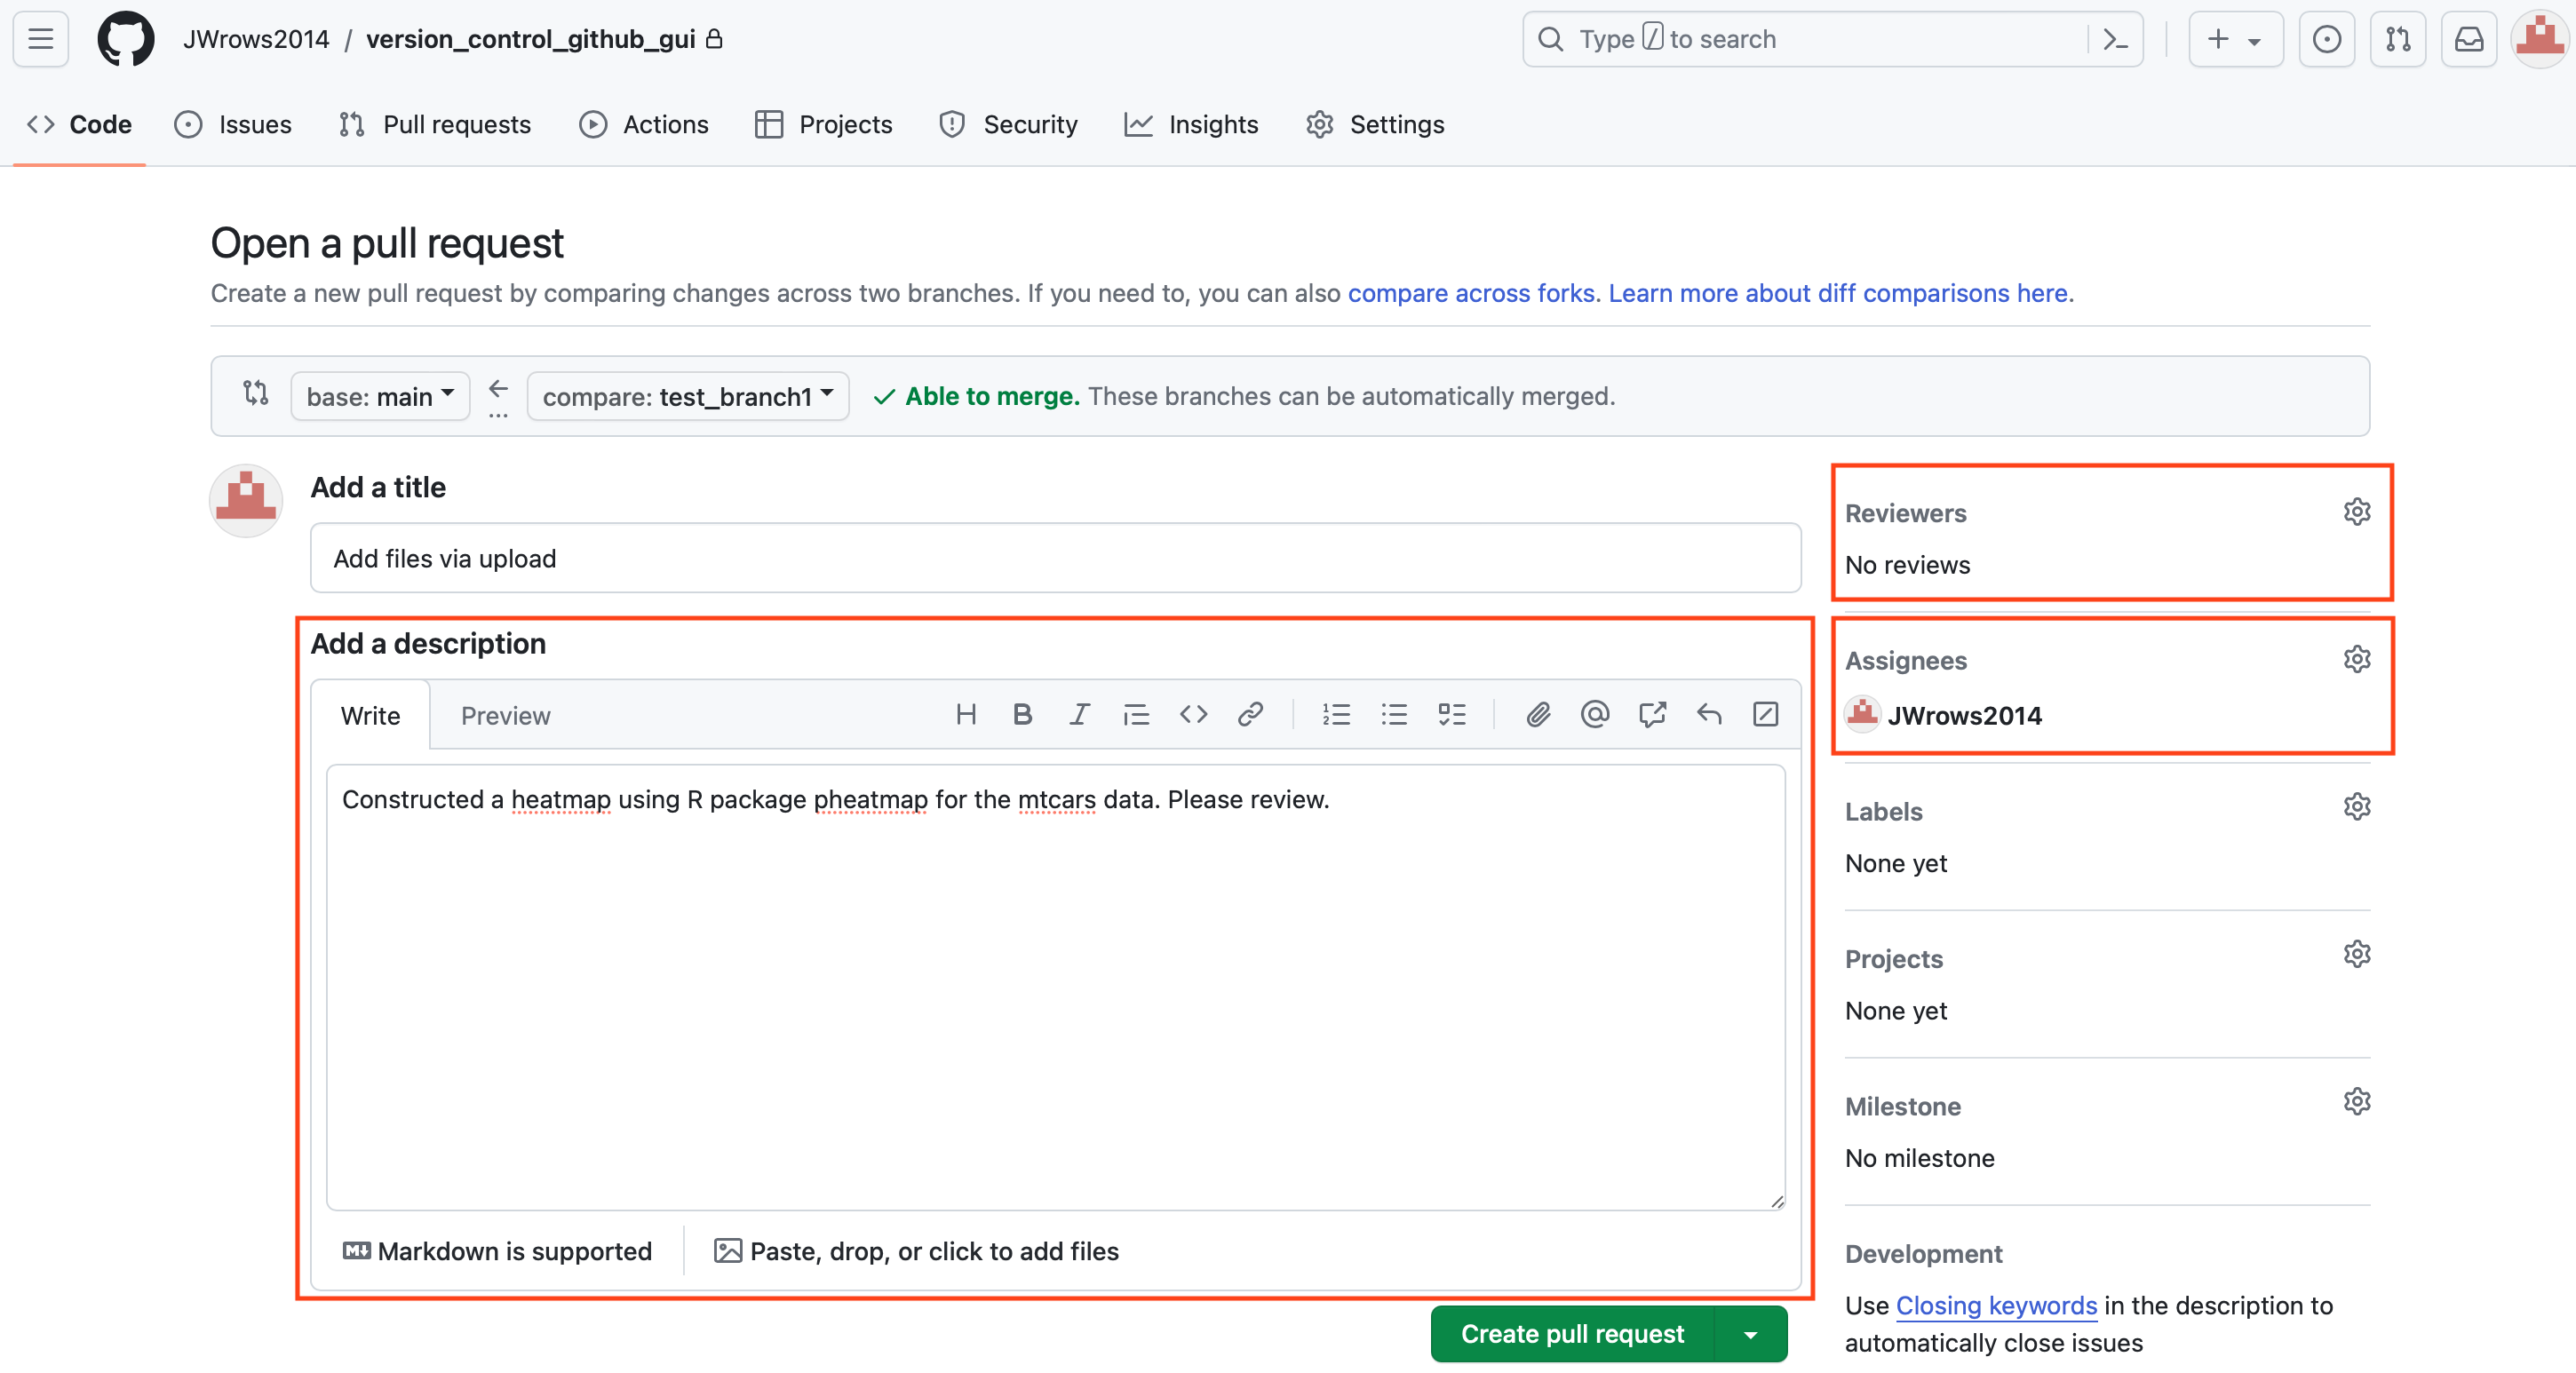
Because the addition of the heatmap for the mtcars data was added to the script in test_branch1, it should ideally be added back to the main branch of the repository once the changes are acceptable by individual or team standards. Create a pull request by clicking on the green "Create pull request" button in the comparison page shown in the previous image. At the subsequent page, users can add a description for the pull request and add reviewers as well as assignees. Click on the green "Create pull requst" icon when done.
At the pull request page, users can view conversations, compare changes by clicking on the "Files changed" tab, and add comments. The green "Open" icon indicates that the pull request status is open and adjacent to it is a message indicating there is 1 commit to merge to the main branch from test_branch1. Users can also request approval from reviewers before merging. But if ready, click on the green "Merge pull request" button and the user will be asked to confirm.
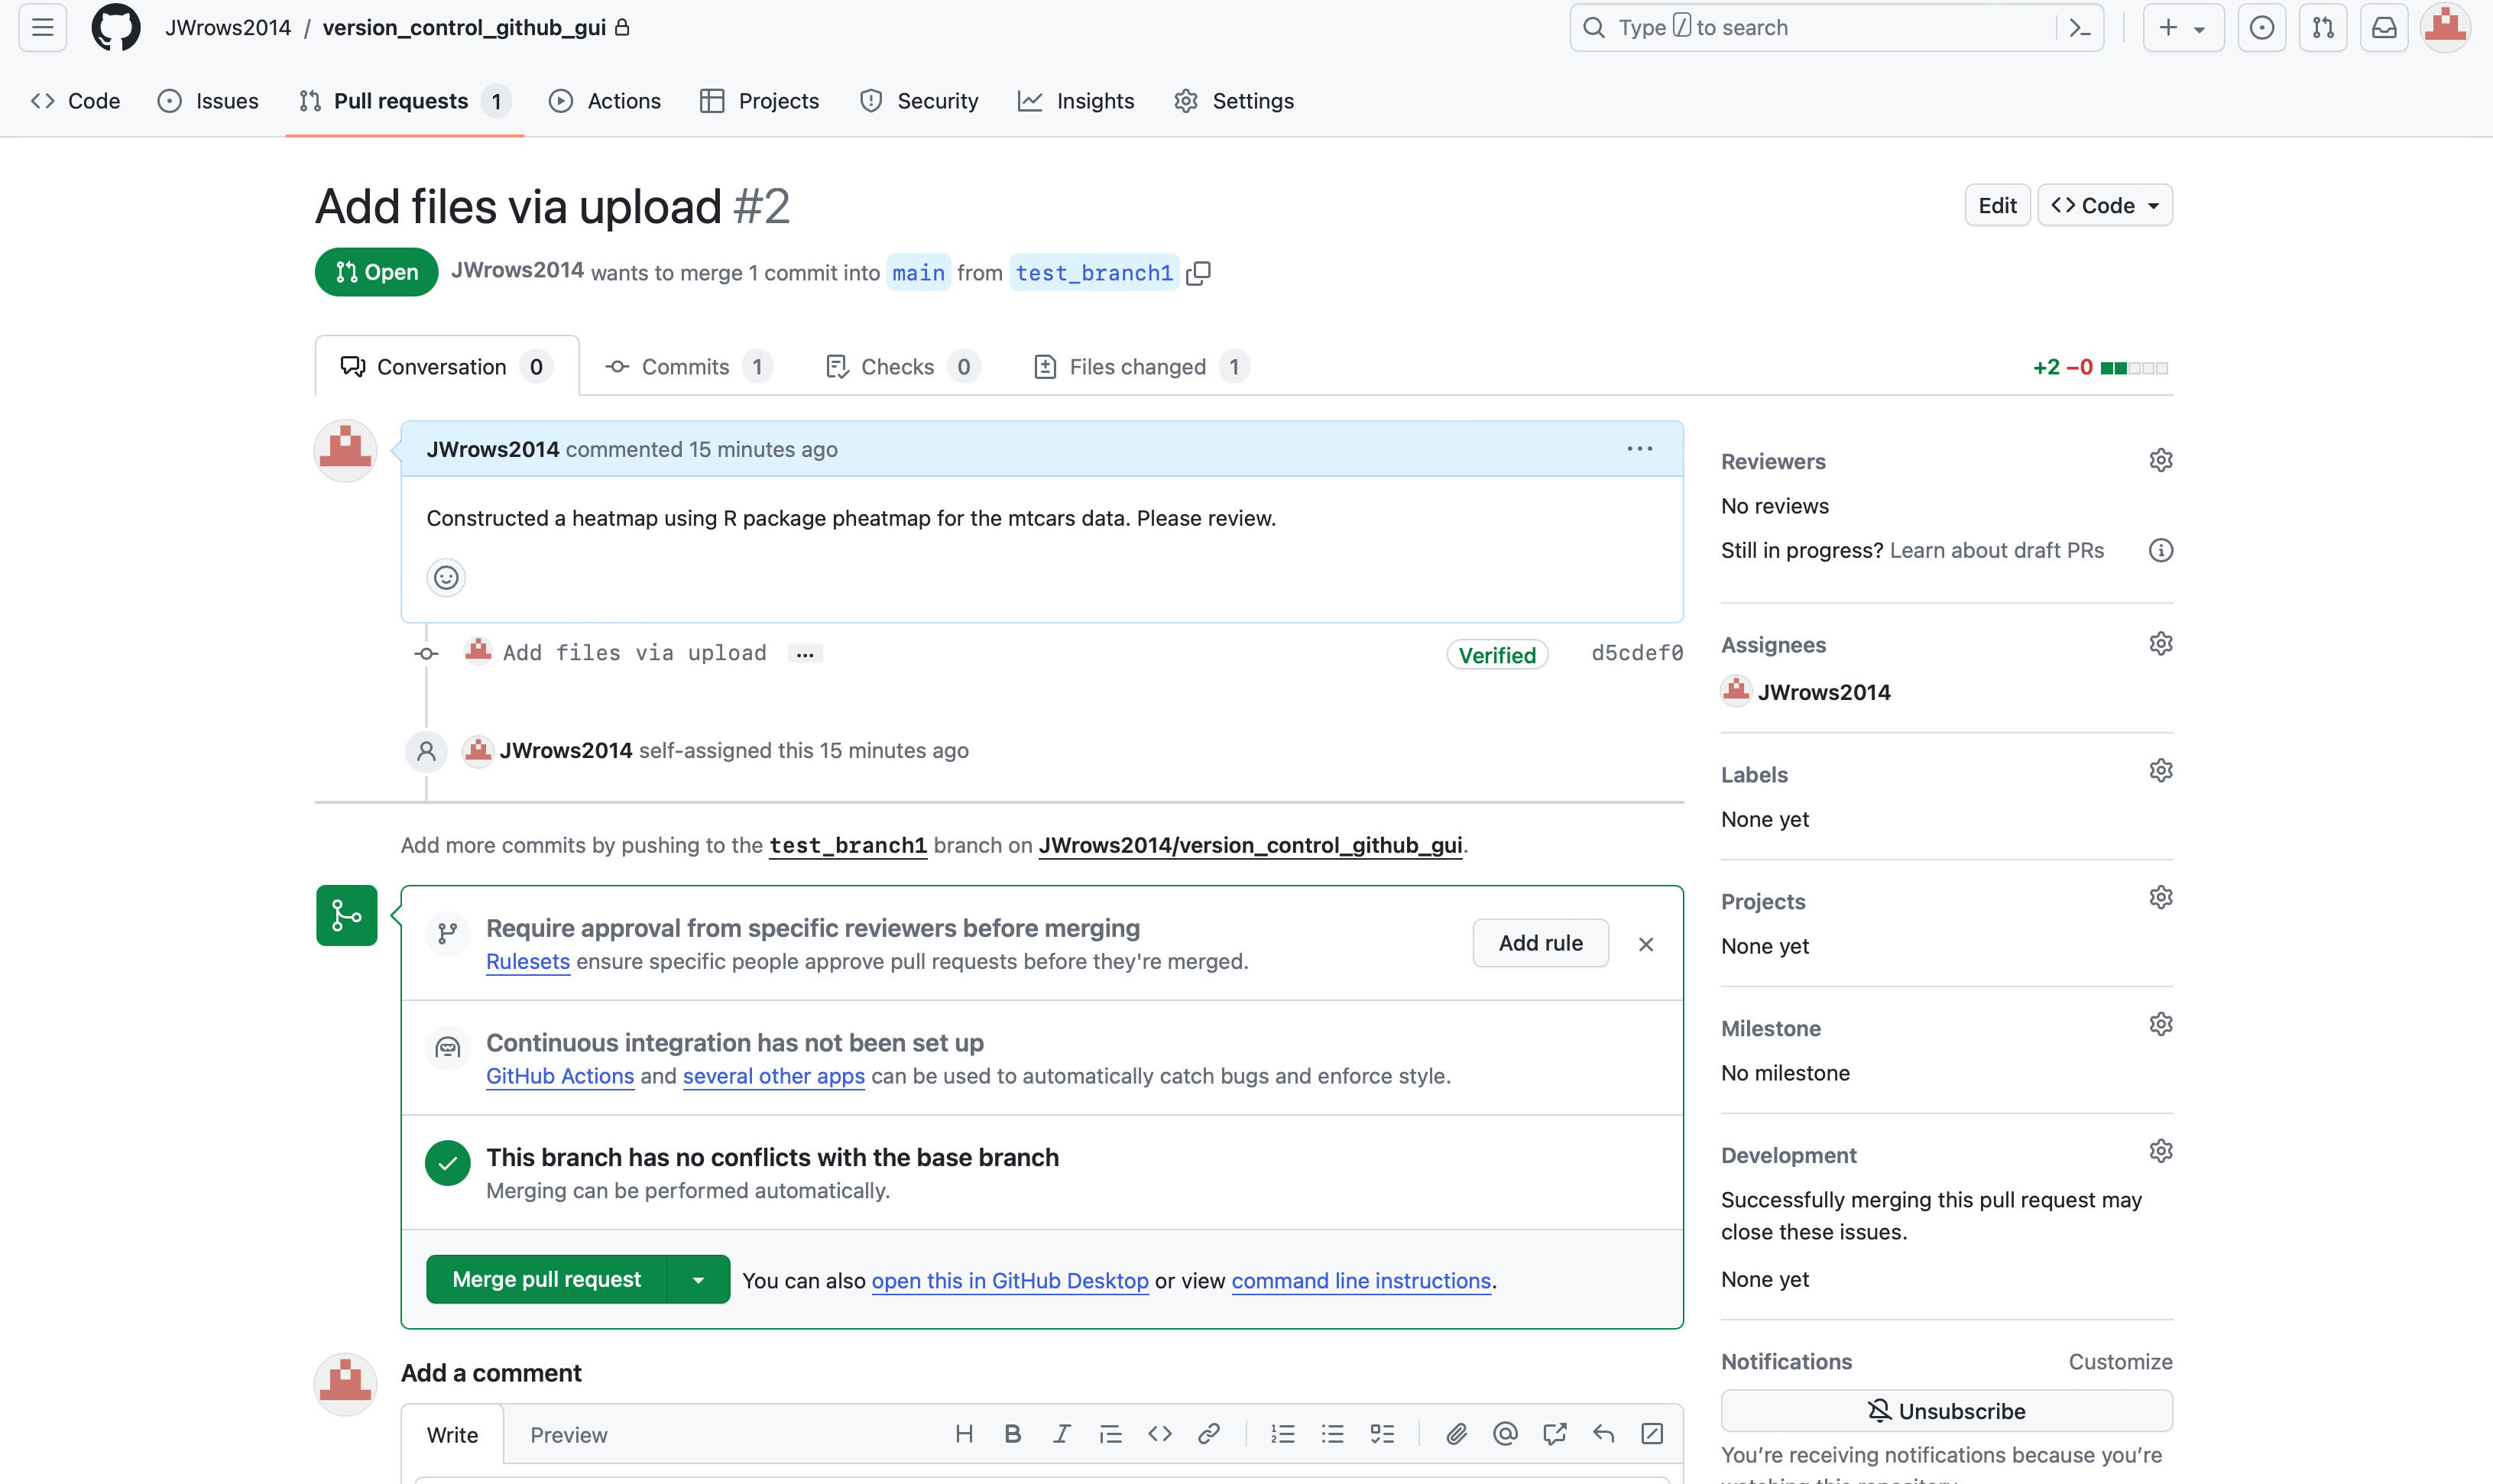
The pull request will be closed if the merge is successful.

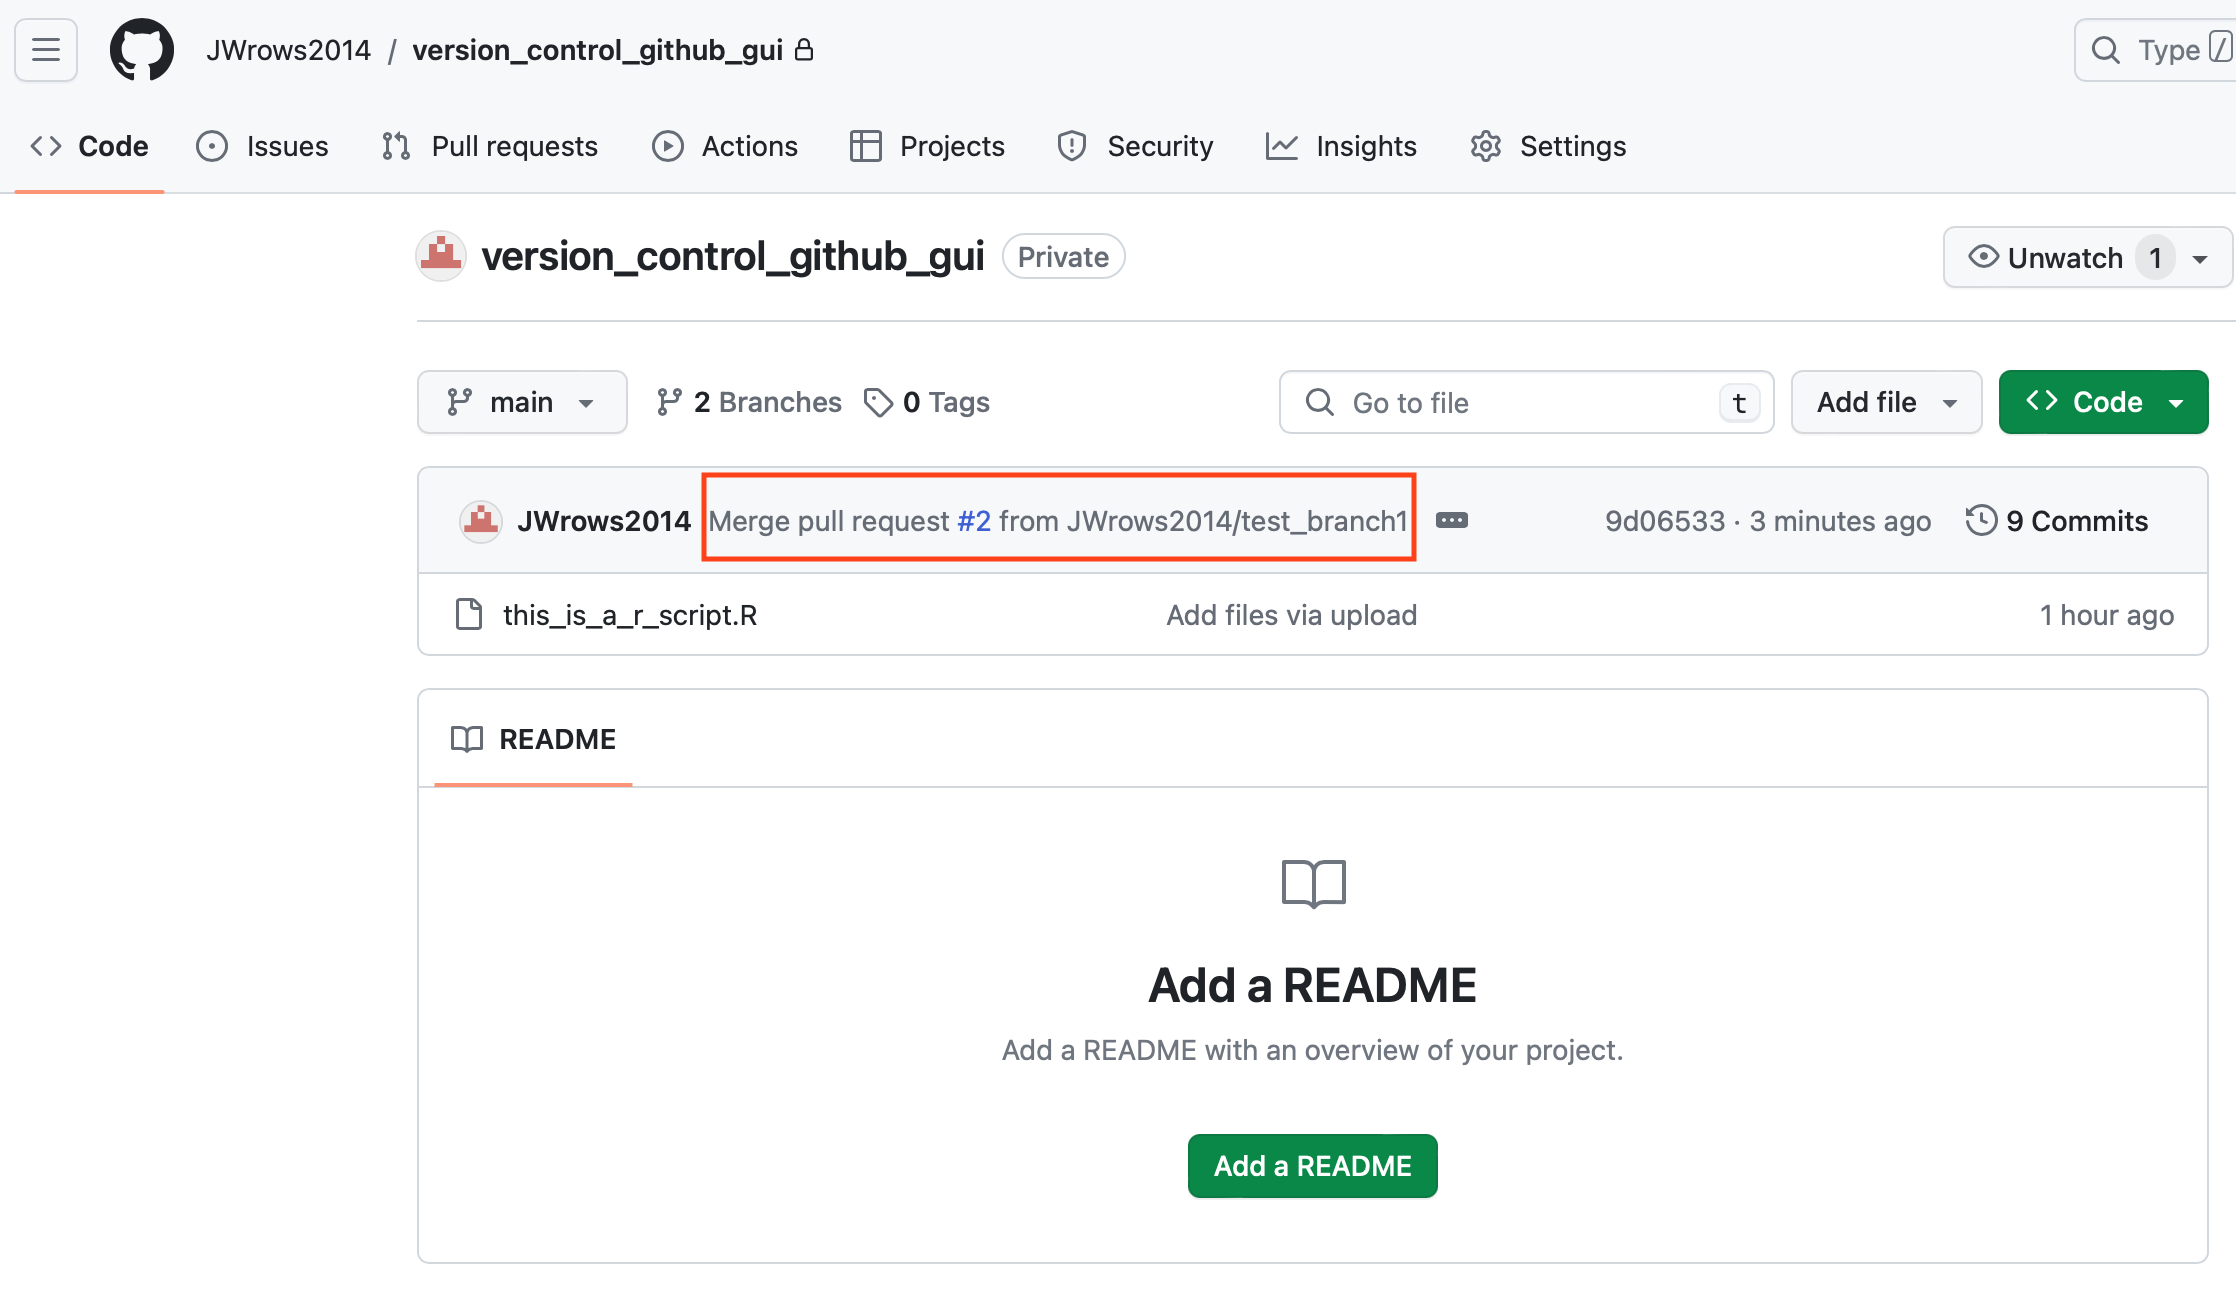
In the respository view, the main branch will now have a message that says a pull request was merged from test_branch1. Clicking on the this_is_a_r_script.R will reveal the updated code.
Versioning using Git command line
Definition
"Git is a distributed version control system that tracks changes in any set of computer files, usually used for coordinating work among programmers who are collaboratively developing source code during software development." -- Wikipedia
Accessing Git
Git installation instructions for computers running Linux, MacOS, or Windows can be found at https://git-scm.com/book/en/v2/Getting-Started-Installing-Git. Windows users can also consider Git BASH as it can be used to ssh in to remote computers like Biowulf, the high performance computing cluster at NIH.
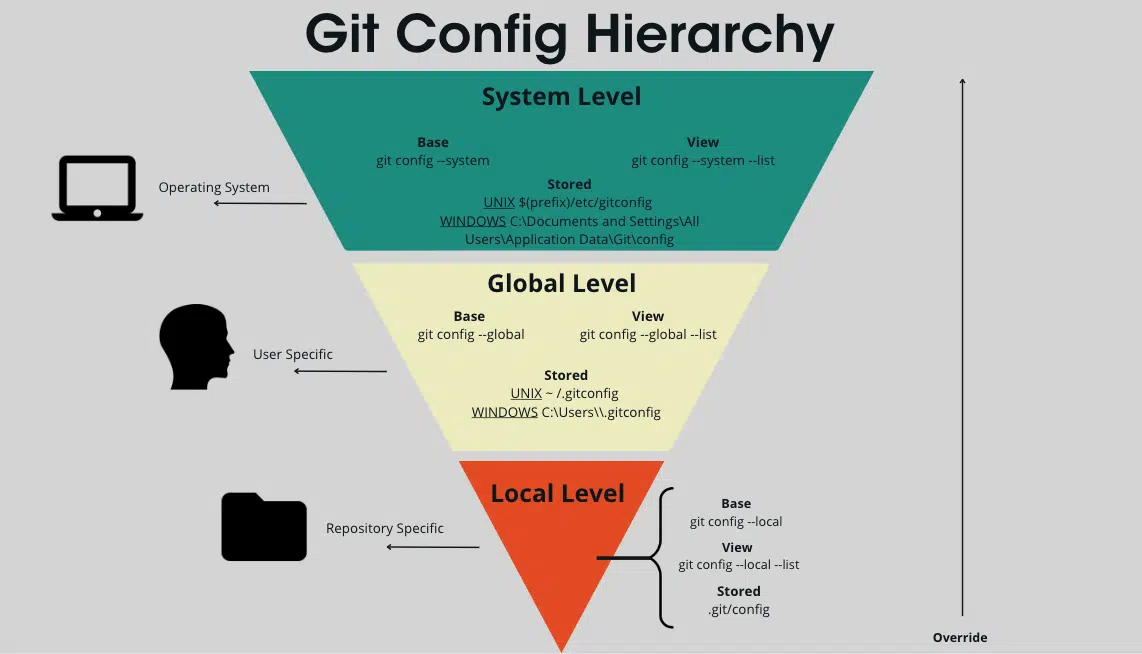
Configuration hierarchy
Create new Git repository
Use git init followed by the folder name to initiate a new Git project. For instance, this exercise will create a new Git project called version_control_git_cli.
git init version_control_git_cli
Using ls to list directory content will reveal a new folder called version_control_git_cli. It is possible to initiate a git repository for an existing folder.
ls -al
drwxr-xr-x 3 wuz8 NIH\Domain Users 96 Jan 8 15:07 version_control_git_cli
When developing code, expect a lot of changes and iterations. As defined in the versioning with GitHub section in this class document, a branch enables users to test new ideas without affecting the content of main repository. Then when done, the new developments maybe merged back into the main repository. By default, the git init command names the main branch is "master". This can be changed through global configurations or using git branch -m followed by new name of the branch.
hint: Using 'master' as the name for the initial branch. This default branch name
hint: is subject to change. To configure the initial branch name to use in all
hint: of your new repositories, which will suppress this warning, call:
hint:
hint:   git config --global init.defaultBranch <name>
hint:
hint: Names commonly chosen instead of 'master' are 'main', 'trunk' and
hint: 'development'. The just-created branch can be renamed via this command:
hint:
hint:   git branch -m <name>
Change into version_control_git_cli.
cd version_control_git_cli
git branch -m main
Set up repository specific configuration
The code below will set the configurations specific to the version_control_git_cli repository. Replace "Your name" and "your@email.com" with actual credentials. For this demonstration, GitHub credentials will be used.
git config --local user.name 'Your Name'
git config --local user.email 'your@email.com'
To view local configuration, use git config --local list.
The .git folder
List the contents of the version_control_git_cli folder. Upon initiating the repository, the folder .git will appear. This folder has all the information needed for versioning (see https://stackoverflow.com/questions/29217859/what-is-the-git-folder).
ls -al
drwxr-xr-x  3 wuz8  NIH\Domain Users   96 Jan  8 15:07 .
drwxr-xr-x@ 9 wuz8  NIH\Domain Users  288 Jan  8 15:07 ..
drwxr-xr-x  9 wuz8  NIH\Domain Users  288 Jan  8 15:59 .git
Create an empty R script
Create an empty R script called this_is_a_r_script.R.
Creating and connecting to an online repository
Users will want to upload or push the files to an online repository such as GitHub for the purpose of sharing data and code. The example below will use the GitHub command line to create a repository on GitHub and then add a connection to it from local. The command to create a GitHub repository from GitHub command line is gh repo create followed by the name of the repository (ie. version_control_git_cli). The following options are included in the gh repo create construct below.
--private: sets the repository to private, away from public view--source: indicates the folder where the repository content (ie. scripts, data) are located; this is set the "." to denote the here in the current directory, which should be version_control_git_cli--remote: specify the name in which to reference the URL for the online repository on GitHub; this is set to version_control_git_cli
gh repo create version_control_git_cli --private --source=. --remote=version_control_git_cli
✓ Created repository JWrows2014/version_control_git_cli on GitHub
✓ Added remote https://github.com/JWrows2014/version_control_git_cli.git
The repository version_control_git_cli should now be available on GitHub with https://github.com/JWrows2014/version_control_git_cli as the URL.
The git remote command is used to manage connections to online repositories. Adding the -v option to this command will show the remote connections including name and URL.
git remote -v
version_control_git_cli https://github.com/JWrows2014/version_control_git_cli.git (fetch)
version_control_git_cli https://github.com/JWrows2014/version_control_git_cli.git (push)
Committing changes
Changes to a coding project (including scripts, data, and other content) should be saved periodically, similar to clicking on the "save" button to periodically save changes when constructing a word document. This is process is known as "commit" in Git. To learn more about commit, refer to the help documentation.
git commit --help
DESCRIPTION
       Create a new commit containing the current contents of the index and the given log
       message describing the changes. The new commit is a direct child of HEAD, usually
       the tip of the current branch, and the branch is updated to point to it (unless no
       branch is associated with the working tree, in which case HEAD is "detached" as
       described in git-checkout(1)).

       The content to be committed can be specified in several ways:

        1. by using git-add(1) to incrementally "add" changes to the index before using the
           commit command (Note: even modified files must be "added");

        2. by using git-rm(1) to remove files from the working tree and the index, again
           before using the commit command;

        3. by listing files as arguments to the commit command (without --interactive or
           --patch switch), in which case the commit will ignore changes staged in the
           index, and instead record the current content of the listed files (which must
           already be known to Git);

        4. by using the -a switch with the commit command to automatically "add" changes
           from all known files (i.e. all files that are already listed in the index) and
           to automatically "rm" files in the index that have been removed from the working
           tree, and then perform the actual commit;

        5. by using the --interactive or --patch switches with the commit command to decide
           one by one which files or hunks should be part of the commit in addition to
           contents in the index, before finalizing the operation. See the “Interactive
           Mode” section of git-add(1) to learn how to operate these modes.
The first step is to tell Git which files have changes and can be included in the next commit. This is done using the git add command and the process is known as "staging".
git add this_is_a_r_script.R
After all of the files to be included in a commit has been staged, the git commit command be used to save those changes. The -m option will be added to enable inclusion of a commit message to tell the user and collaborators what changes were made.
git commit -m "This is the first commit and includes a blank R script named this_is_a_r_script.R."
[main (root-commit) 2765ace] This is the first commit and includes a blank R script named this_is_a_r_script.R.
 1 file changed, 0 insertions(+), 0 deletions(-)
 create mode 100644 this_is_a_r_script.R
To check on the commit log, do the following. In the results,
- The alpha-numeric "2765ace7ea9b9cdd614844adcbb0210d888ab334" is the commit ID/hash.
- HEAD -> main indicates the commit was to the main branch of the project/repository.
To view the commit history for a project, use the git log command.
git log
commit 2765ace7ea9b9cdd614844adcbb0210d888ab334 (HEAD -> main)
Author: JWrows2014 <wuz8@nih.gov>
Date:   Wed Jan 10 18:51:34 2024 -0500

    This is the first commit and includes a blank R script named this_is_a_r_script.R.
When ready upload to GitHub using git push. In the command construct below
-u: sets upstream and this needs to be done onceversion_control_git_cli: the name used to reference the remote repository from local.main: the branch of the remote repository to push to
Tip
"The --set-upstream option in git push links your local branch to the corresponding remote branch. This means that, in the future, you can just use git pull or git push without specifying the branch. If you remove --set-upstream, the push will work for that instance, but the upstream link won't be set, so you'll need to specify the remote branch in subsequent pulls or pushes for that local branch." -- Ben Jonson
git push -u version_control_git_cli main
Enumerating objects: 3, done.
Counting objects: 100% (3/3), done.
Writing objects: 100% (3/3), 266 bytes | 266.00 KiB/s, done.
Total 3 (delta 0), reused 0 (delta 0), pack-reused 0
To https://github.com/JWrows2014/version_control_git_cli.git
 * [new branch]      main -> main
branch 'main' set up to track 'version_control_git_cli/main'.
To confirm that the commit and upload was successful, check the repository on GitHub. Users can use the GitHub webpage to compare between versions, revert to a previous version, create branches, etc.
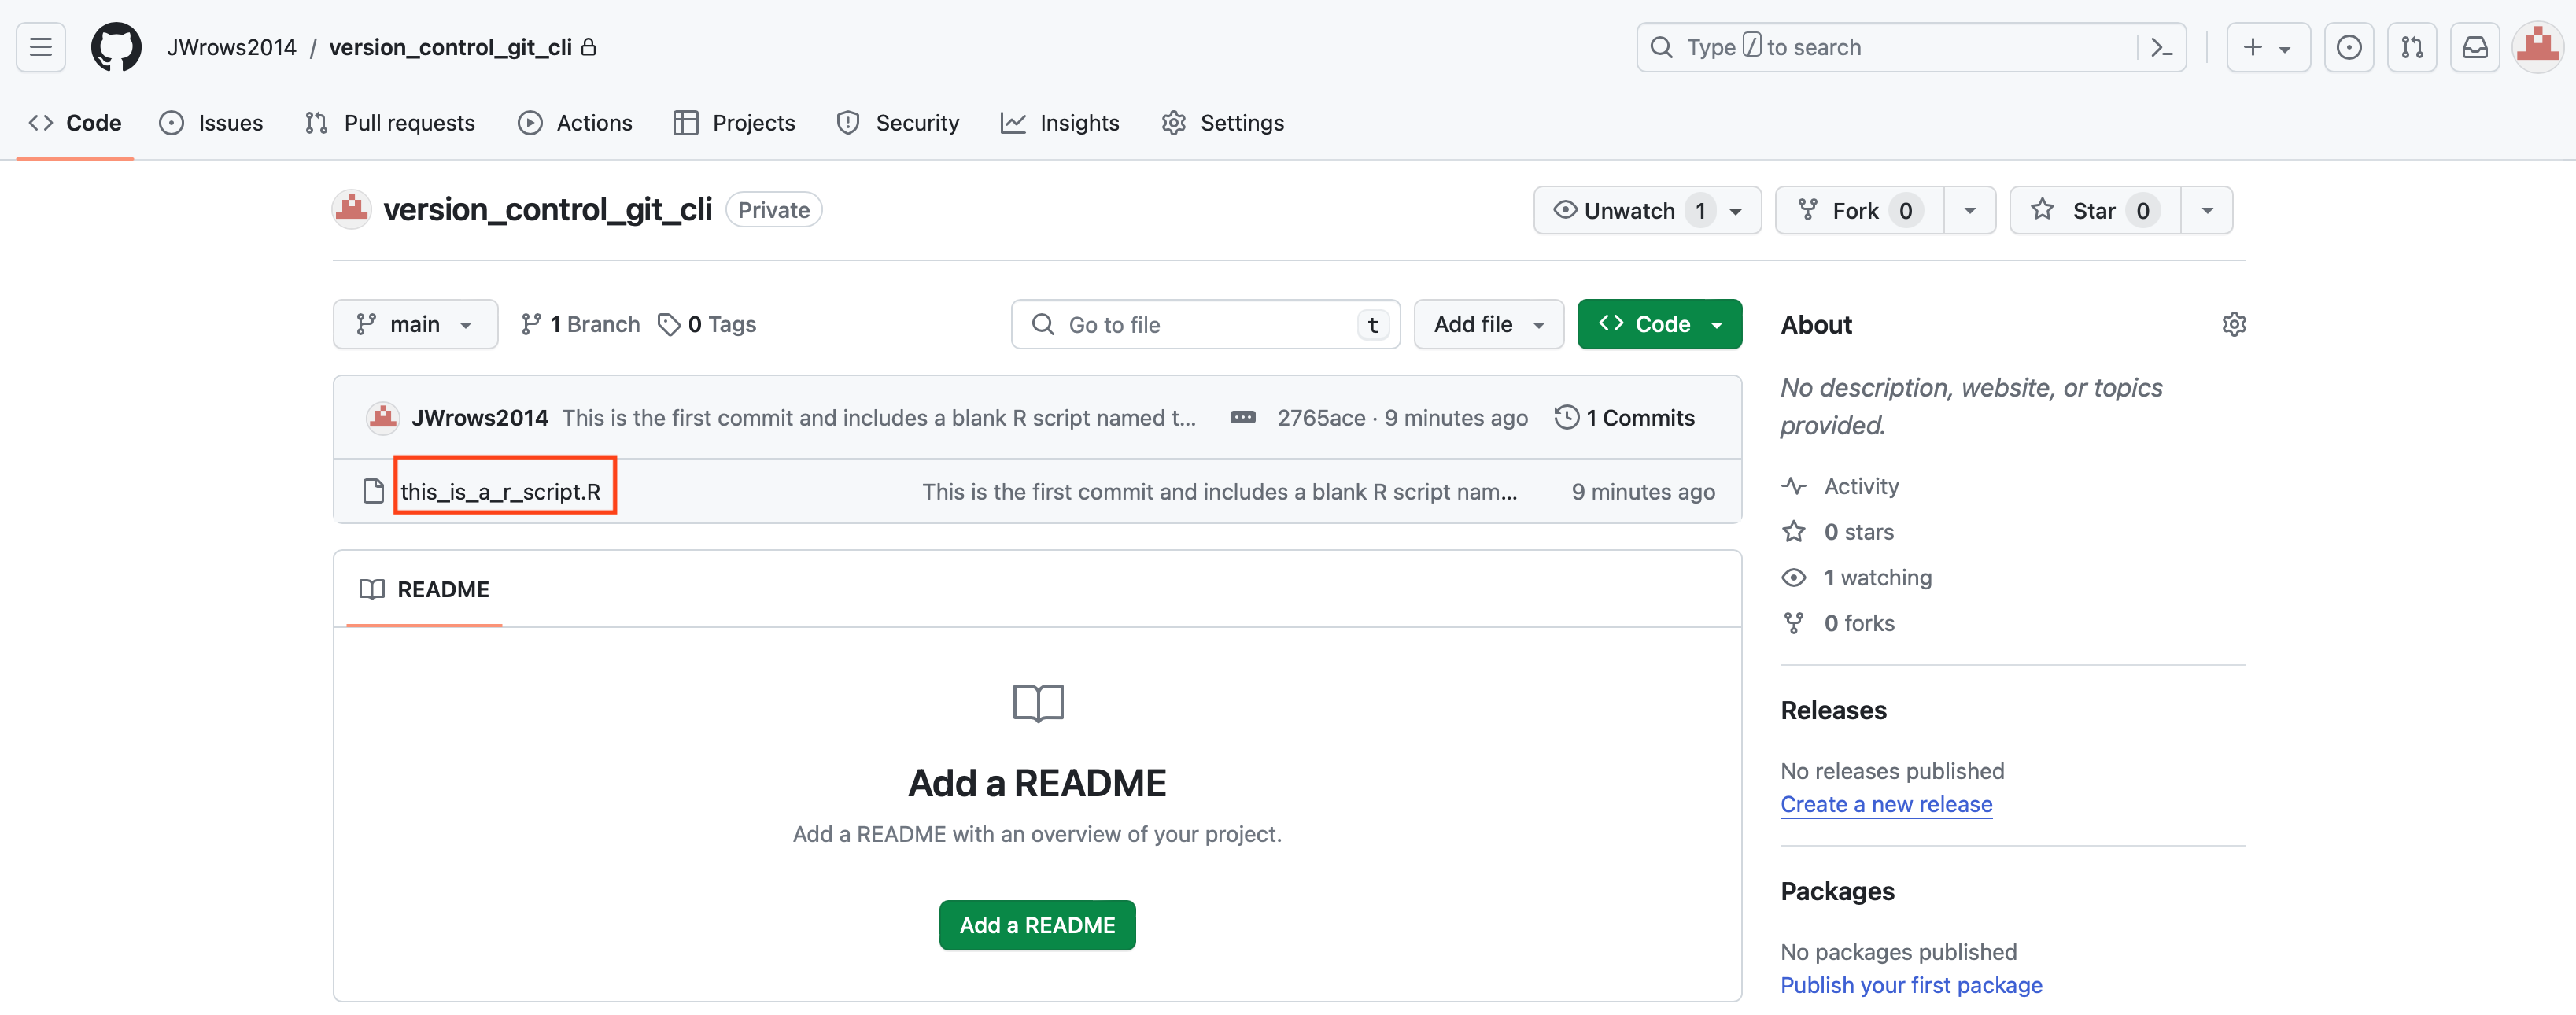
Add the following lines of code in this_is_a_r_script.R, commit the changes, and post to GitHub.
## This R script is used to demonstrate version control using the
### GitHub webpage

# load data
data("mtcars")

library(tidyverse)

mtcars %>% summarise(mean=mean(mpg))

ggplot(mtcars, aes(x=hp, y=mpg, color=cyl))+geom_point()+scale_color_continuous(low="blue", high="red")
Use git add to include this_is_a_r_script.R to the list of files included in the next commit. Alternatively, because there is only one file in the project, the -a option can be used with git commmit to add all files. If there multiple files in a project, users can select which ones to stage for the next commit. The example below will use the -a option with git commit. Further, -m will be used to include a commit message.
git commit -a -m "This commit includes code that loads the mtcars data, Tidyverse package, and create summarization and visualizations of the data."
The commit output indicates that 1 file changed and 11 lines were added (ie. this_is_a_r_script.R has 11 lines of coded added to it).
[main 12223f2] This commit includes code that loads the mtcars data, Tidyverse package, and create summarization and visualizations of the data.
 1 file changed, 11 insertions(+)
Because the new version of the script will be posted to the main branch of the version_control_git_cli repository on GitHub, there is no need to supply the -u option or the branch name.
git push version_control_git_cli
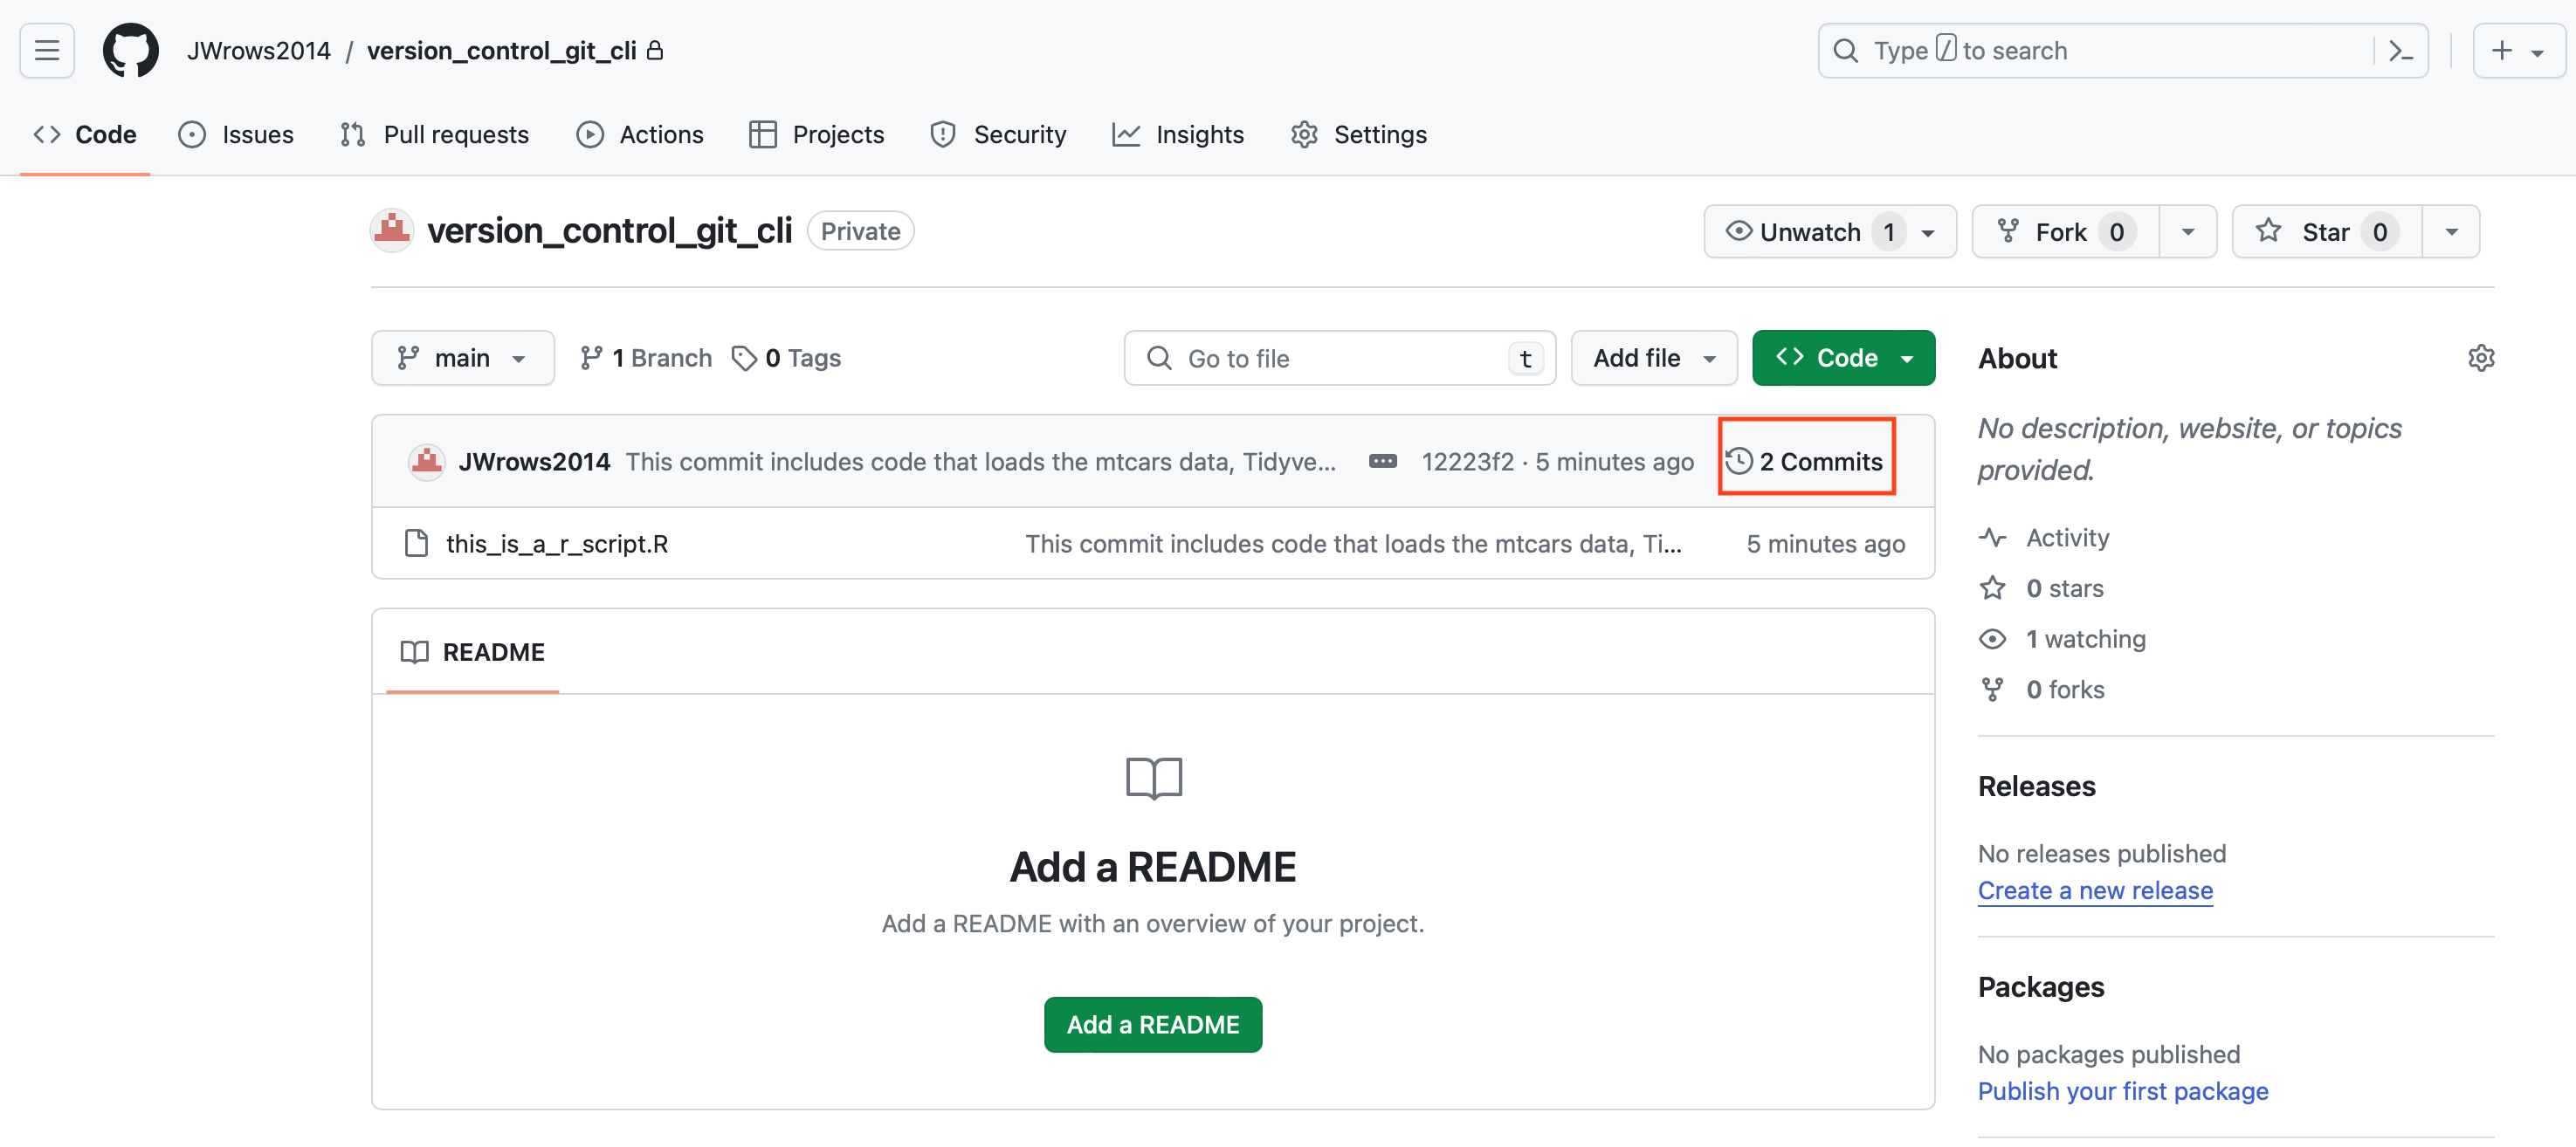
The repository on GitHub now confirms that there are 2 commits.
Check the commit log using the git log command.
commit 8e2b7ff70727b9878e192ebd797603aa9b9b6570 (HEAD -> main, version_control_git_cli/main)
Author: JWrows2014 <wuz8@nih.gov>
Date:   Thu Jan 11 18:24:21 2024 -0500

     This commit includes code that loads the mtcars data, Tidyverse package, and create summarization and visualizations of the data.

commit a1562325254e030c73454c88b9f21849d206374a
Author: JWrows2014 <wuz8@nih.gov>
Date:   Thu Jan 11 18:20:24 2024 -0500

    This is the first commit and includes a blank R script named this_is_a_r_script.R.
Users can also construct a graph showing the commit history by appending the --graph option to git log. Next to the commits, there are a series of "*" (representing commits) and vertical dashes connecting the commits. As such, users can trace the commit history of a project.
* commit 8e2b7ff70727b9878e192ebd797603aa9b9b6570 (HEAD -> main, version_control_git_cli/main)
| Author: JWrows2014 <wuz8@nih.gov>
| Date:   Thu Jan 11 18:24:21 2024 -0500
|
|     This commit includes code that loads the mtcars data, Tidyverse package, and create summarization and visualizations of the data.
|
* commit a1562325254e030c73454c88b9f21849d206374a
  Author: JWrows2014 <wuz8@nih.gov>
  Date:   Thu Jan 11 18:20:24 2024 -0500

      This is the first commit and includes a blank R script named this_is_a_r_script.R.
Tip
The --abbrev-commit option in git log displays the abbreviated commit ID or hash.
Find difference between versions
For this exercise, the abbreviated commit IDs will be used.
git log --abbrev-commit
commit 8e2b7ff (HEAD -> main, version_control_git_cli/main)
Author: JWrows2014 <wuz8@nih.gov>
Date:   Thu Jan 11 18:24:21 2024 -0500

    This commit includes code that loads the mtcars data, Tidyverse package, and create summarization and visualizations of the data.

commit a156232
Author: JWrows2014 <wuz8@nih.gov>
Date:   Thu Jan 11 18:20:24 2024 -0500

    This is the first commit and includes a blank R script named this_is_a_r_script.R.
The git diff command is used to differentiate between versions. Here, the abbreviated commit ID for version 1 is provided as the first argument and the abbreviated commit ID for version 2 is provided as the second argument.
git diff a156232 8e2b7ff
In the git diff results, the commit referenced by a156232 is denoted as "a" and "-" while that referenced by 8e2b7ff is denoted as "b" by "+". The order in which the commit IDs are entered does not matter. If 8e2b7ff was entered first then the corresponding commit will be denoted as "a" and by "-" instead.
The diff function is comparing the only file in this project, which is this_is_a_r_script.R. The header, which is enclosed by "@@" on both sides summarizes the changes to a file. The header below can be interpreted as follows:
- "-0": indicates the starting line for this_is_a_r_script.R in commit a156232 (this is because commit a156232 corresponds version 1 of this_is_a_r_script.R, which is blank)
- "0": indicates that there were no code in the version of this_is_a_r_script.R corresponding to commit a156232.
- "+1": indicates the starting line for this_is_a_r_script.R in commit 8e2b7ff
- "11": indicates that in there are 11 lines in the version of this_is_a_r_script.R corresponding to commit 8e2b7ff.
- The code for this_is_a_rscript.R is shown next and a "+" next to a line of code indicates it was added to the first version of this_is_a_rscript.R. Lines that both versions of a file have in common will begin with a space, while a line removed from the first version will begin with a "-".
diff --git a/this_is_a_r_script.R b/this_is_a_r_script.R
index e69de29..6a8aba7 100644
--- a/this_is_a_r_script.R
+++ b/this_is_a_r_script.R
@@ -0,0 +1,11 @@
+## This R script is used to demonstrate version control using the
+### GitHub webpage
+
+# load data
+data("mtcars")
+
+library(tidyverse)
+
+mtcars %>% summarise(mean=mean(mpg))
+
+ggplot(mtcars, aes(x=hp, y=mpg, color=cyl))+geom_point()+scale_color_continuous(low="blue", high="red")
Note
See https://stackoverflow.com/questions/2529441/how-to-read-the-output-from-git-diff for an interpretation of the git diff output.
Branches and pulling
Suppose that a colleague added the following line to this_is_a_r_script.R and posted to a new branch called test_branch1 on the GitHub repository for further testing and development.
library(pheatmap)

pheatmap(mtcars, scale="column")
To incorporate the changes for this_is_a_r_script.R posted to test_branch1 on GitHub, the git pull command can be used, which in this example will use git fetch to download the contents from test_branch1 and then merge to and creates a new commit in the local repository's main branch
git pull version_control_git_cli test_branch1
remote: Enumerating objects: 5, done.
remote: Counting objects: 100% (5/5), done.
remote: Compressing objects: 100% (2/2), done.
remote: Total 3 (delta 1), reused 0 (delta 0), pack-reused 0
Unpacking objects: 100% (3/3), 741 bytes | 185.00 KiB/s, done.
From https://github.com/JWrows2014/version_control_git_cli
 * branch            test_branch1 -> FETCH_HEAD
 * [new branch]      test_branch1 -> version_control_git_cli/test_branch1
Updating 0fd9105..0f1f69b
Fast-forward
 this_is_a_r_script.R | 6 +++++-
 1 file changed, 5 insertions(+), 1 deletion(-)
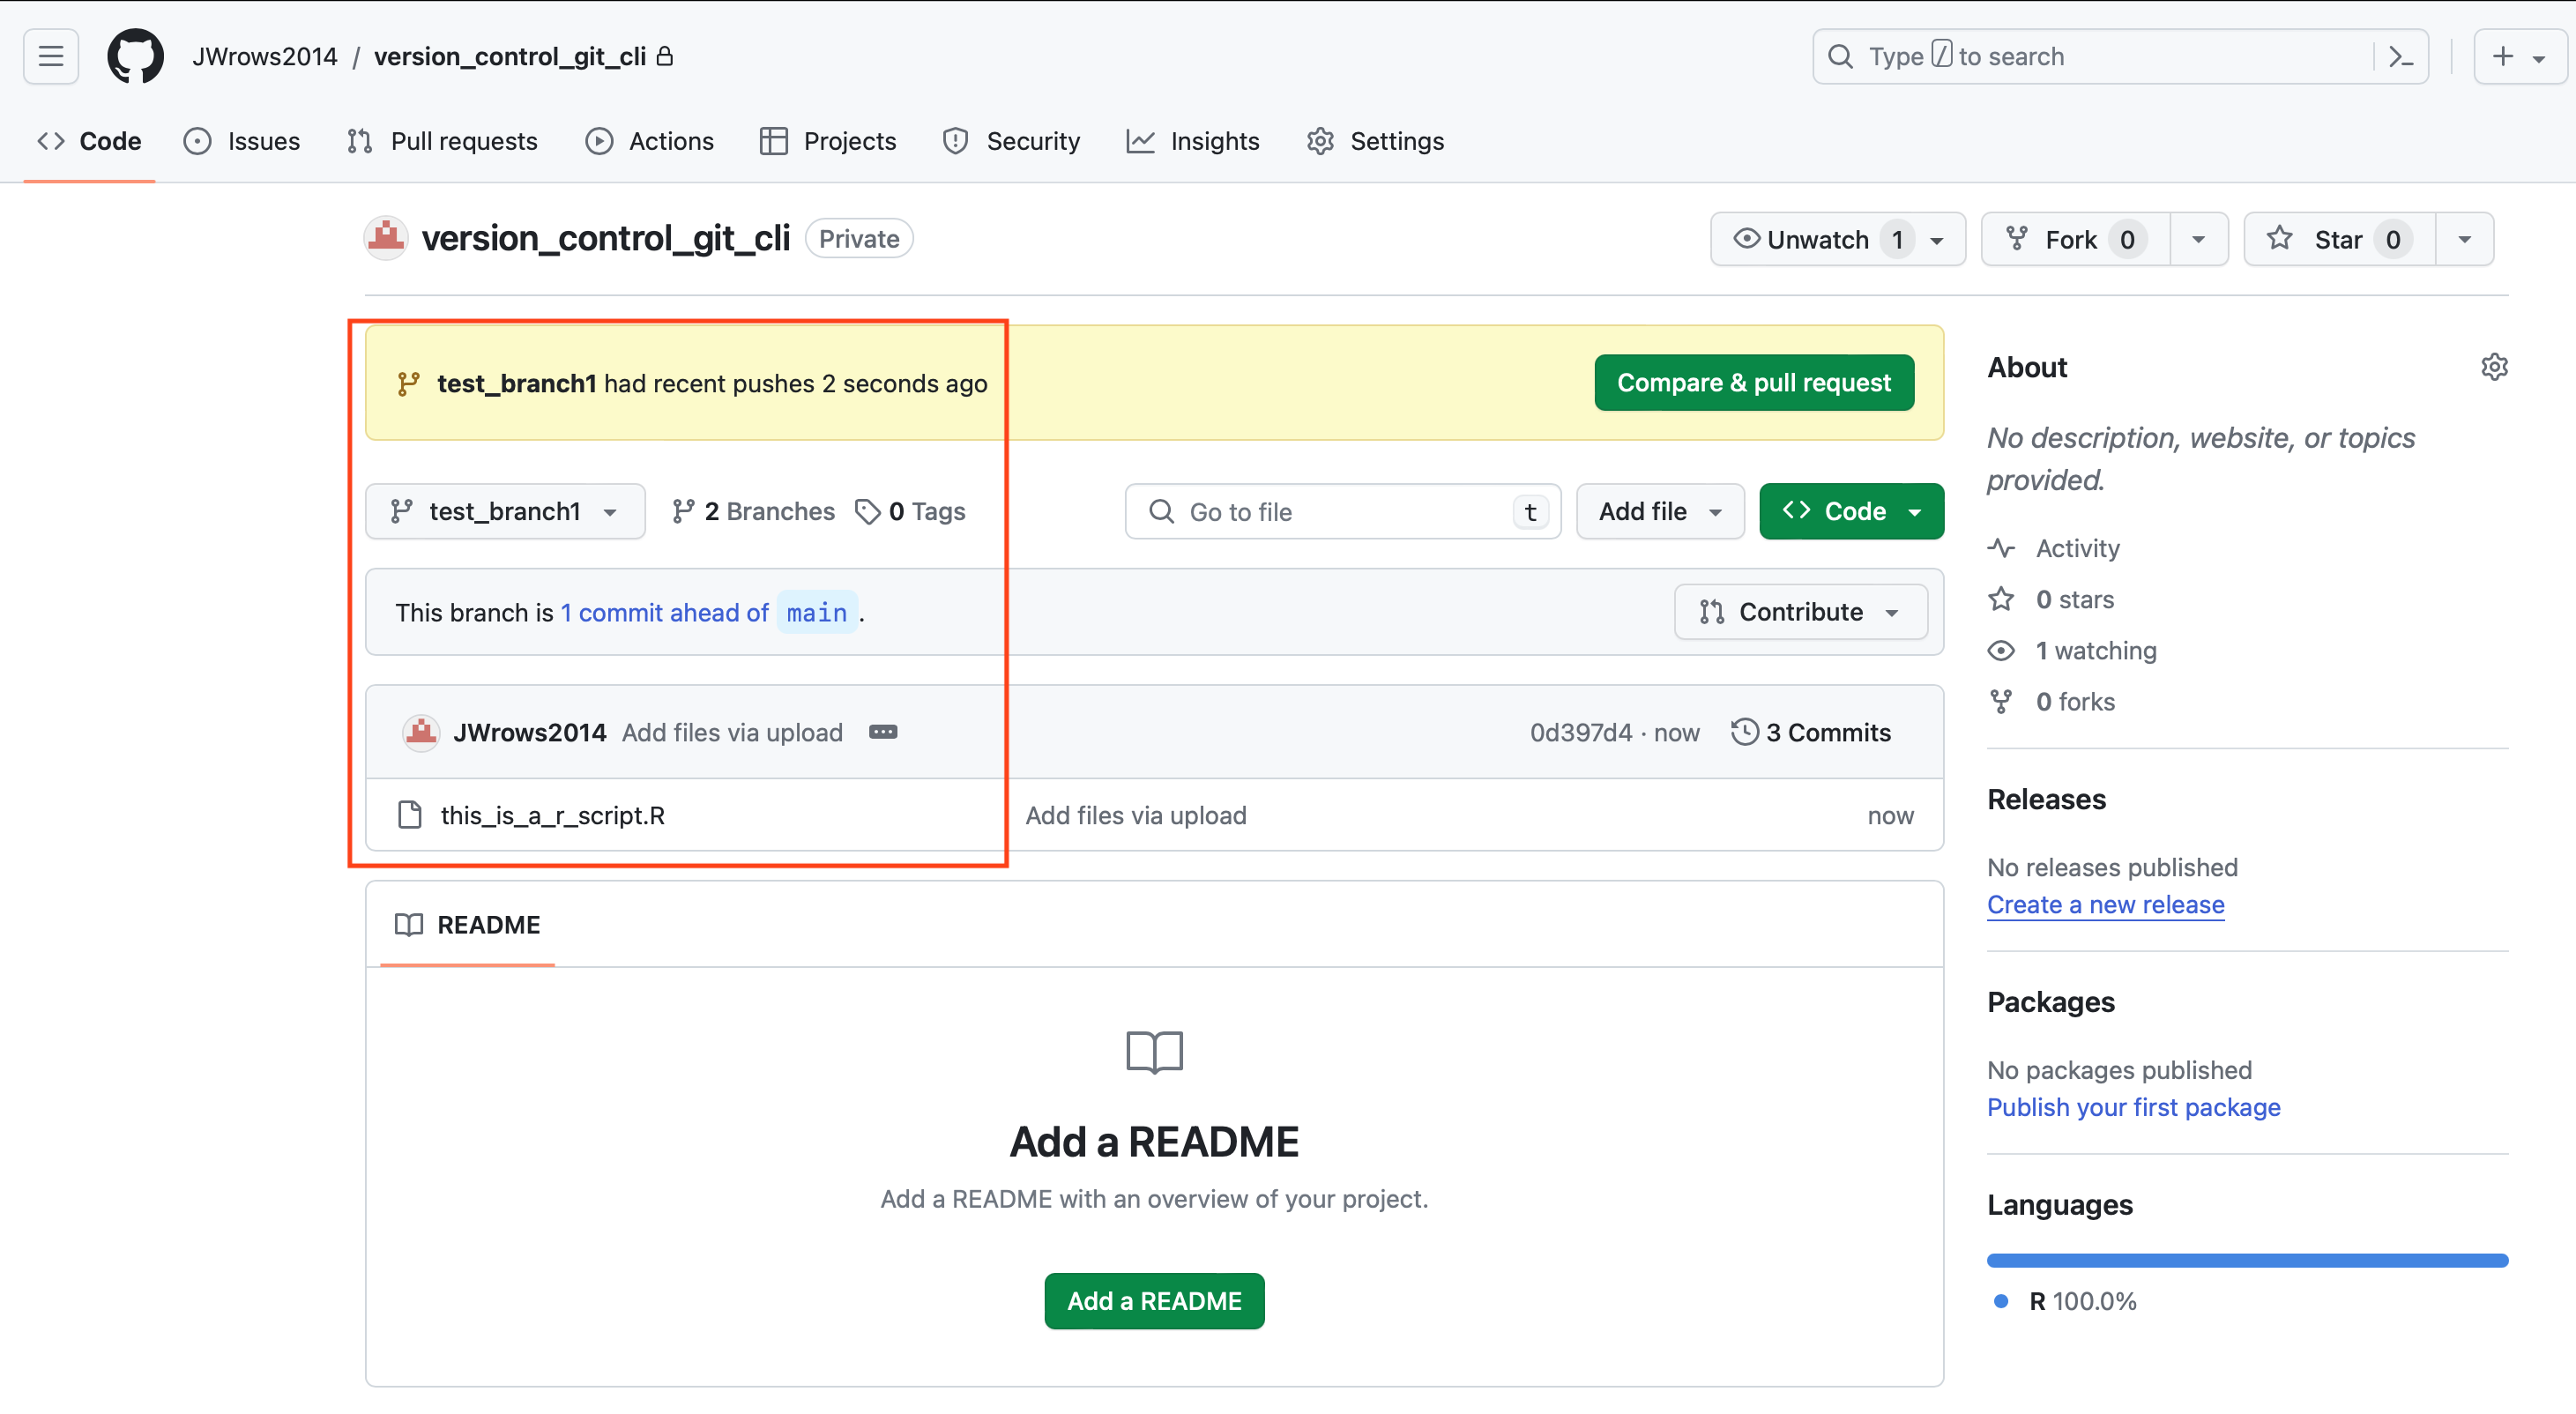
The changes this_is_a_r_script.R has now been added as a new commit in the main branch of the local repository as evident by the results of git log.
git log
commit 0f1f69bb3ed9d49932aaa8486a055f1a01e63a4b (HEAD -> main, version_control_git_cli/test_branch1)
Author: Joe Wu <wuz8@nih.gov>
Date:   Thu Jan 11 22:39:25 2024 -0500

    Add files via upload

    Used the R package pheatmap to create a heatmap for the mtcars data.

commit 0fd91052b9b49f415314f3c4b5c4893dbb06015e (version_control_git_cli/main)
Author: JWrows2014 <wuz8@nih.gov>
Date:   Thu Jan 11 22:37:28 2024 -0500

    This commit includes code that loads the mtcars data, Tidyverse package, and create summarization and visualizations of the data.

commit 164efce528d365700190b9dd761c7cefa11948db
Author: JWrows2014 <wuz8@nih.gov>
Date:   Thu Jan 11 22:35:17 2024 -0500

    This is the first commit and includes a blank R script named this_is_a_r_script.R.
To post the revised this_is_a_r_script.R back to the main branch in the GitHub repository, use the following.
git push version_control_git_cli main
View a previous version of a file
One way to view a previous version of a file is to use git checkout followed by the commit ID. the example below goes back to the version before the mtcar data heatmap was added (so one versionb back).
git checkout 0fd9105
Then to retrieve the code from this previous version.
cat this_is_a_r_script.R
## This R script is used to demonstrate version control using the
### GitHub webpage

# load data
data("mtcars")

library(tidyverse)

mtcars %>% summarise(mean=mean(mpg))

ggplot(mtcars, aes(x=hp, y=mpg, color=cyl))+geom_point()+scale_color_continuous(low="blue", high="red")
Use git checkout main to get back to the most recent commit.
Note
Git can be used with other code repositories such as Bitbucket.
Git credentials
If this is the first time a personal access token is used, Git will ask to user to supply it. However, Git will store this in the MacOSX keychain or Windows Credential Manager so users will not have to enter it on subsequent pushes. But this is risky and a way to prevent this at least on a Mac is to remove the credentials from the keychain.
For Macs, to confirm, search for "keychain Access" on the Mac's Finder. Then select "Open Key Chain Access" and there should be a listing for GitHub.
For Windows, search for the "Credential Manager" and then choose "Windows Credentials". The GitHub credentials should show under "Generic Credentials".
To see the location on the computer where these credentials are stored, use the following.
git config --get-all --show-origin credential.helper
file:/usr/local/etc/gitconfig   osxkeychain
file:/Users/wuz8/.gitconfig     --help
file:/Users/wuz8/.gitconfig
file:/Users/wuz8/.gitconfig     /usr/local/share/gcm-core/git-credential-manager
Using cat to display /usr/local/etc/gitconfig reveals that the credentials are stored on the osx keychain.
cat /usr/local/etc/gitconfig
[credential]
    helper = osxkeychain
Another way to enable Git to ask for the personal access token during every push is to use the command below. Which will setup a blank credential in the local repository configurations stored as .git/config The --add option adds a new line to the existing configuration without changing anything else.
git config --add credential.helper ""
cat .git/config
[core]
    repositoryformatversion = 0
    filemode = true
    bare = false
    logallrefupdates = true
    ignorecase = true
    precomposeunicode = true
[user]
    name = JWrows2014
    email = wuz8@nih.gov
[remote "version_control_test"]
    url = https://github.com/JWrows2014/version_control_test.git
    fetch = +refs/heads/*:refs/remotes/version_control_test/*
[branch "main"]
    remote = version_control_test
    merge = refs/heads/main
[branch "test_branch2"]
    remote = version_control_test
    merge = refs/heads/test_branch2
[credential]
    helper =
Definition
"The [core] section refers to things that control the “core” of Git’s behavior: how files & updates are recognized, caching, compression..." -- J. C. Salomon, Stack Overflow.
Self learning resources
- https://www.atlassian.com/git/tutorials
- https://docs.github.com/en/get-started/quickstart/hello-world
- https://github.nih.gov/learn
NIH GitHub Enterprise
Note
"NIH GitHub is an approved solution for NIH investigators, engineers, and developers who rely on versioning and source control to securely store and share code, collaborate effectively inside and outside the NIH,publish reproducible research that satisfies journal requirements for sharing source code, automate daily operations that consume valuable time and staffing resources, track issues across projects, and host simple static websites." -- NIH GitHub
NCI GitHub Enterprise
To learn about NCI GitHub Enterprise, see the following.