Lesson 5: Working on Biowulf
Lesson 4 Review
- Flags and command options
- Wildcards (
*) - Tab complete
- Accessing user history with the "up" and "down" arrows
cat,head, andtail- Working with file content (input,output, and append)
- Combining commands with the pipe (
|) grepfor loop- File Permissions
Lesson Objectives
- Learn about the slurm system by working on Biowulf: batch jobs, swarms jobs, interactive sessions
- Retrieve data from NCBI through a batch job
- Learn how to troubleshoot failed jobs
NOTE: for this session, you will need to either login to your Biowulf account or use a student account.
Working on Biowulf
Now that we are becoming more proficient at the command line, we can use these skills to begin working on Biowulf. Today's lesson will focus on submitting computational jobs on the Biowulf compute nodes.
Login using ssh
Login to Biowulf. Make sure you are on VPN.
Open your Terminal if you are using a mac or the Command prompt if you are using a Windows machine.
ssh username@biowulf.nih.gov
When you log into Biowulf, you are automatically in your home directory (/home). This directory is very small and not suitable for large data files or analysis.
Use the "cd" command to change to the /data directory.
$ cd /data/$USER
where $USER is an environment variable holding your username.
When working on Biowulf, you can not use any computational tools on the "login node". Instead, you need to work on a node or nodes that are sufficient for what you are doing.
To run jobs on Biowulf, you must designate them as interactive, batch or swarm. Failure to do this may result in a temporary account lockout.
Batch Jobs
Most jobs on Biowulf should be run as batch jobs using the "sbatch" command.
$ sbatch yourscript.sh
Where yourscript.sh is a shell script containing the job commands including input, output, cpus-per-task, and other steps. Batch scripts always start with #!/bin/bash or similar call. The sha-bang (#!) tells the computer what command interpreter to use, in this case the Bourne-again shell.
For example, to submit a job checking sequence quality using fastqc (MORE ON THIS LATER), you may create a script named fastqc.sh:
nano fastqc.sh
Inside the script, you may include something like this:
#!/bin/bash

module load fastqc
fastqc -o output_dir -f fastq seqfile1 seqfile2 ... seqfileN
-o names the output directory
-f states the format of the input file(s)
and seqfile1 ... seqfileN are the names of the sequence files.
Note: fastqc is a available via Biowulf's module system, and so prior to running the command, the module had to be loaded.
For more information on running batch jobs on Biowulf, please see: https://hpc.nih.gov/docs/userguide.html
Multi-threaded jobs and sbatch options
For multi-threaded jobs, you will need to set --cpus-per-task. You can do this at the command line or from within your script.
Example at the command line:
$ sbatch --cpus-per-task=# yourscript.sh
In your script:
#!/bin/bash
#SBATCH --job-name qc
#SBATCH --mail-type BEGIN,END
#SBATCH --cpus-per-task #

module load fastqc
fastqc -o output_dir -t $SLURM_CPUS_PER_TASK -f fastq seqfile1 seqfile2 ... seqfileN
Within the script we can use directives denoted by #SBATCH to support command line arguments such as --cpus-per-task. If included within the script, you will not need to call these at the command line when submitting the job. You should also pass the environment variable, $SLURM_CPUS_PER_TASK to the thread argument Some other useful directives include --job-name, where you assign a name to the submitted job, and --mail-type, which you can use to direct slurm to send you an email when a job begins, ends, or both.
NOTE: the jobscript should always be the last argument of sbatch.
To see more sbatch options, use
sbatch --help
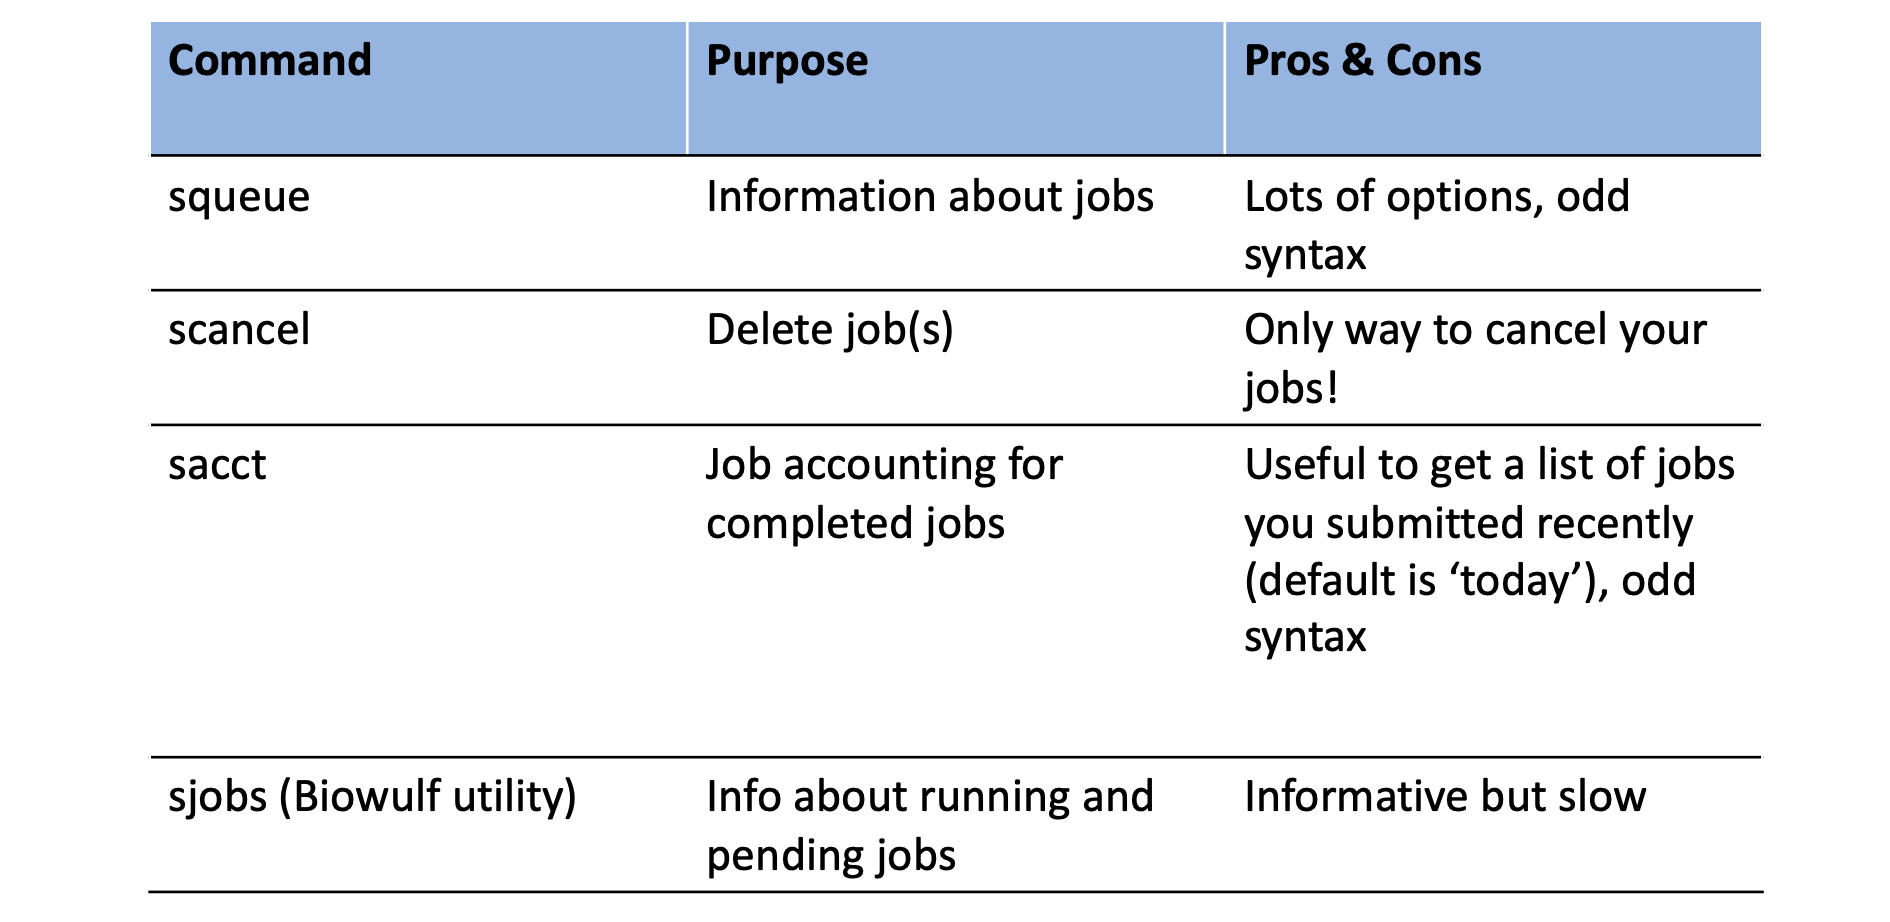
Some slurm commands
Once you submit a job, you will need to interact with the slurm system to manage or view details about submitted jobs.
Here are some useful commands for this purpose:
Standard error and standard output
Output that you would expect to appear in the terminal (e.g., standard error and standard output) will not in batch mode. Rather, these will be written by default to slurm######.out in the submitting directory, where ###### represents the job id. These can be redirected using --output=/path/to/dir/filename and --error=/path/to/dir/filename on the command line or as an #SBATCH directive.
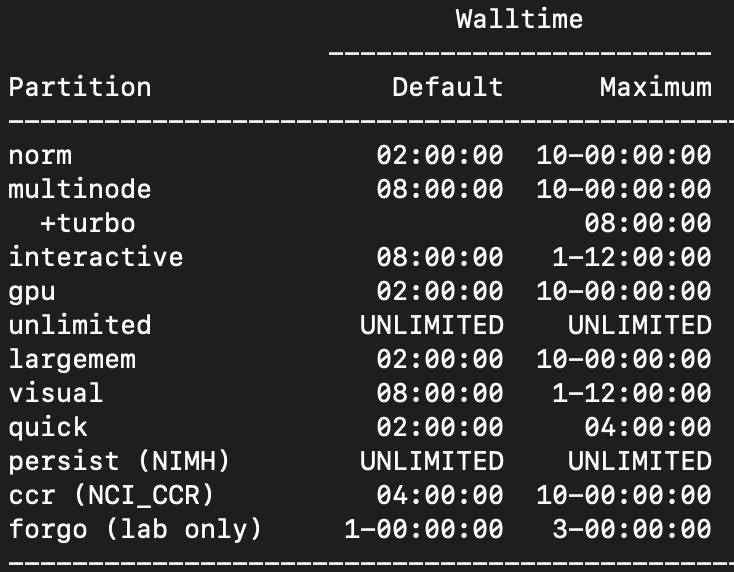
Partitions
Your job may be in a waiting phase ("Pending" or "PD") depending on available resources. You can specify a particular node partition using --partition.
Use freen to see what's available.
Summary of partitions

Walltime
The default walltime, or amount of time allocated to a job, is 2 hours on the norm partition. To change the walltime, use --time=d-hh:mm:ss.
Here are the walltimes by partition:
batchlim
You can change the walltime after submitting a job using
newwall --jobid <job_id> --time <new_time_spec>
Submit an actual job
Let's submit a batch job. We are going to download data from the Sequence Read Archive (SRA), a public repository of high throughput, short read sequencing data. We will discuss the SRA a bit more in detail in Lesson 6. For now, our goal is to simply downlaod multiple fastq files associated with a specific BioProject on the SRA. We are interested in downloading RNAseq files associated with BioProject PRJNA578488, which "aimed to determine the genetic and molecular factors that dictate resistance to WNT-targeted therapy in intestinal tumor cells".
We will learn how to pull the files we are interested in directly from SRA at a later date. For now, we will use the run information stored in sra_files_PRJNA578488.txt.
Let's check out this file.
less sra_files_PRJNA578488.txt
Now, let's build a script downloading a single run, SRR10314042, to a directory called /data/$USER/testscript.
mkdir /data/$USER/testscript
Open the text editor nano and create a script named filedownload.sh.
nano filedownload.sh
Inside our script we will type
#!/bin/bash
#SBATCH --cpus-per-task=6
#SBATCH --gres=lscratch:10

#load module
module load sratoolkit

fasterq-dump -t /lscratch/$SLURM_JOB_ID SRR10314042
Notice our use of sbatch directives inside the script.
fasterq-dump assigns 6 threads by default, so we are specifying --cpus-per-task=6. This can be modified once we get an idea of the CPUs needed for the job. -t assigns the location to be used for temporary files. Here, we are using /lscratch/$SLURM_JOB_ID, which is created upon job submission. In combination, we need to request local scratch space allocation, which we are setting to 10 GB (--gres=lscratch:10).
Remember:
Default compute allocation = 1 physical core = 2 CPUs
Default Memory Per CPU = 2 GB Therefore, default memory allocation = 4 GB
Now, let's run the script.
sbatch filedownload.sh
Let's check our job status.
squeue -u $USER
Once the job status changes from PD (pending) to R (running), let's check the job status.
sjobs -u $USER
SRR10314042.fastq.
ls -lth
Now, what if we want to download all of the runs from sra_files_PRJNA578488.txt. We could use GNU parallel, which acts similarly to a for loop (MORE ON THIS NEXT LESSON), or we can submit multiple fasterq-dump jobs in a job array, one subjob per run accession.
NOTE: There are instructions for running SRA-Toolkit on Biowulf here.
Swarm-ing on Biowulf
Swarm is for running a group of commands (job array) on Biowulf. swarm reads a list of command lines and automatically submits them to the system as sub jobs. To create a swarm file, you can use nano or another text editor and put all of your command lines in a file called file.swarm. Then you will use the swarm command to execute.
By default, each subjob is allocated 1.5 gb of memory and 1 core (consisting of 2 cpus) --- hpc.nih.gov
$ swarm -f file.swarm
$ less swarm_jobid_subjobid.o
$ less swarm_jobid_subjobid.e
View the swarm options using
swarm --help
For more information on swarm-ing on Biowulf, please see: https://hpc.nih.gov/apps/swarm.html
Let's create a swarm job
To retrieve all the files at once, you can create a swarm job.
nano set.swarm
#SWARM --threads-per-process 3
#SWARM --gb-per-process 1
#SWARM --gres=lscratch:10
#SWARM --module sratoolkit

fasterq-dump -t /lscratch/$SLURM_JOB_ID SRR10314043
fasterq-dump -t /lscratch/$SLURM_JOB_ID SRR10314044
fasterq-dump -t /lscratch/$SLURM_JOB_ID SRR10314045
for loop and echo in the swarm user guide.
Let's run our swarm file. Because we included our directives within the swarm file, the only option we need to include is -f for file.
swarm -f set.swarm
Running Interactive Jobs
Interactive nodes are suitable for testing/debugging cpu-intensive code, pre/post-processing of data, graphical application, and to GUI interface to application.
To start an interactive node, type "sinteractive" at the command line "$" and press Enter/Return on your keyboard.
$ sinteractive
You will see something like this printed to your screen. You only need to use the sinteractive command once per session. If you try to start an interactive node on top of another interactive node, you will get a message asking why you want to start another node.
[username@biowulf ]$ sinteractive
salloc.exe: Pending job allocation 34516111
salloc.exe: job 34516111 queued and waiting for resources
salloc.exe: job 34516111 has been allocated resources
salloc.exe: Granted job allocation 34516111
salloc.exe: Waiting for resource configuration
salloc.exe: Nodes cn3317 are ready for job
srun: error: x11: no local DISPLAY defined, skipping
[username@cn3317 ]$
You can use many of the same options for sinteractive as you can with sbatch. The default sinteractive allocation is 1 core (2 CPUs) and 4 GB of memory and a walltime of 8 hours.
To terminate / cancel the interactive session use
exit
Exiting from Biowulf
To disconnect the remote connection on Biowulf, use
exit
So you think you know Biowulf?
Quiz yourself using the hpc.nih.gov biowulf-quiz.
Help Session
Let's submit some jobs on Biowulf.