Database for Annotation, Visualization and Integrated Discovery (DAVID) - an overview
Lesson 17 review
In the previous class, we got an overview of functional and pathway analysis, which help to put RNA sequencing results into biological context by informing us of things like biomolecular pathway, biological function, cellular localization, etc. of genes in our study. We were also introduced to tools that could help us perform these analyses.
Learning objectives
This lesson will provide an overview of the Database for Annotation, Visualization and Integrated Discovery (DAVID). We will
- Provide some background on DAVID, including
- what it does
- statistical methods that it uses
- some expected outputs
- data size limits
- how to get help
- Run an example and interpret results
Background on DAVID
What does DAVID do?
This tool was created and is maintained by the Laboratory of Human Retrovirology and Immunoinformatics at Frederick National Lab.
DAVID is used for functional analysis. Given an input gene list, DAVID will inform us of the following.
- Whether genes in an input gene list are associated with diseases and links out to resources such as NCBI's MedGen
- Molecular functions that genes perform
- Biological pathways in which genes participate
- Other annotations (ie. cellular location, tissue expression, etc.) that the genes map to
Background gene list
DAVID compares the overlap of user provided gene list to an annotation to the overlap of a background gene list to the same annotation. Thus, DAVID is using the Fisher exact test to determine if the overlap of genes in the user input to a particular annotation is statistically different from what we would observe in the background. See Table 2 in Huang et al, Nature Protocols 2009 for more information on the background gene set but essentially, the default background of the genome-wide genes is appropriate for studies that involve a genome-wide survey. However, DAVID provides custom background gene sets and users can specify their own.
Caution
"...make sure that the genes in your list are found in the background set that you have selected in DAVID otherwise, DAVID will ignore them." -- DAVID FAQ
Basic statistics behind DAVID
Fisher Exact Test
DAVID performs over representation analysis (ORA) at its core, which aims to find enriched molecular functions, pathways, or other annotations represented by the input gene list. In other words, many genes in the list map onto those molecular functions, pathways, or annotations.
With DAVID, we are essentially looking at contingency tables (Figure 1). The example in Figure 1 shows the number of user input genes and background genes (selected from the whole genome) that fall onto a particular pathway (ie. p53 signaling). However, how certain can we be that the number of user input genes that map to the pathway is observed not by random chance. In other words, do user input genes fall onto a pathway more often as compared to the background or expected. DAVID uses the Fisher exact test to help us decide whether what we are observing is due to chance.
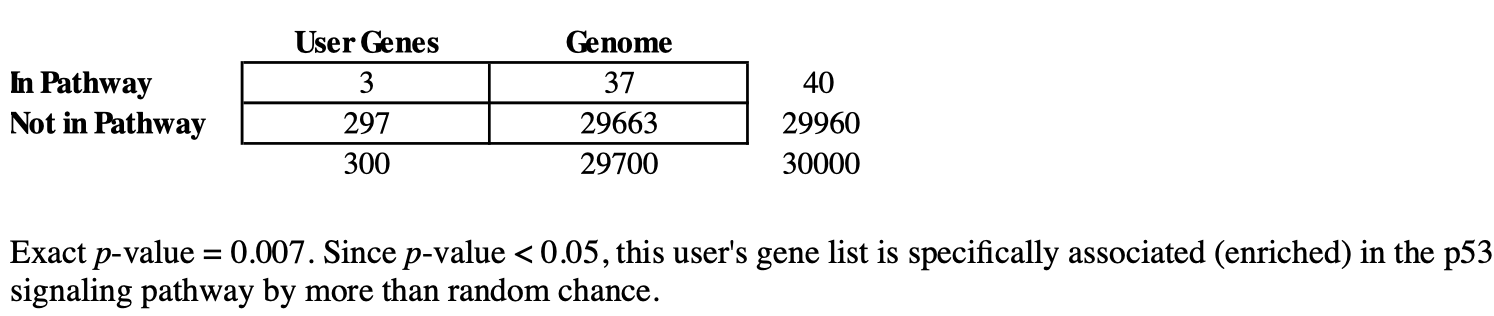
Figure 1: Contingency table showing the number of user input genes and background genes from the genome that fall onto a certain pathway. DAVID help documentations
Below are some resources for you to learn about or review this statistical procedure.
- Fisher exact test from Wikipedia
- Hypergeometric distribution from Wikipedia
- Fisher exact test from Pathway Commons
- Hypergeometric distribution from Pathway Commons
- EASE score
Pathway Commons also provides a statistics primer that discusses those methods that are relevant to pathway analysis.
Multiple Testing Correction
A problem that arises with enrichment analysis is the need to perform multiple statistical tests across many gene sets. In short, type I errors or false positives increases as the number of tests performed increases -- Pathway Commons multiple testing. Users can choose to use either Bonferroni, Benjamini-Hochberg, or False Discovery Rate (FDR) to corrrect for multiple testing.
Reducing Redundancy
"Due to the redundant nature of annotations, Functional Annotation Chart presents similar/relevant annotations repeatedly. It dilutes the focus of the biology in the report. To reduce the redundancy, the Functional Annotation Clustering report groups/displays similar annotations together which makes the biology clearer and more focused..." -- DAVID help documents
DAVID uses the Kappa statistic is used to measure the level of similarities in genes between annotations and then applies fuzzy heuristic clustering to cluster groups of similar annotations.
Data size limits
"The goal of DAVID's design is to be able to efficiently upload and analyze a list consisting of <=3000 genes. All DAVID tools have been tested with lists in this range and should return results in a few seconds to no more than a few minutes. If running time is longer than a few minutes, please contact the DAVID Bioinformatic Team for help. Please note that Functional Annotation Clustering and Gene Functional Classification have a 3000 gene limit." -- DAVID FAQ
Getting help
Starting an analysis in DAVID
USE GOOGLE CHROME TO INTERACT WITH DAVID
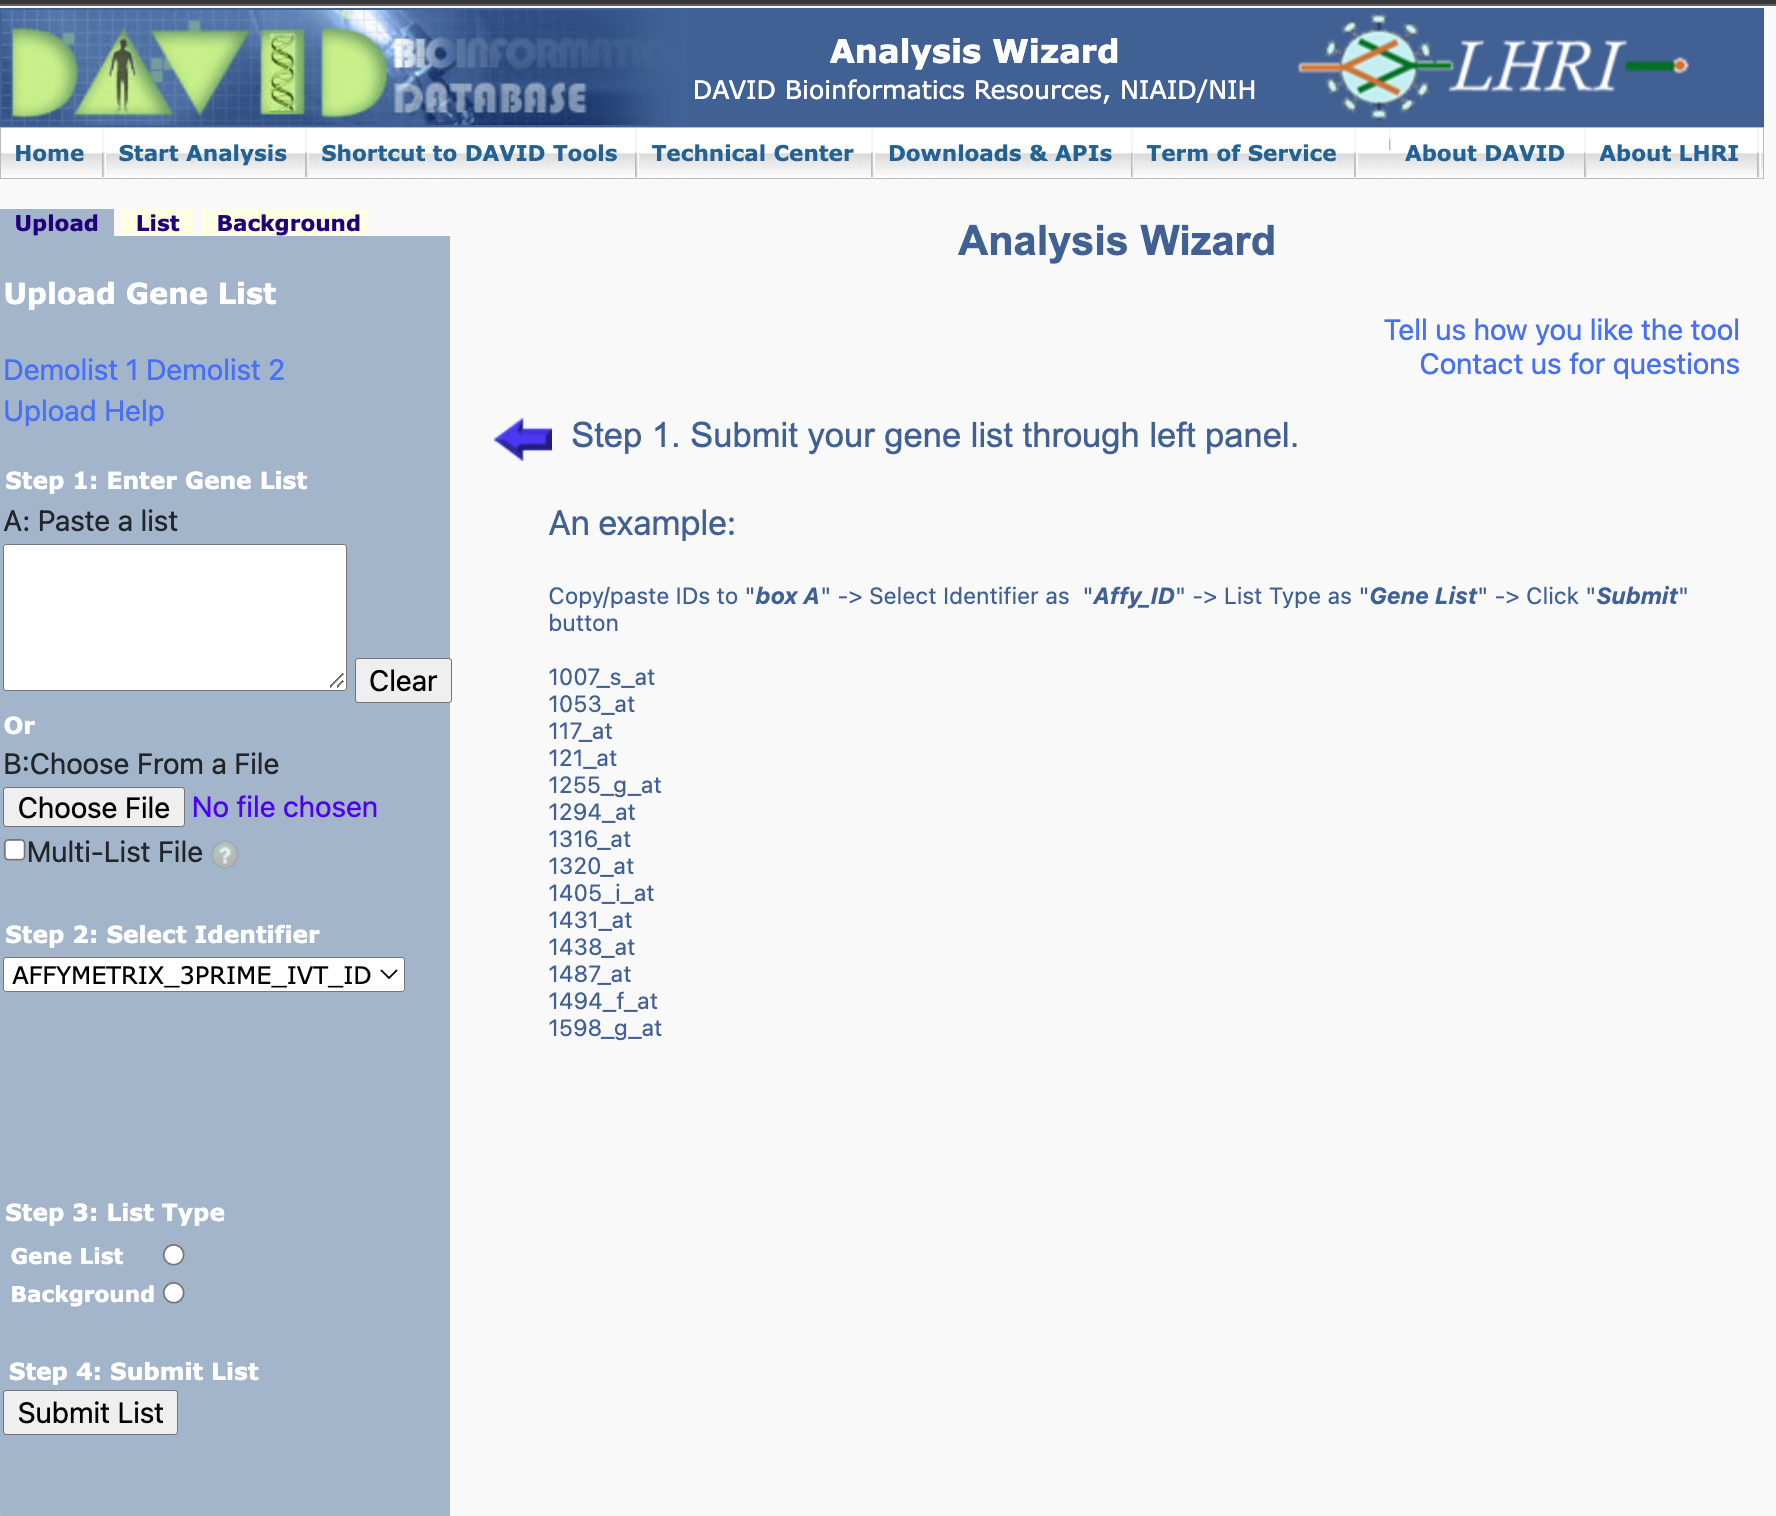
Click on the Start Analysis button to initiate an analysis, this will take us to the Analysis Wizard.

Supplying input
Tasks to do at the Analysis Wizard:
- provide our input gene list (either copy paste or upload as a text file)
- specify gene identifier type (gene identifiers could be gene symbol, Ensembl IDs, Entrez IDs, Genbank IDs, Refseq IDs, etc.)
- specify whether we are providing an input gene list or background gene list
- submit the list for analysis
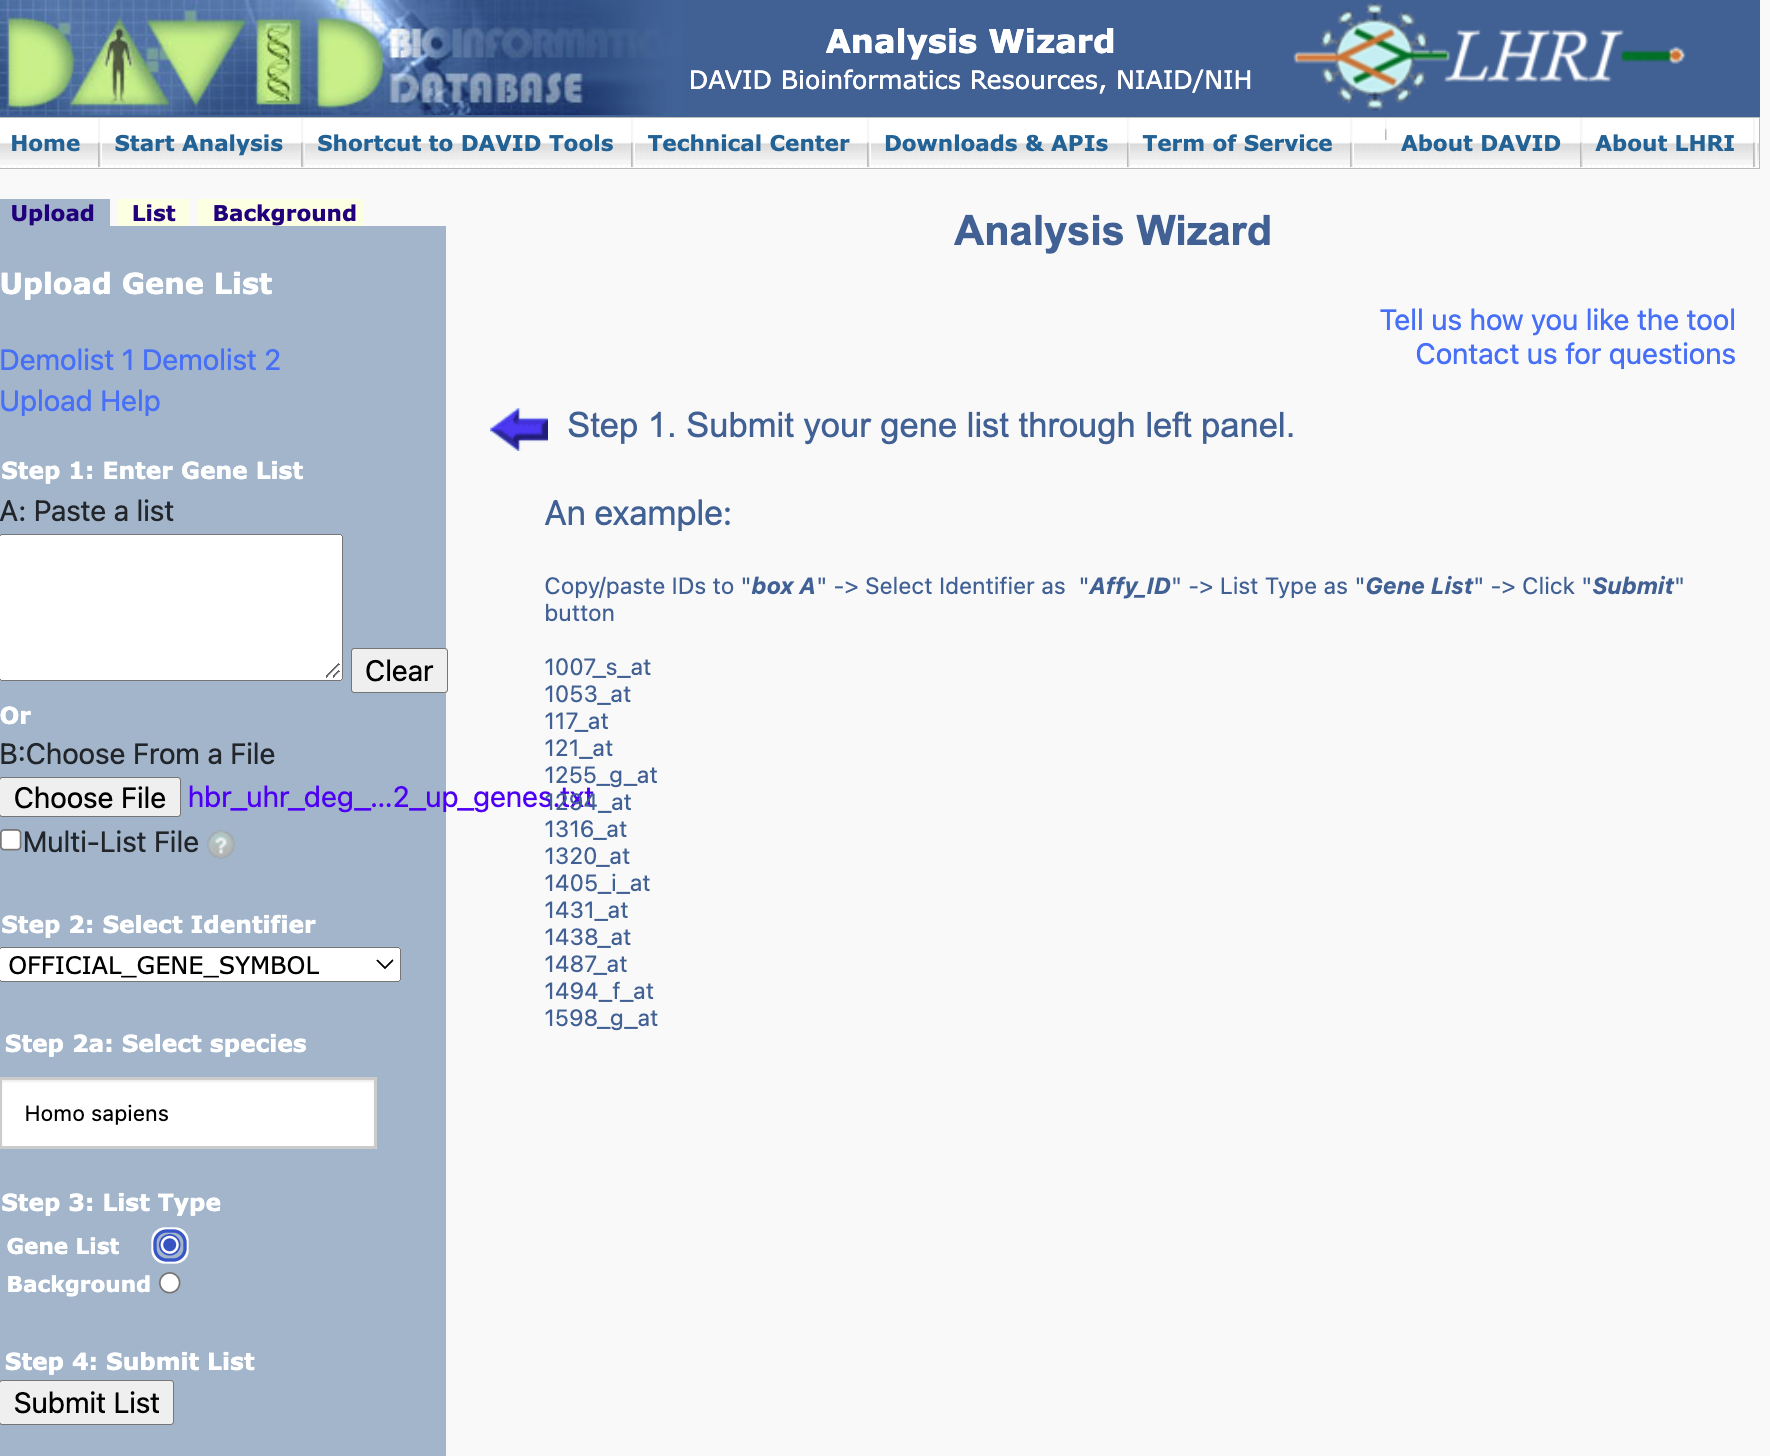
Here, we are going to provide the genes that are upregulated in the UHR sample with respect to the HBR samples. These genes were obtained by filtering the differential expression table for log2 fold change ≥ 1 and false discovery rate of ≤ 0.05. The genes are in the file hbr_uhr_deg_chr22_up_genes.txt.
Step 1: After attaching hbr_uhr_deg_chr22_up_genes.txt as the input gene list in the DAVID Analysis Wizard, choose OFFICIAL_GENE_SYMBOL as the identifier type and then specify Homo sapiens in the Select species box that appears. Next, specify that we are providing an input gene list and then click on Submit List.
Step 2: After submitting the gene list, DAVID will tell us that we have successfully submitted the gene list and that we are using the Homo sapiens genome as background. We can then select which analysis tool we like to run. Notice that there is a Gene ID Conversion Tool. This is used to convert the input gene list to a set of IDs that are recognized by DAVID in the event that we do not know or DAVID does not recognize the identifier type in our input.

Step 2 alternative: Here, we re-upload hbr_uhr_deg_chr22_up_genes.txt and then select Not Sure in the Select Identifier drop down menu. This will take us to the Gene ID Conversion Tool.

Gene ID conversion - specify ID type to convert to: We have an option to choose a range of IDs to convert our gene list to but in this example, we have chosen the ENSEMBL_GENE_ID. Remember to specify the species where our genes came from (Homo sapiens in this case). When ready, hit Submit to Conversion Tool.

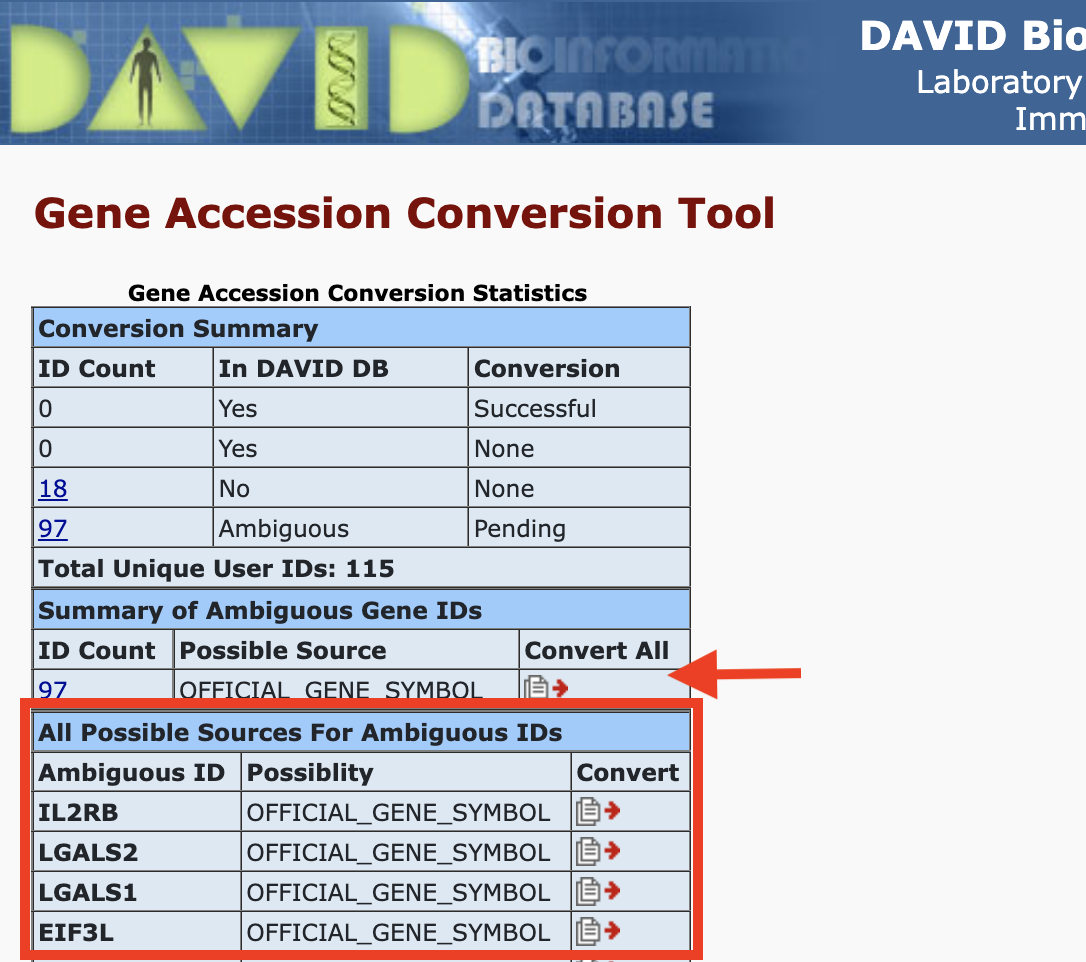
Gene ID conversion: Once we hit Submit to Conversion Tool, we will be taken to the page below. We can choose to convert all genes or convert each gene individually. Some of the genes may not be in the DAVID database, so the Gene ID conversion tool will not be able to convert those. We would need to do some data wrangling to find identifiers for those genes not in the DAVID database.
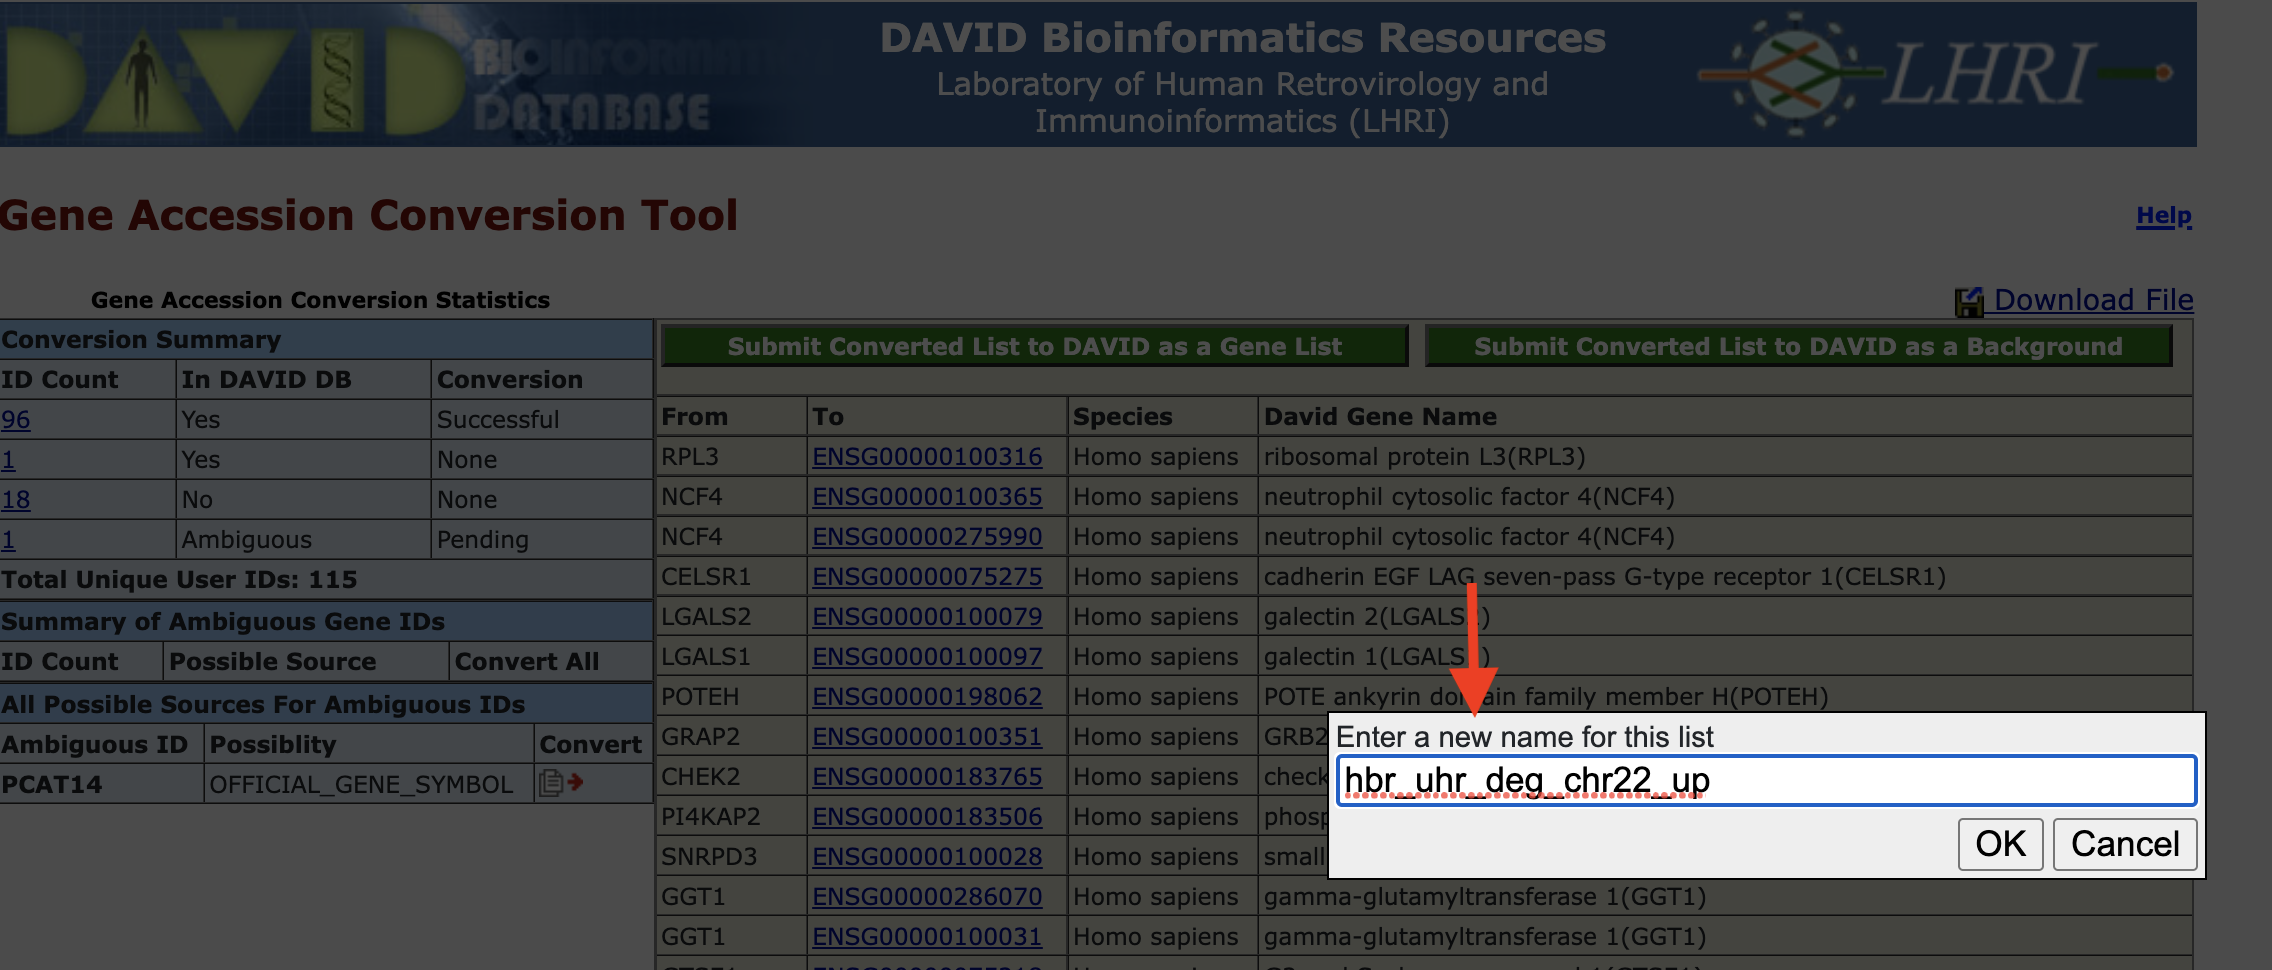
Gene ID conversion - send converted IDs back to input: After conversion, we can send the new list back to DAVID either as input or background. Here, we will submit as input.

Gene ID conversion - name the converted ID list: DAVID will give us the option to name the converted gene list. We will name its hbr_uhr_deg_chr22_up. Note that the Gene ID Conversion Tool was opened in a separate tab. After we submit the converted gene list, go back to the Analysis Wizard tab to continue with the analysis.
Results and interpretation
Annotation Results Summary
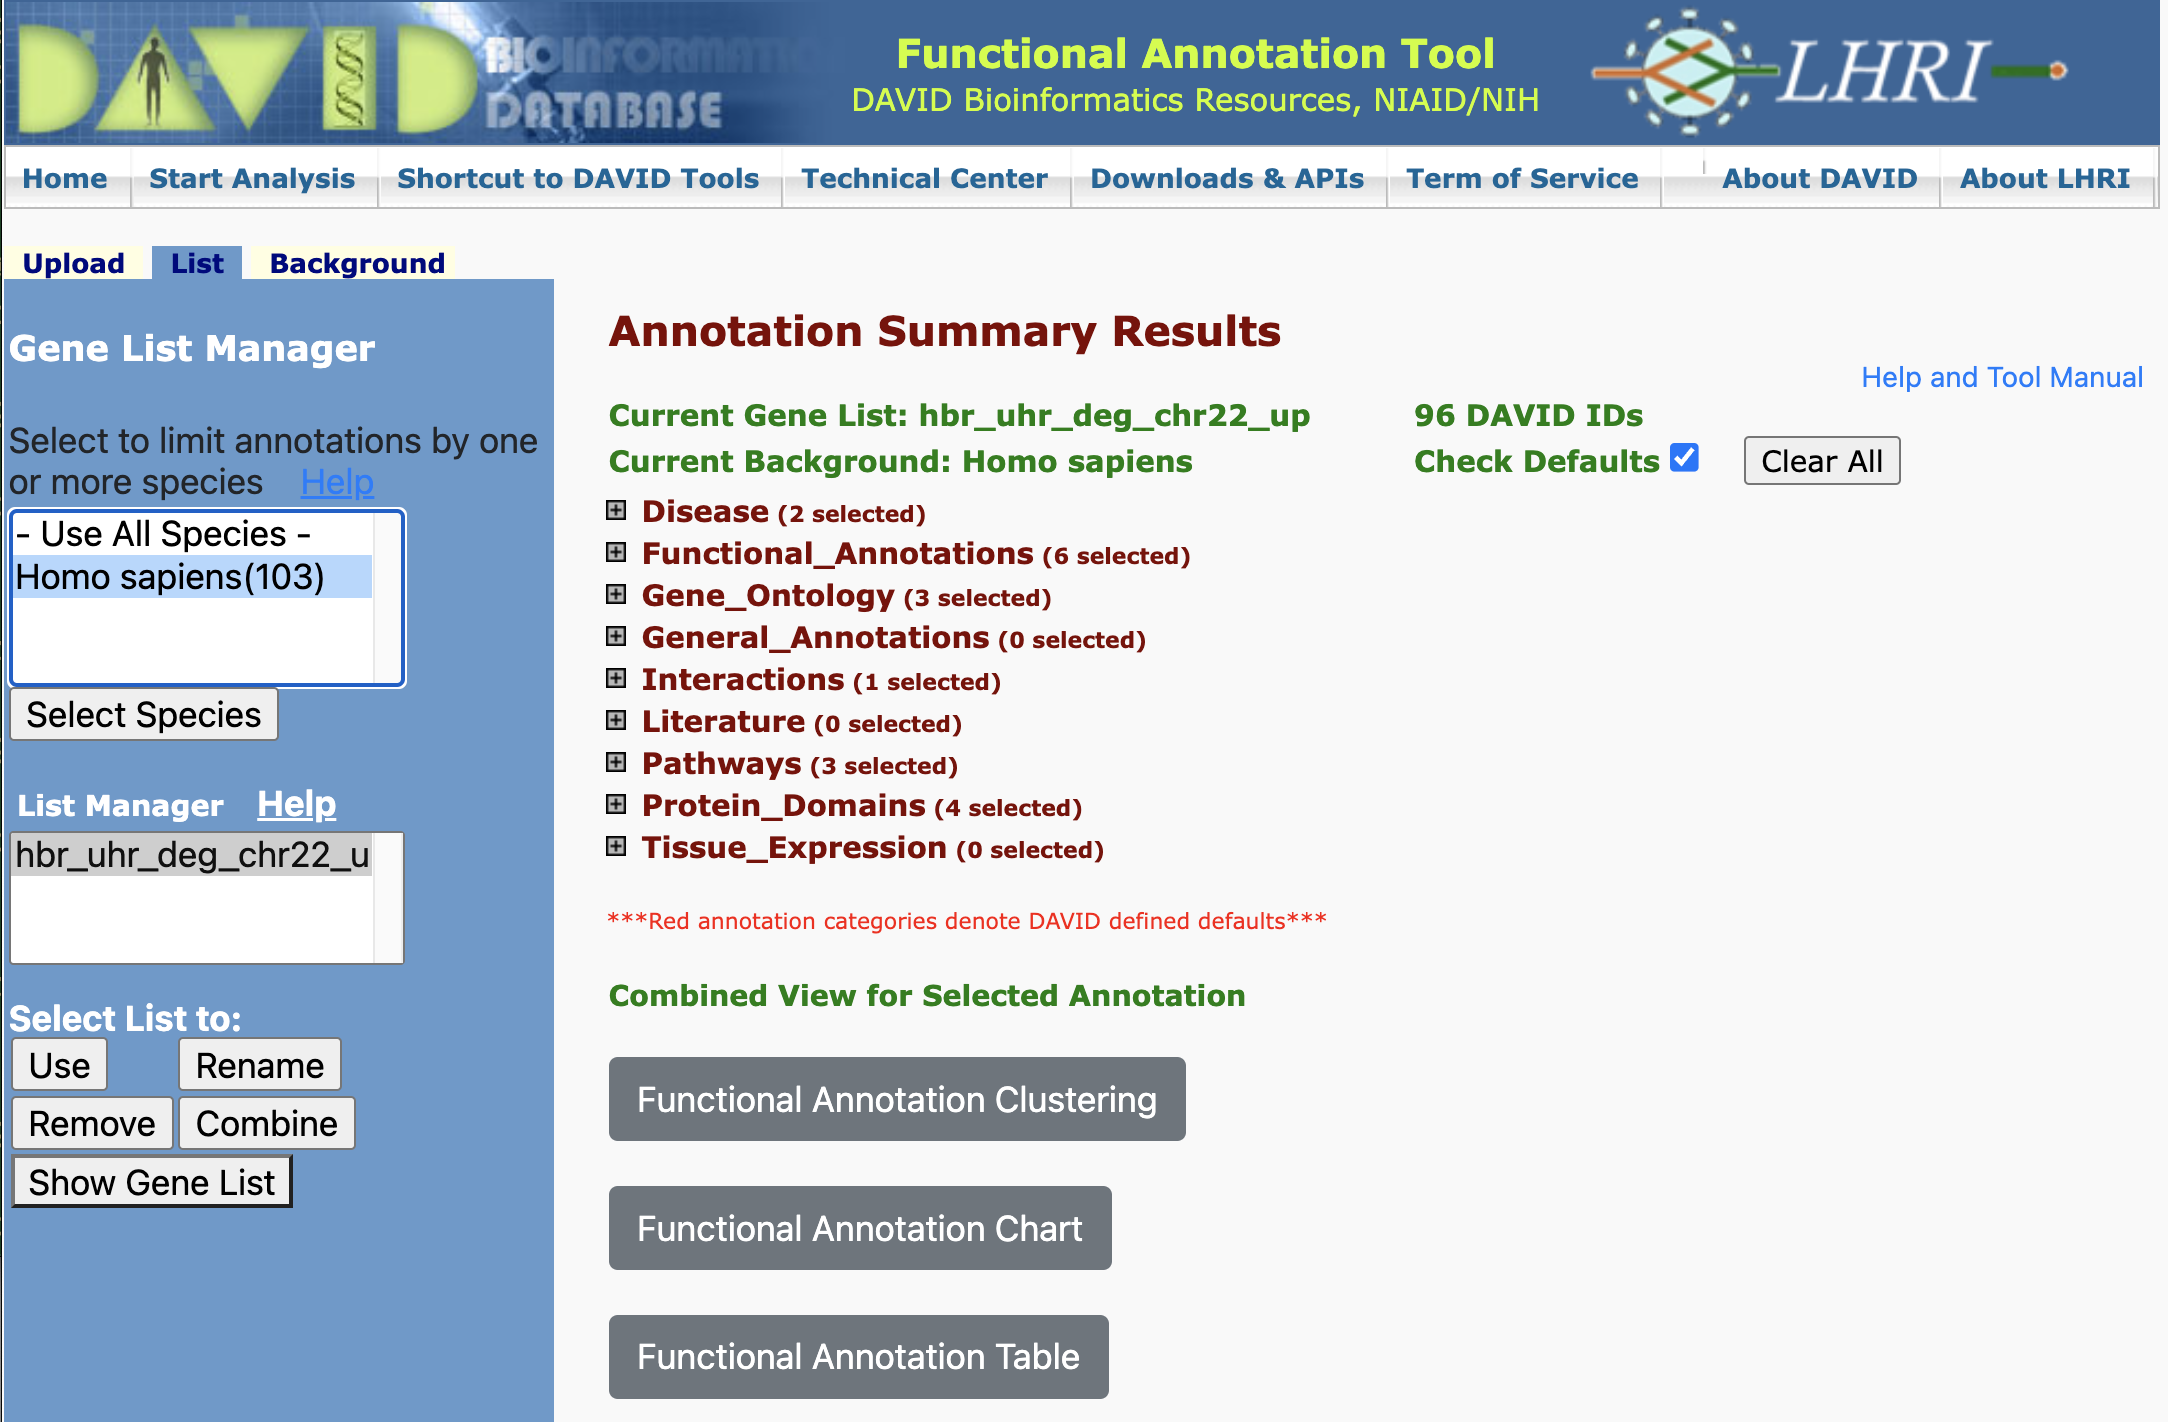
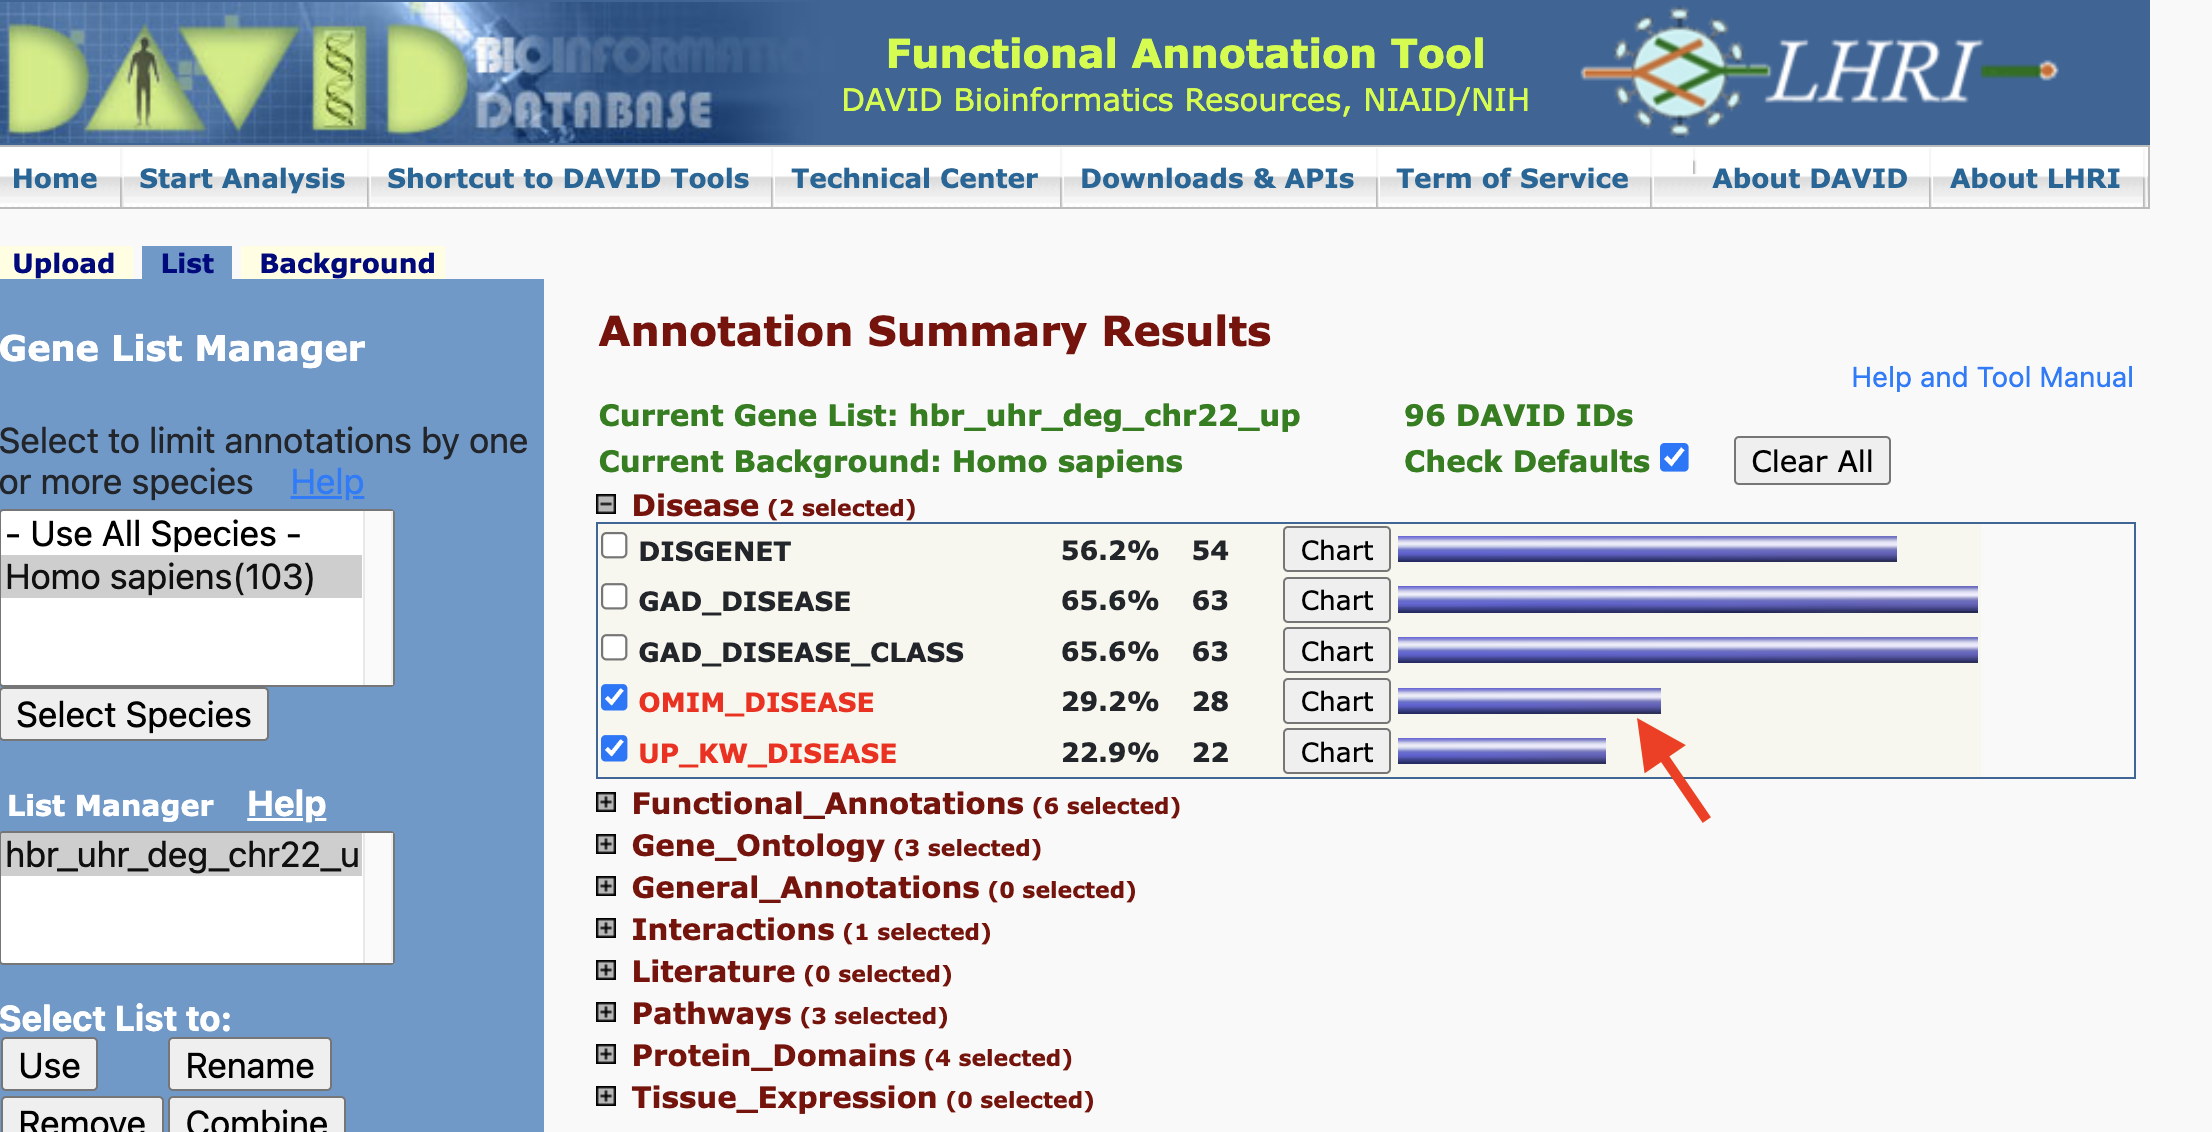
Once we have submitted our gene list for analysis, DAVID takes us to the Annotation Summary Results page. This page confirms the name of our gene list (hbr_uhr_deg_chr22_up) and the background gene list that we are using (Homo sapiens). We can navigate the Annotation Summary Results page to obtain different insights to our data.
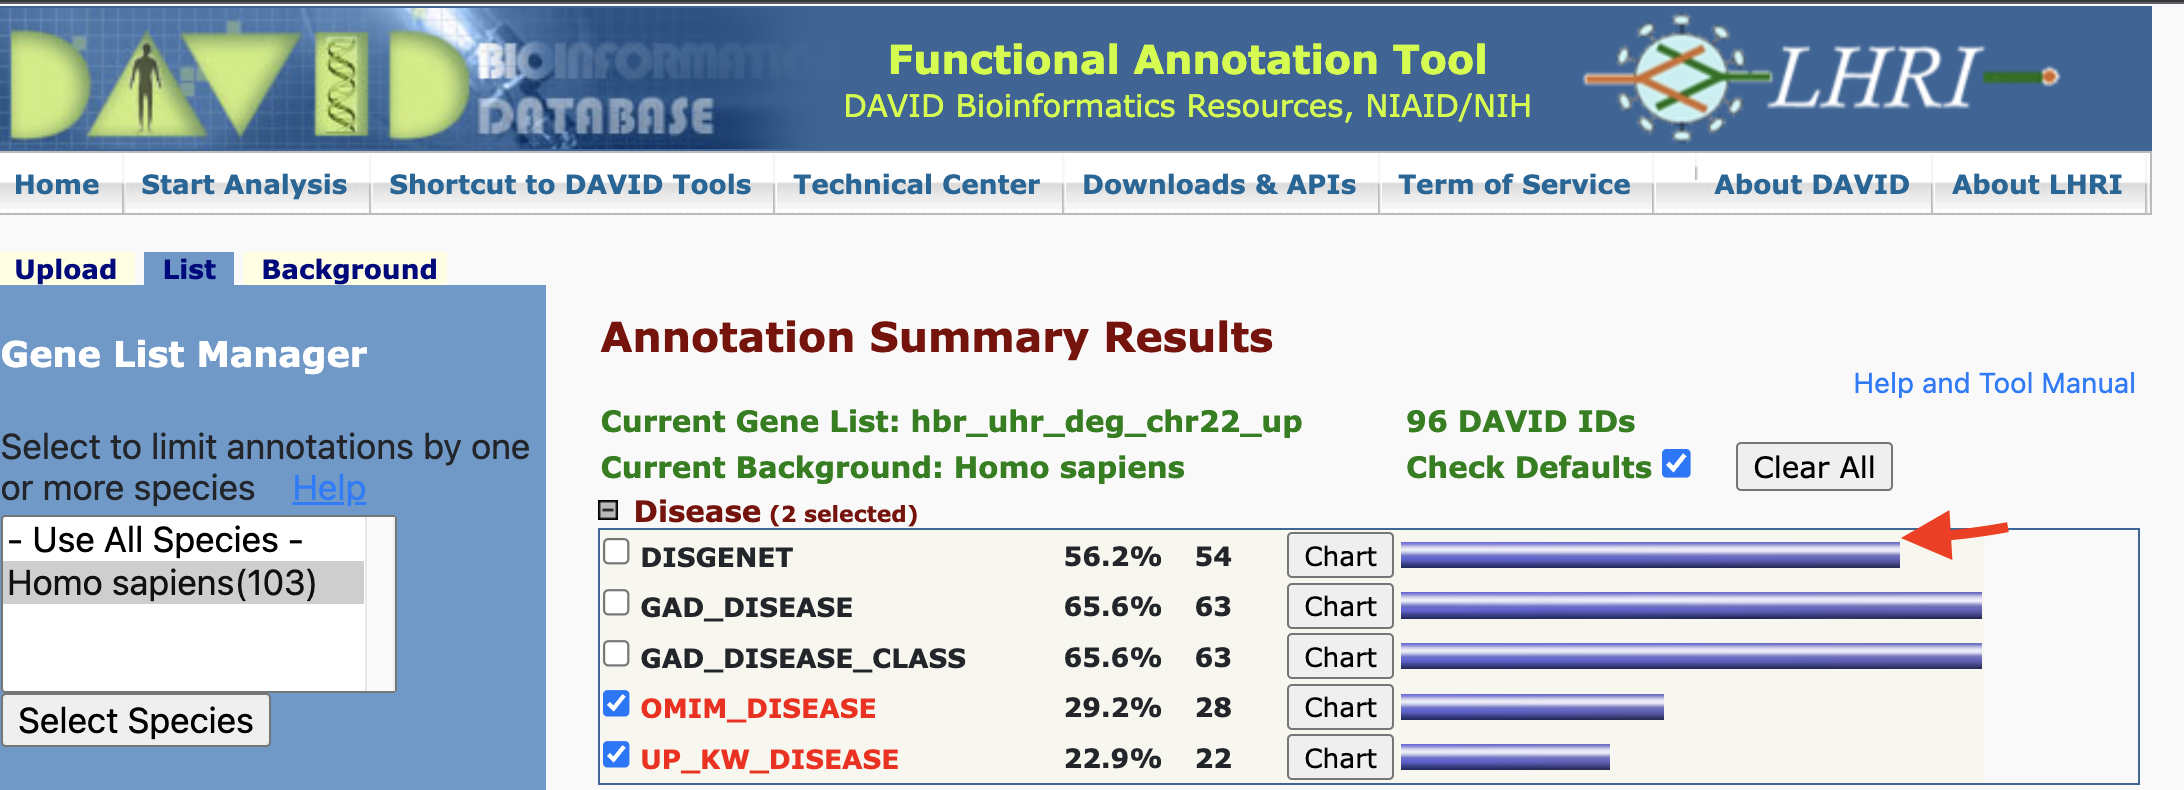
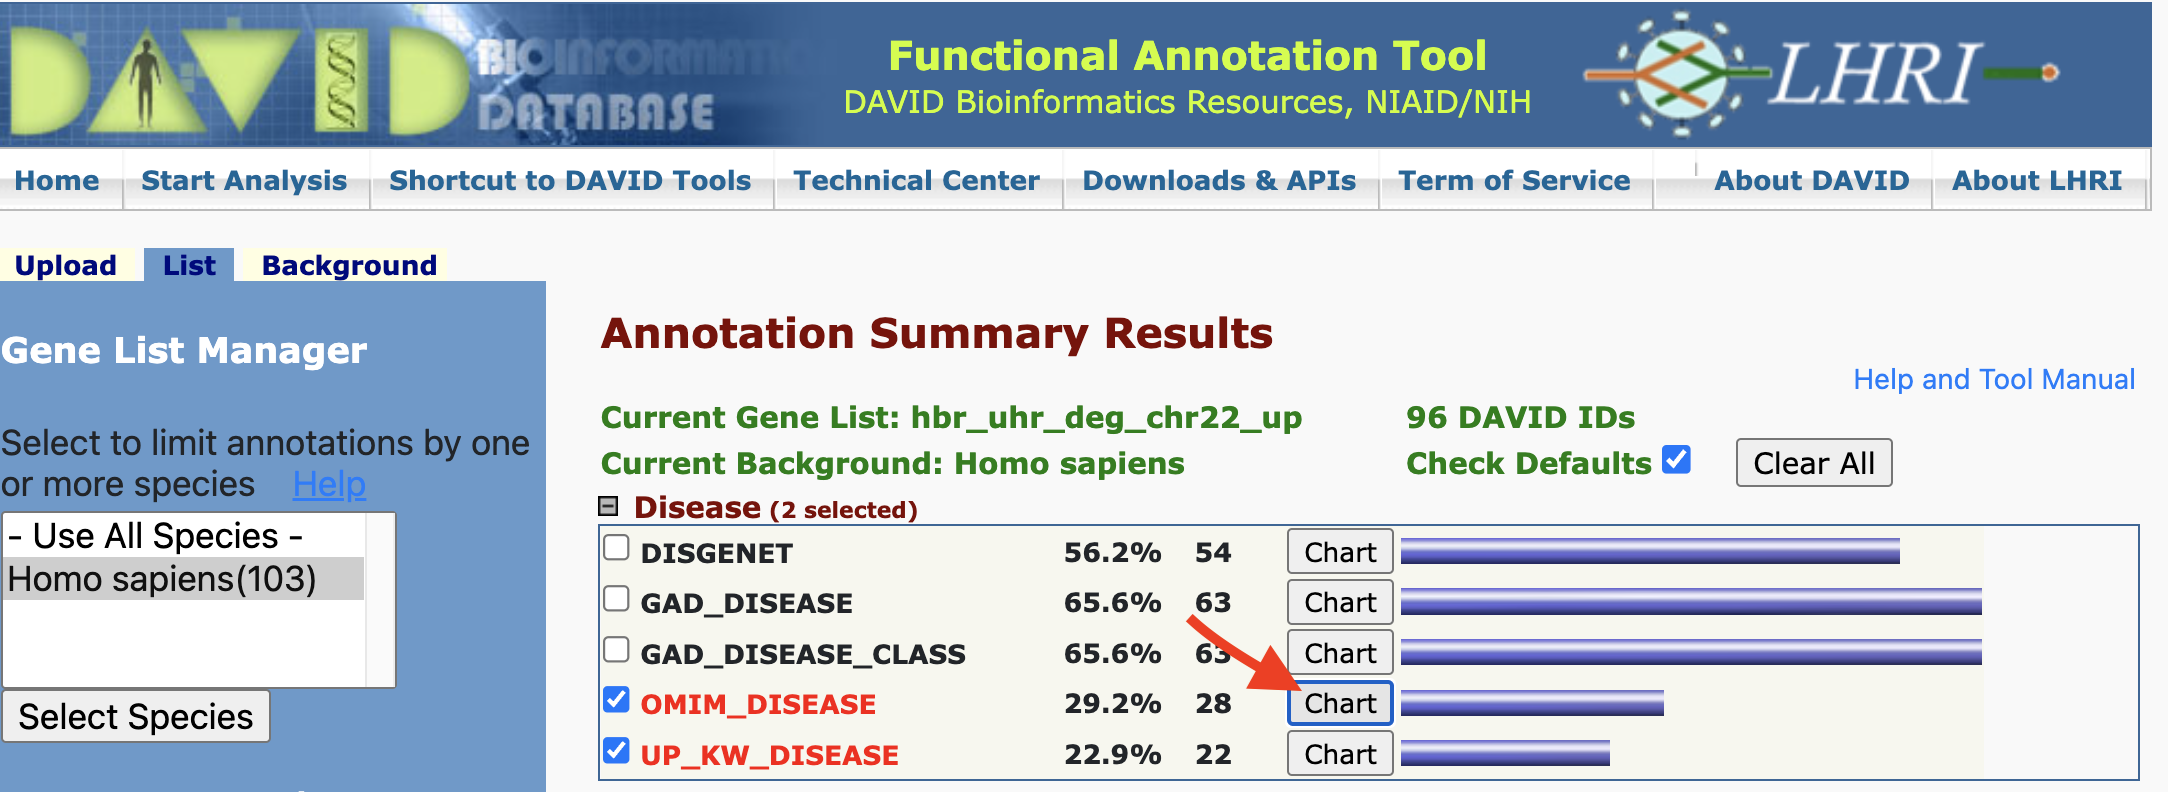
Disease Annotations
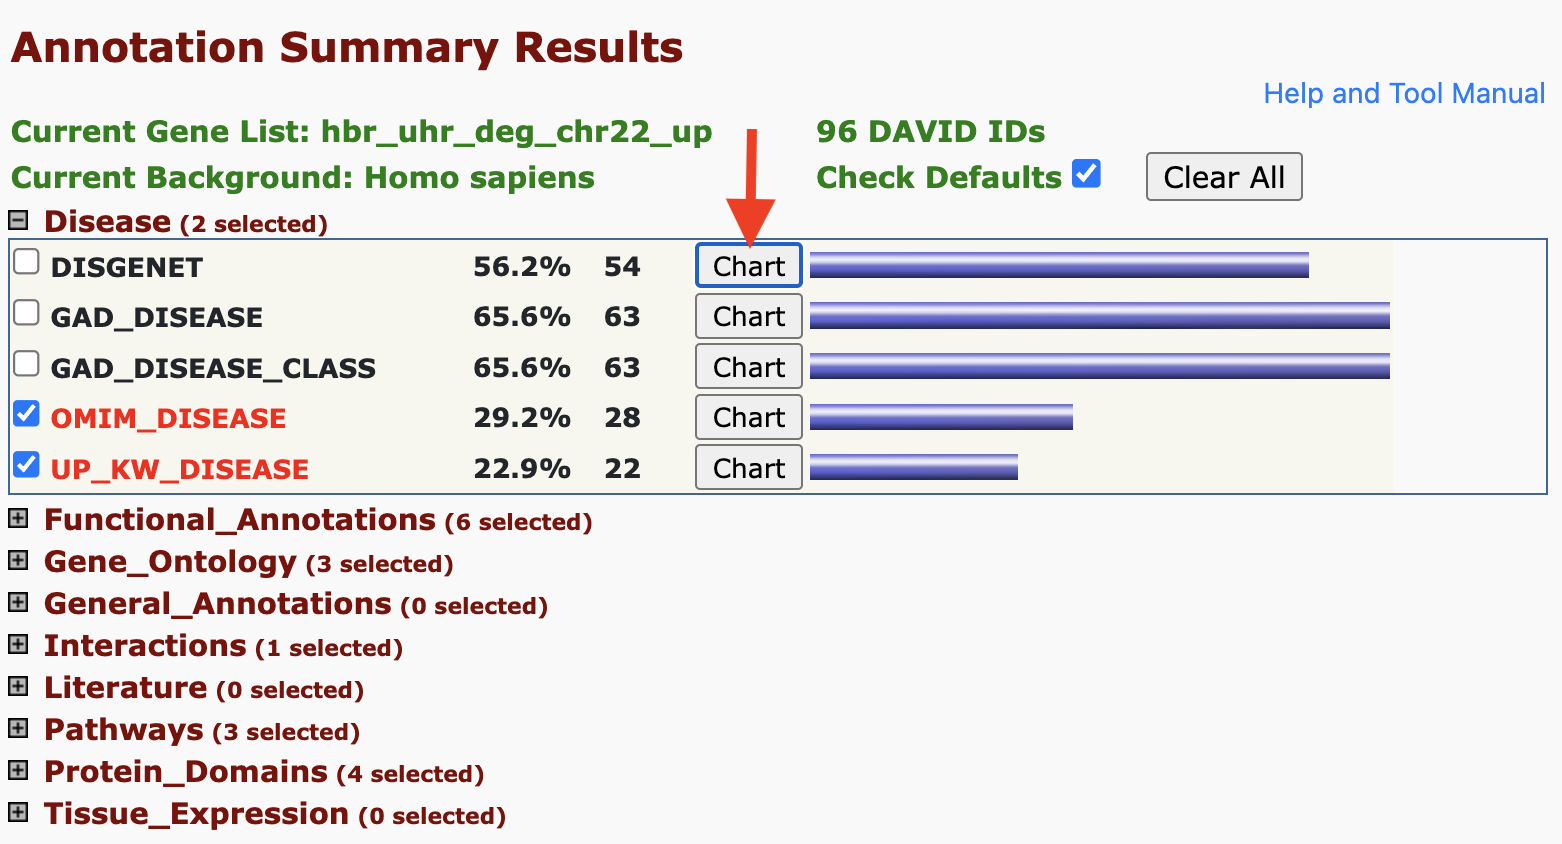
One of the first insights is that DAVID informs whether our input genes play a role in diseases. DAVID pulls disease annotations from different sources. Clicking on the Chart button will take us to a chart view showing the disease records from a given database in which our input genes map.
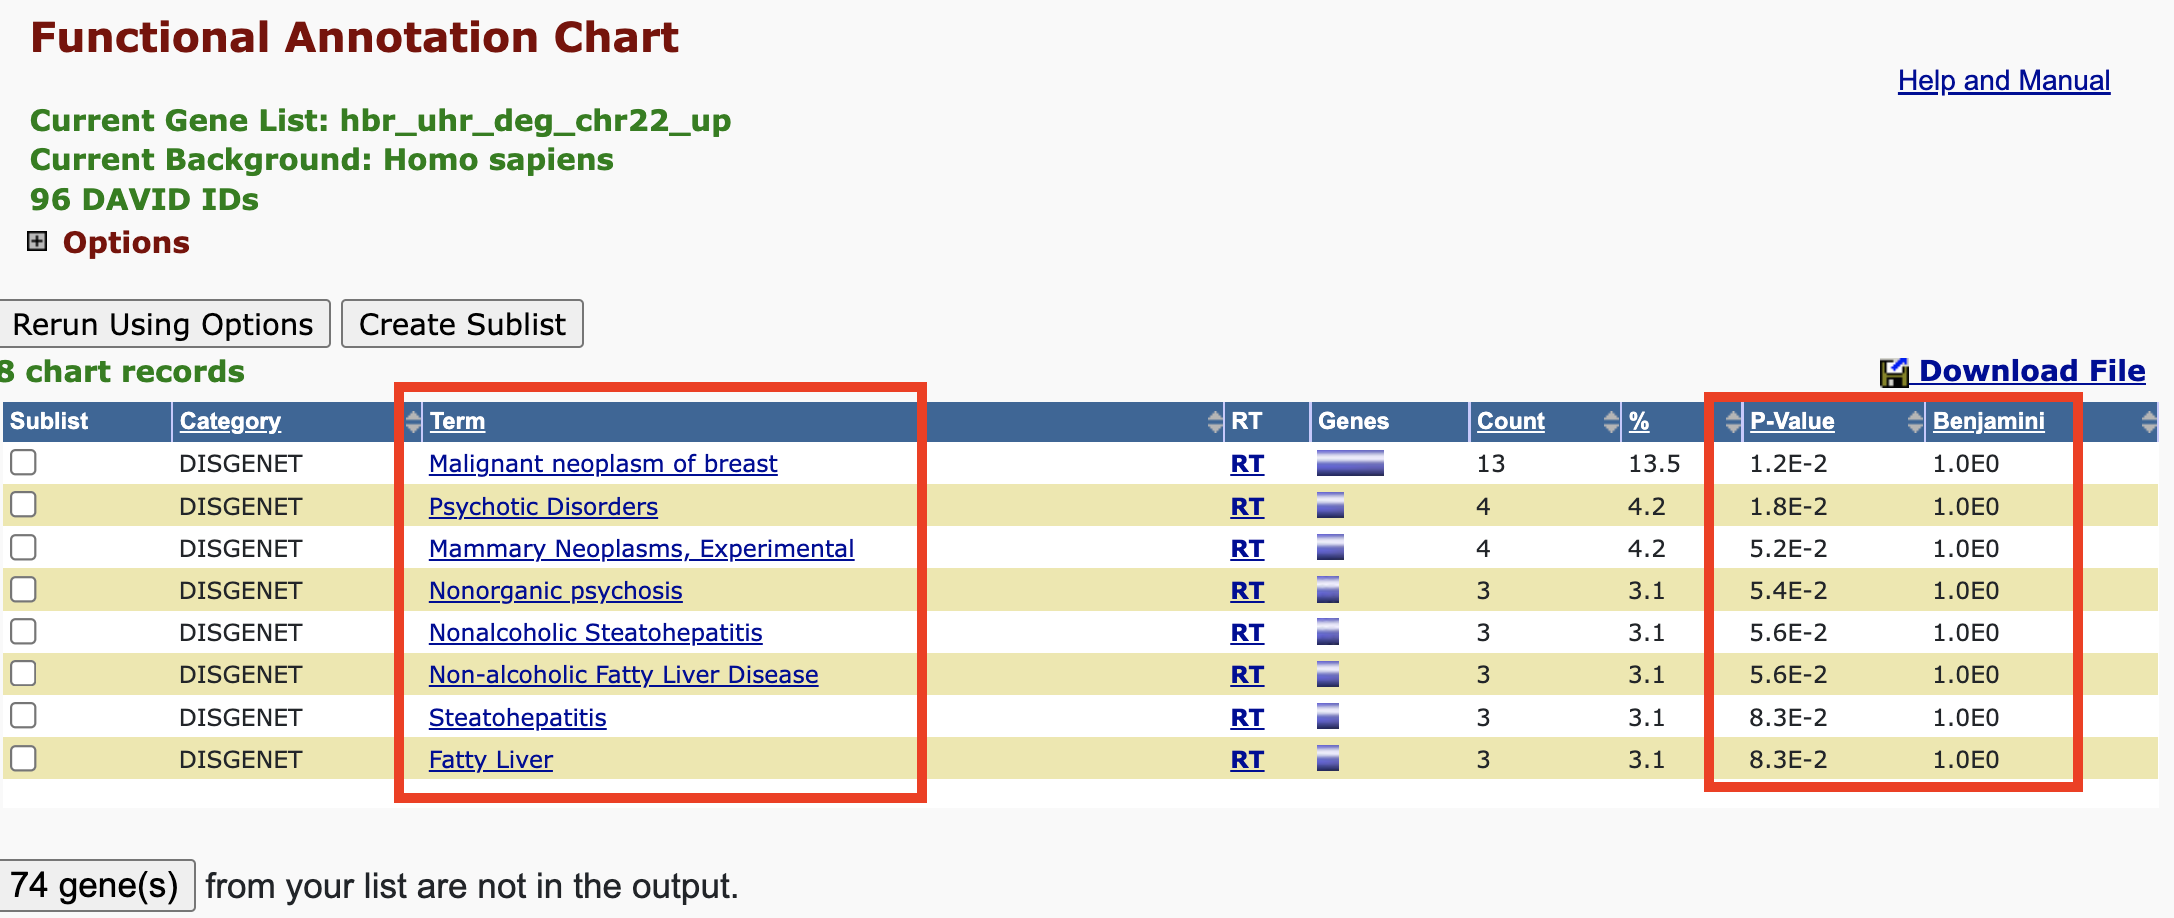
Disease Annotation - chart view
In the chart view, we are presented with the disease(s) found in a particular database that our input genes map to. Clicking on one of the disease terms sends us to NCBI' MedGen.
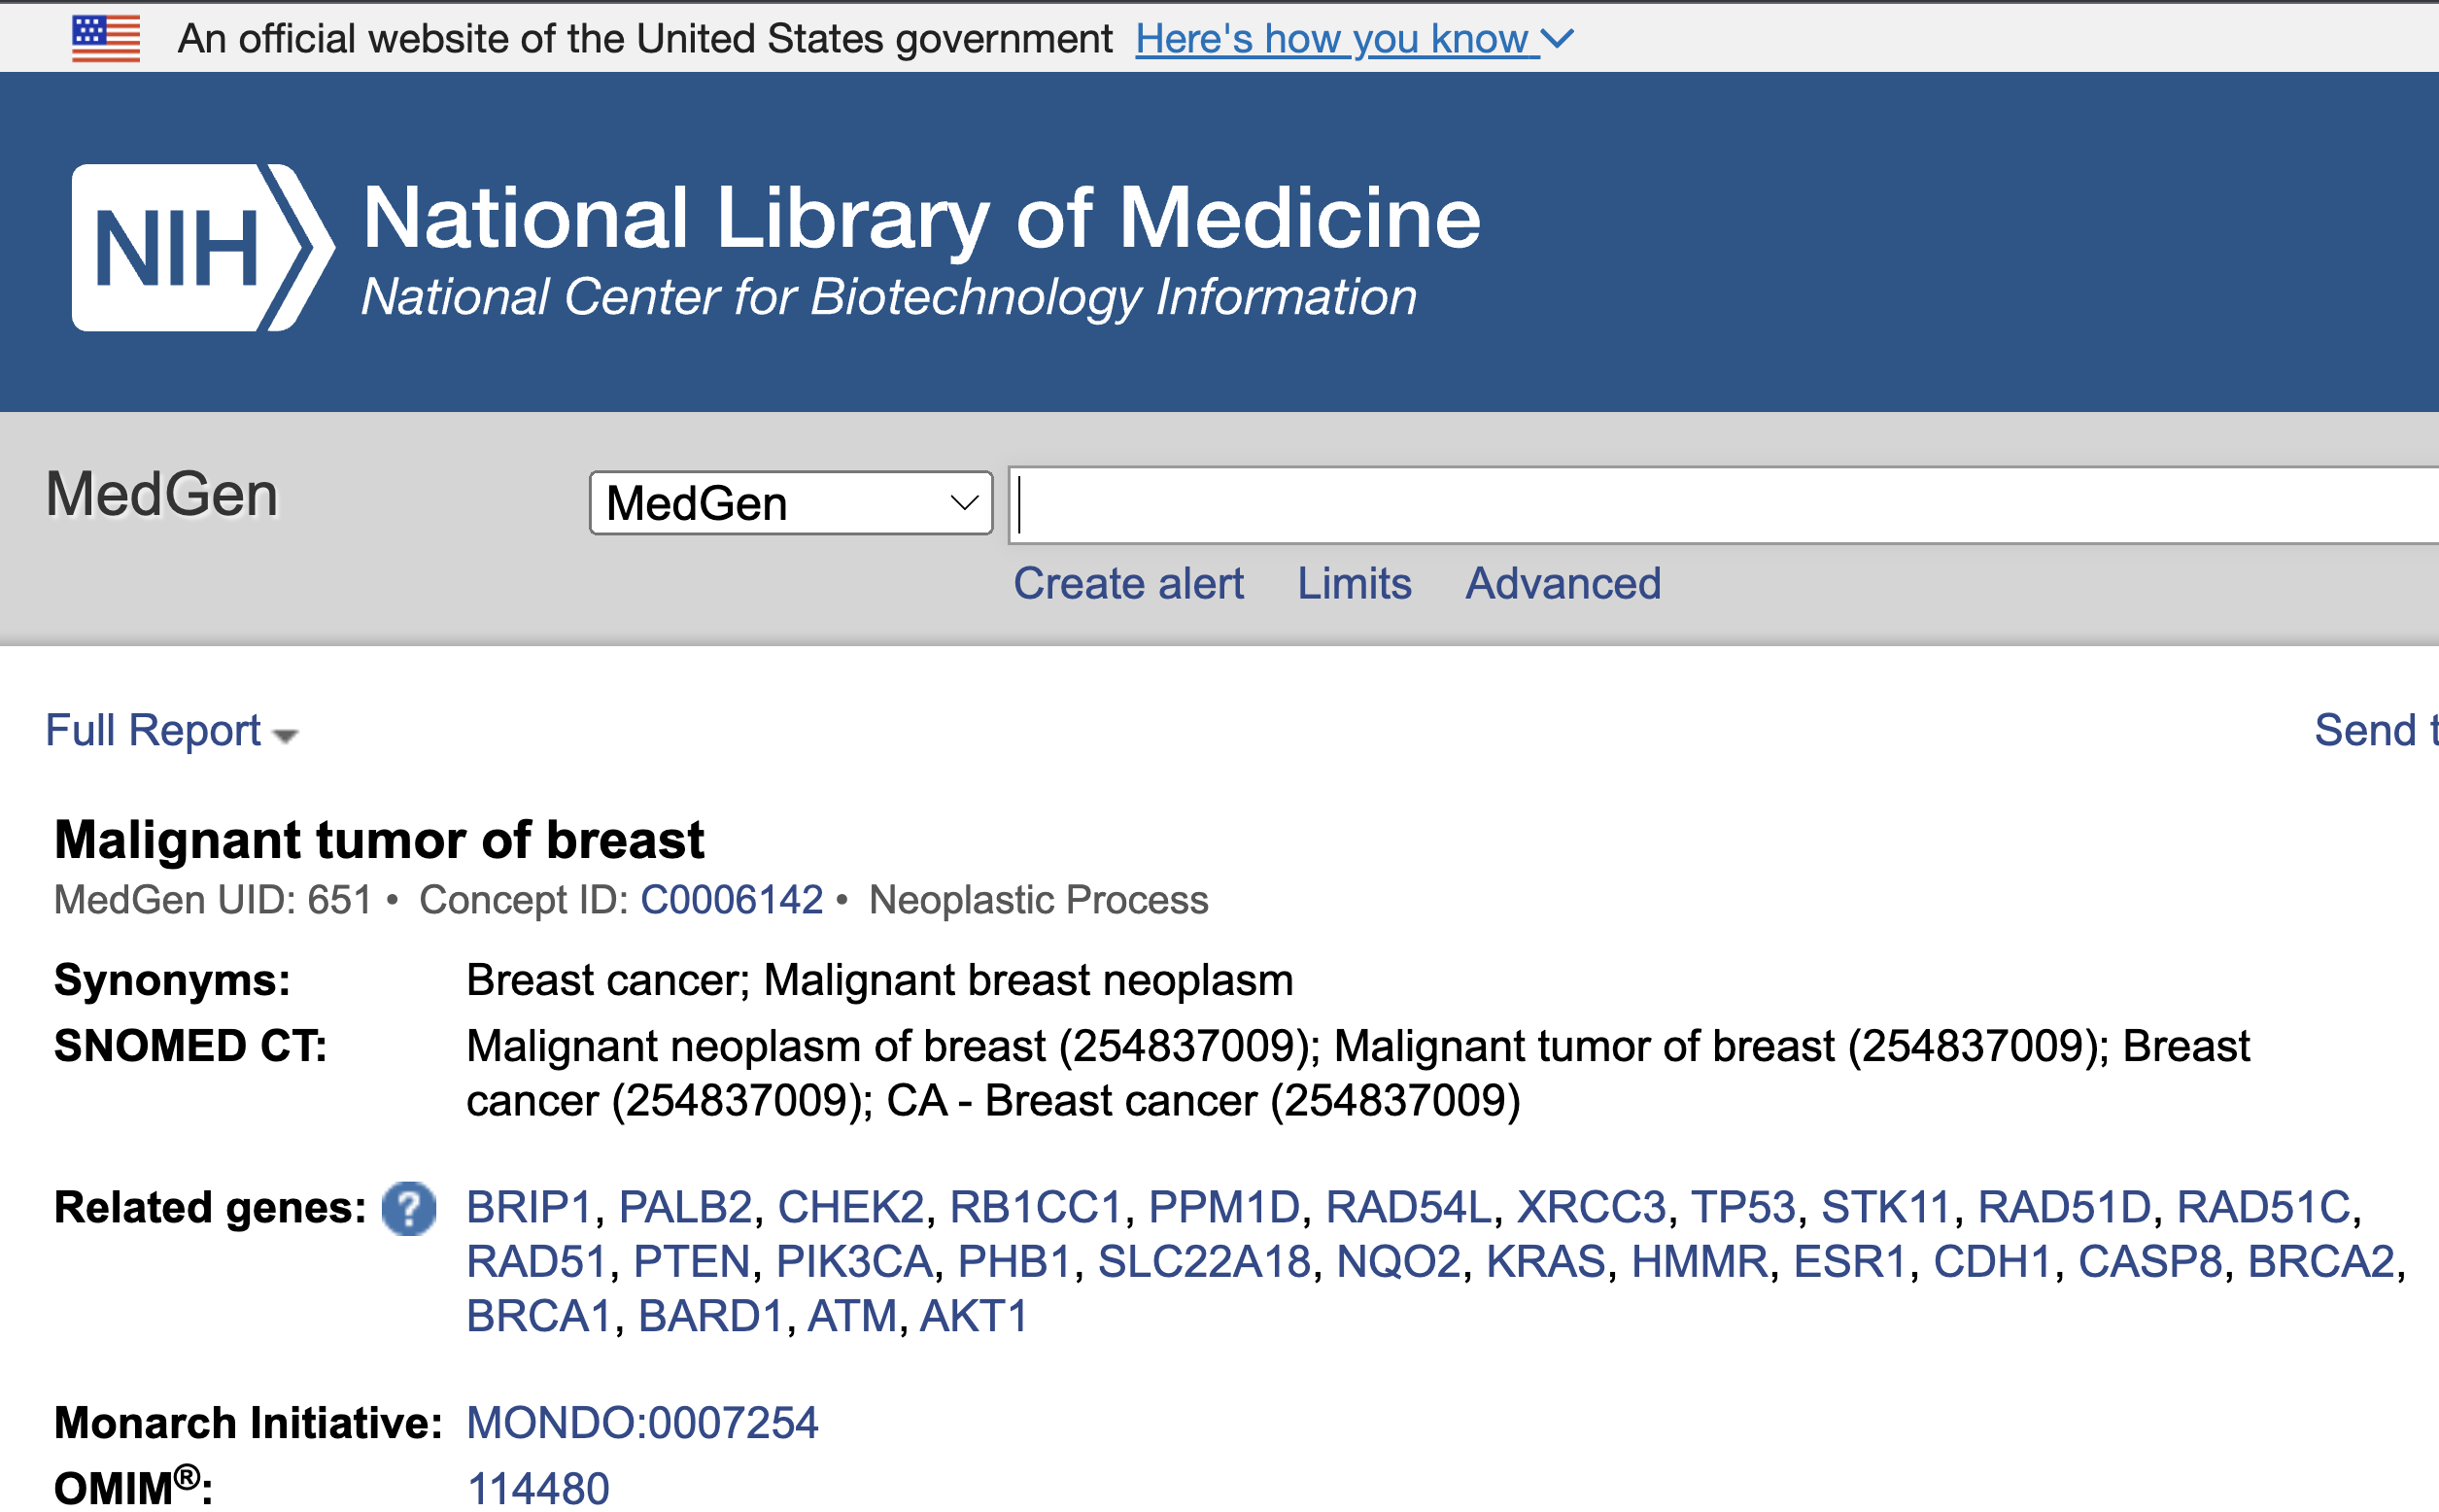
Disease Annotation - link to external resource
In the chart view shown above, we clicked on Malignant neoplasm of the breast, and this took us to the corresponding record in NCBI's MedGen. MedGen is NCBI's database that contains organized information pertaining to human gene-disease relationships.
Disease Annotation - gene view
If we click on the blue bar next to the chart button, we will be taken to a gene view of the disease terms.
Disease Annotation - gene view results
The gene view lists disease(s) that the gene may play a role in.

Disease Annotation - OMIM
The chart view for some annotation databases such as OMIM will not have records. This is because there were no diseases that met the statistical threshold.

However, we can still click on the gene view to see what disease individual genes may play a role in.
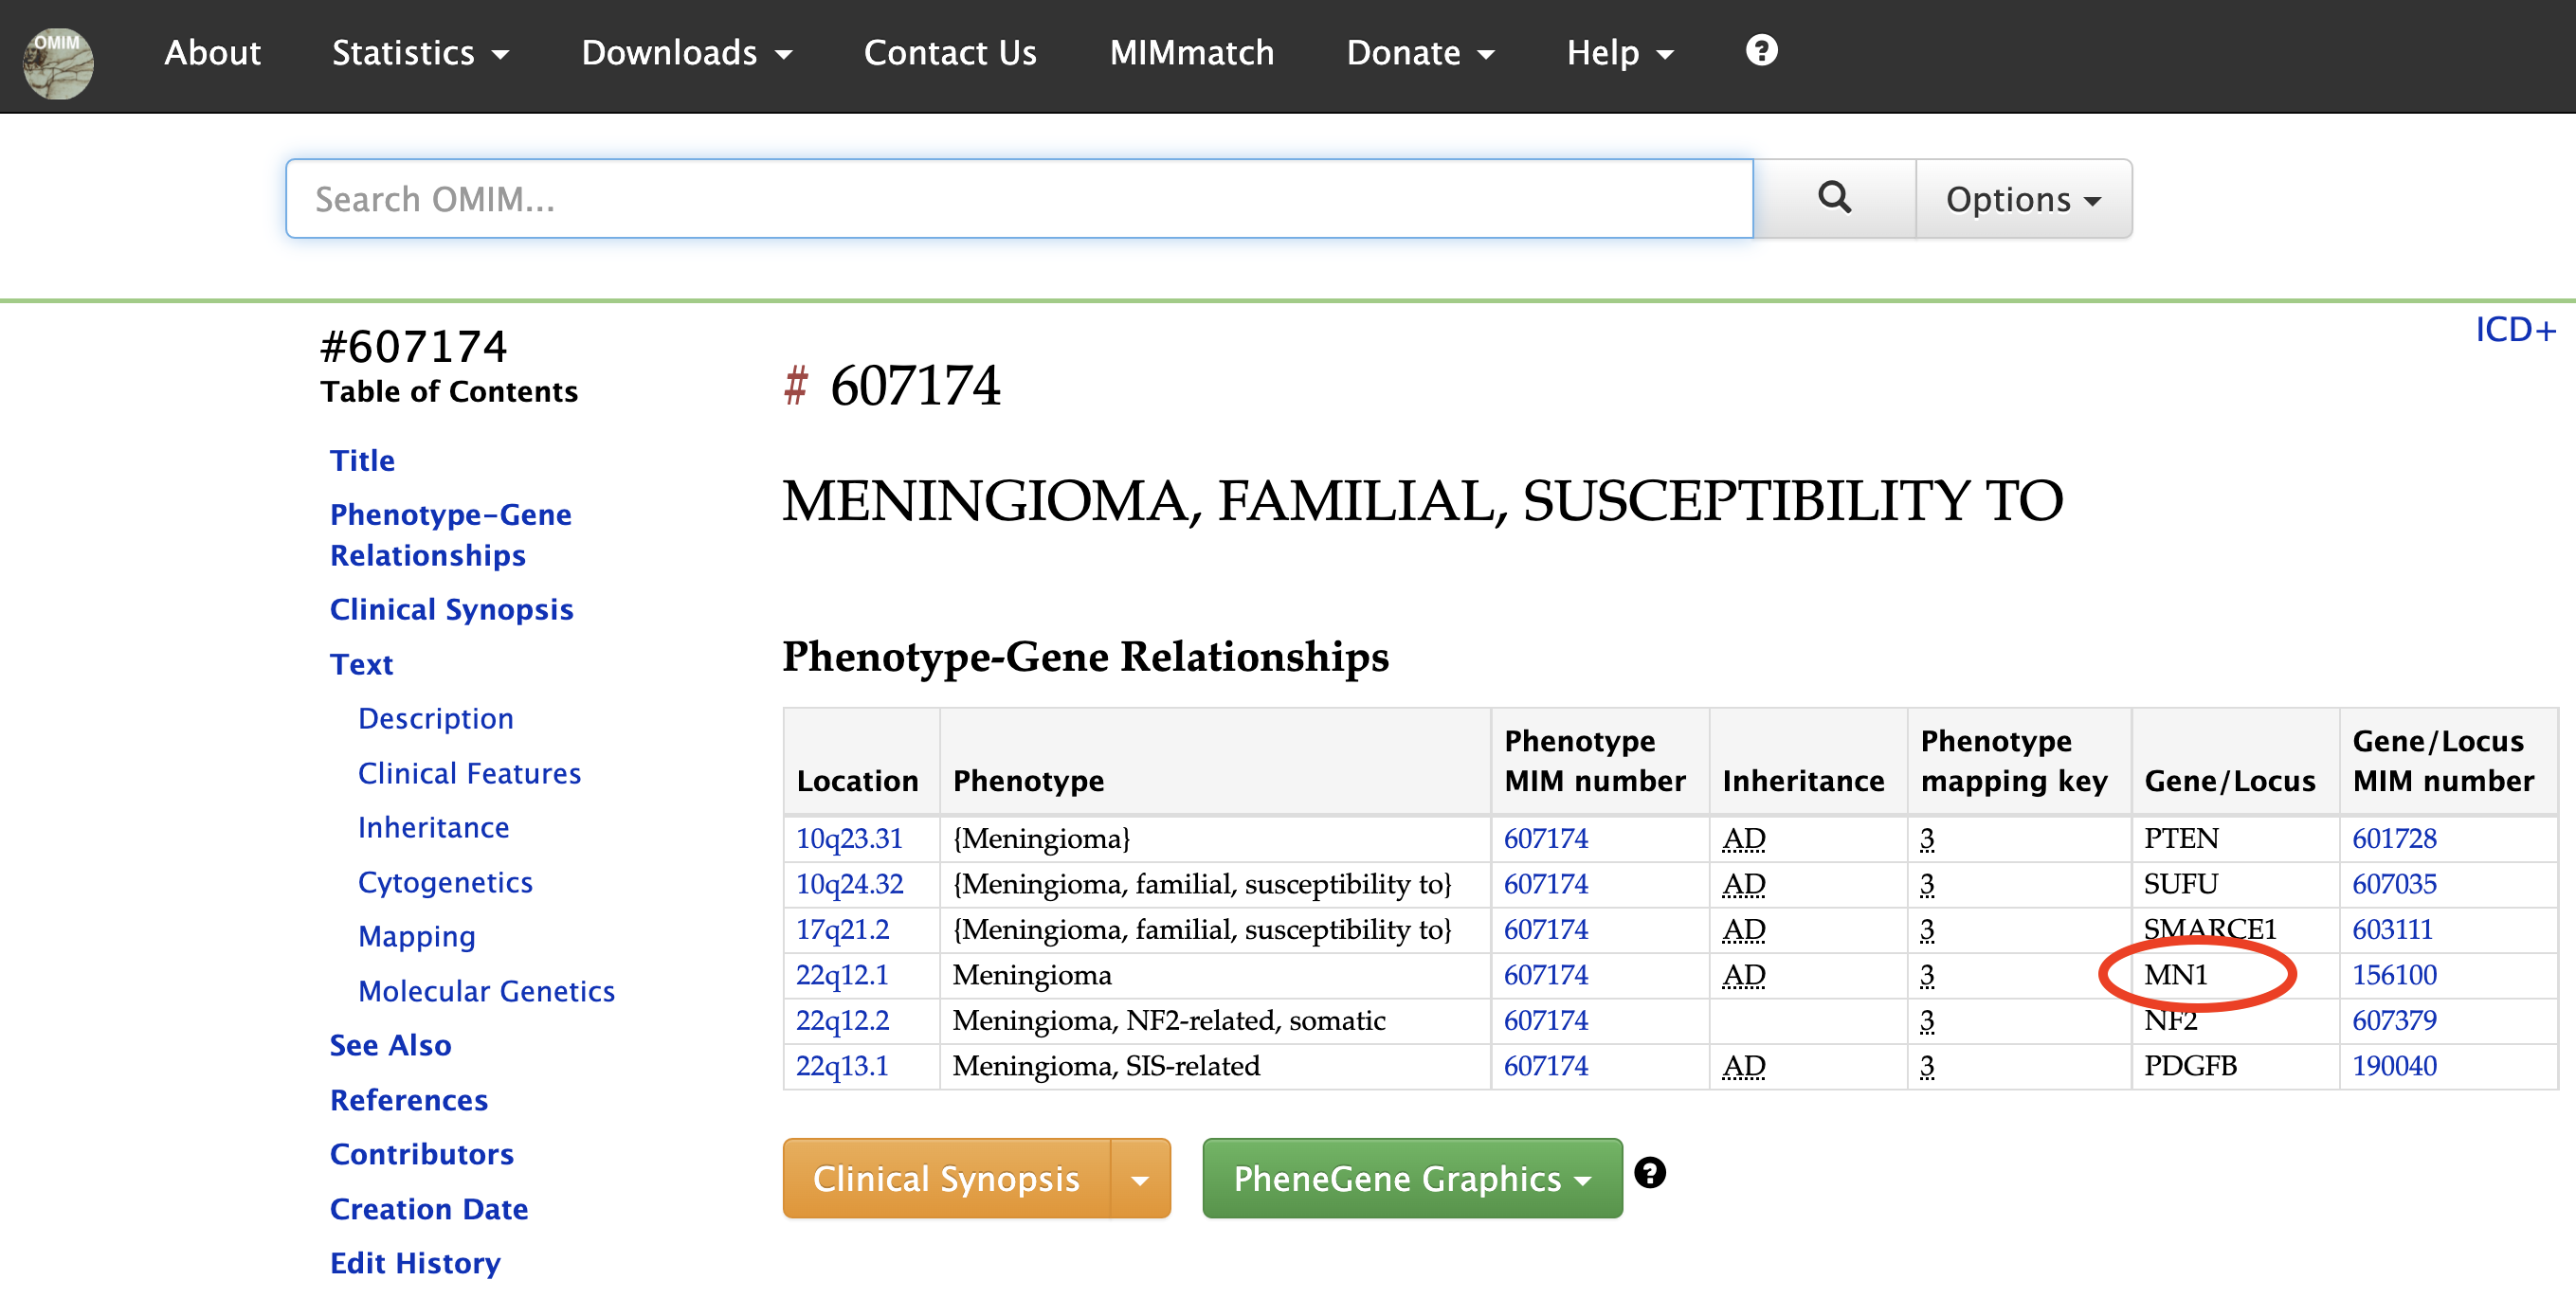
For diseases that are annotated in OMIM, clicking on the corresponding link in the gene view will take us to the OMIM record.
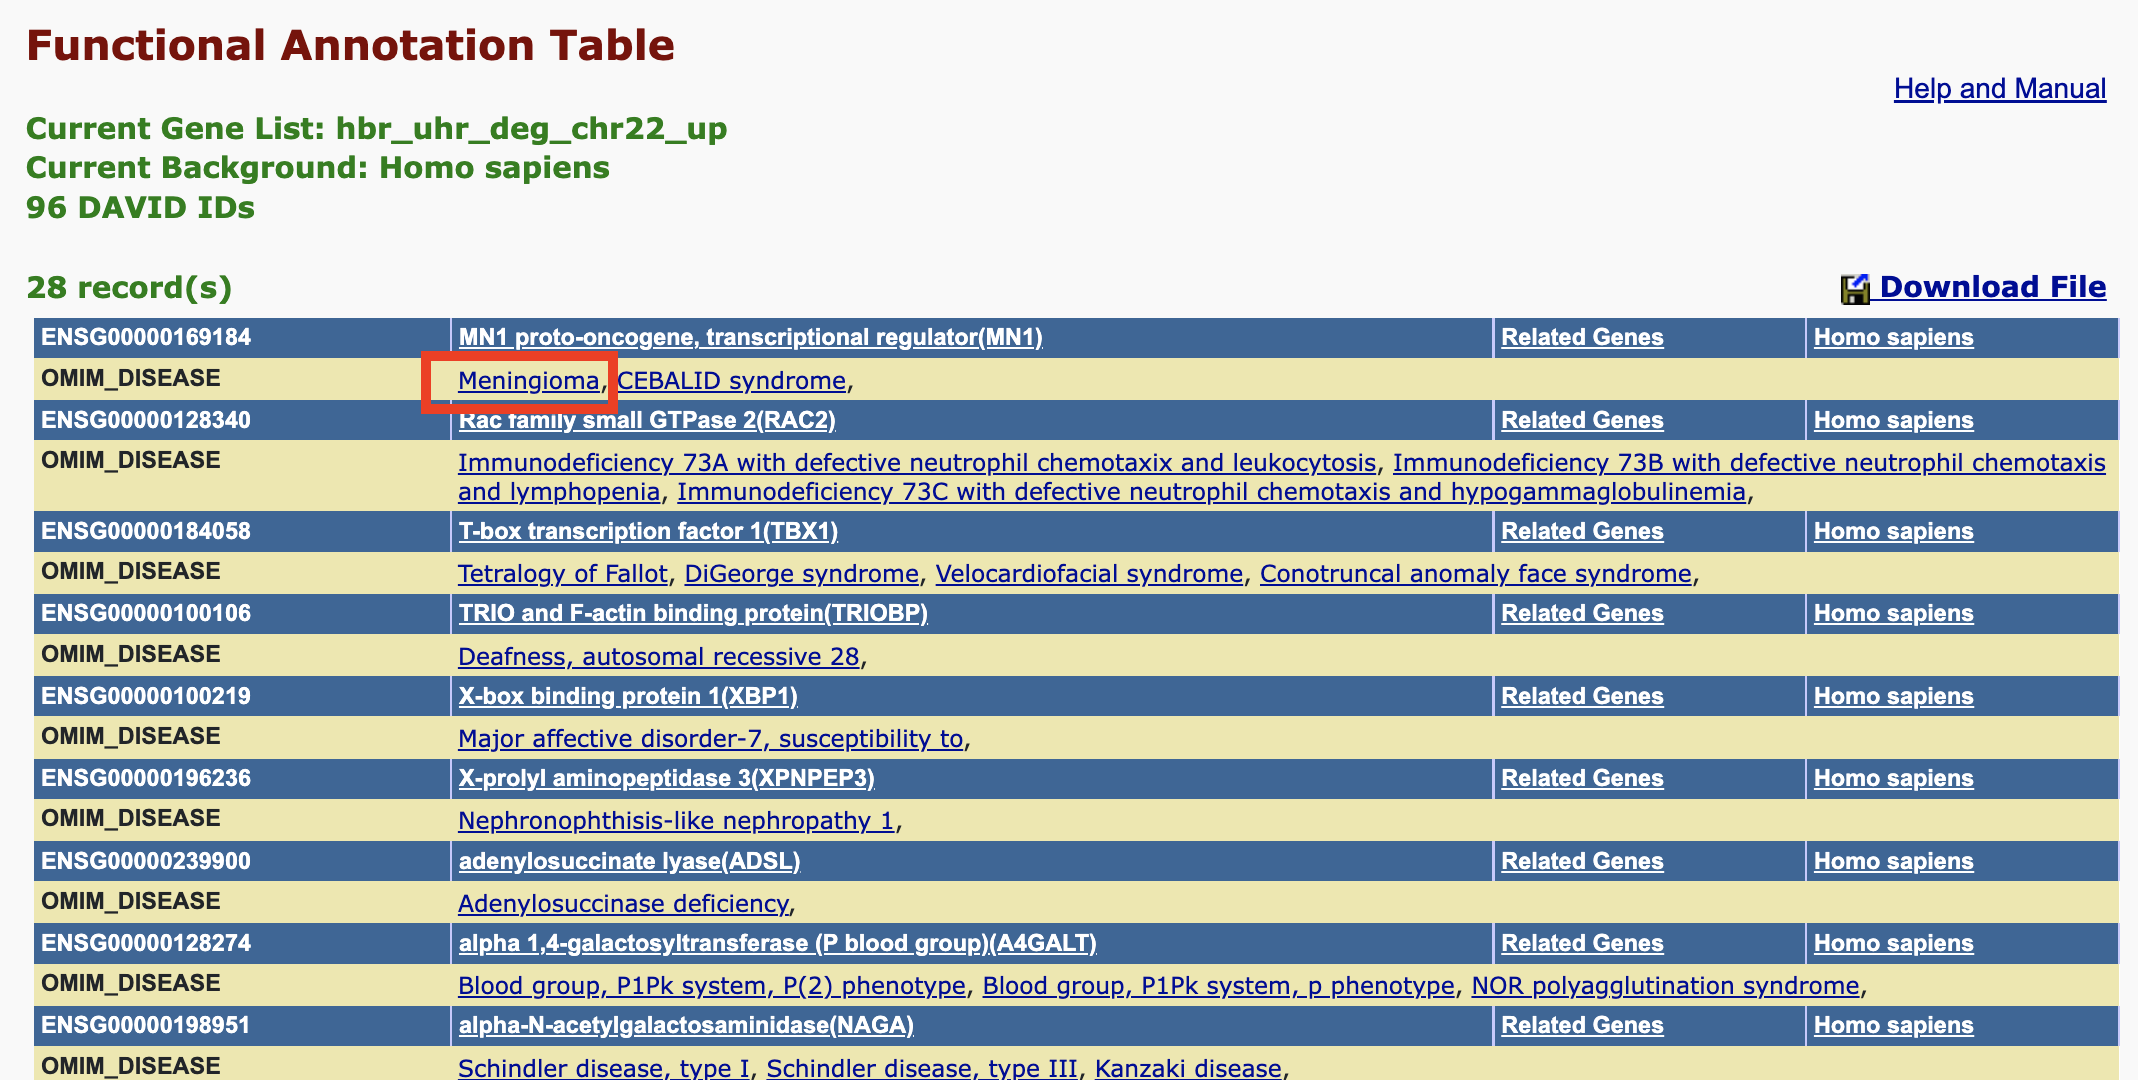
Here, we clicked on Meningioma and was taken to the OMIM record for this disease where we see MN1 as one of the genes involved in the disorder.
Pathways:
We see similar organization of information for other annotations. For instance, DAVID pulls biomolecular pathway information from several sources such as KEGG.
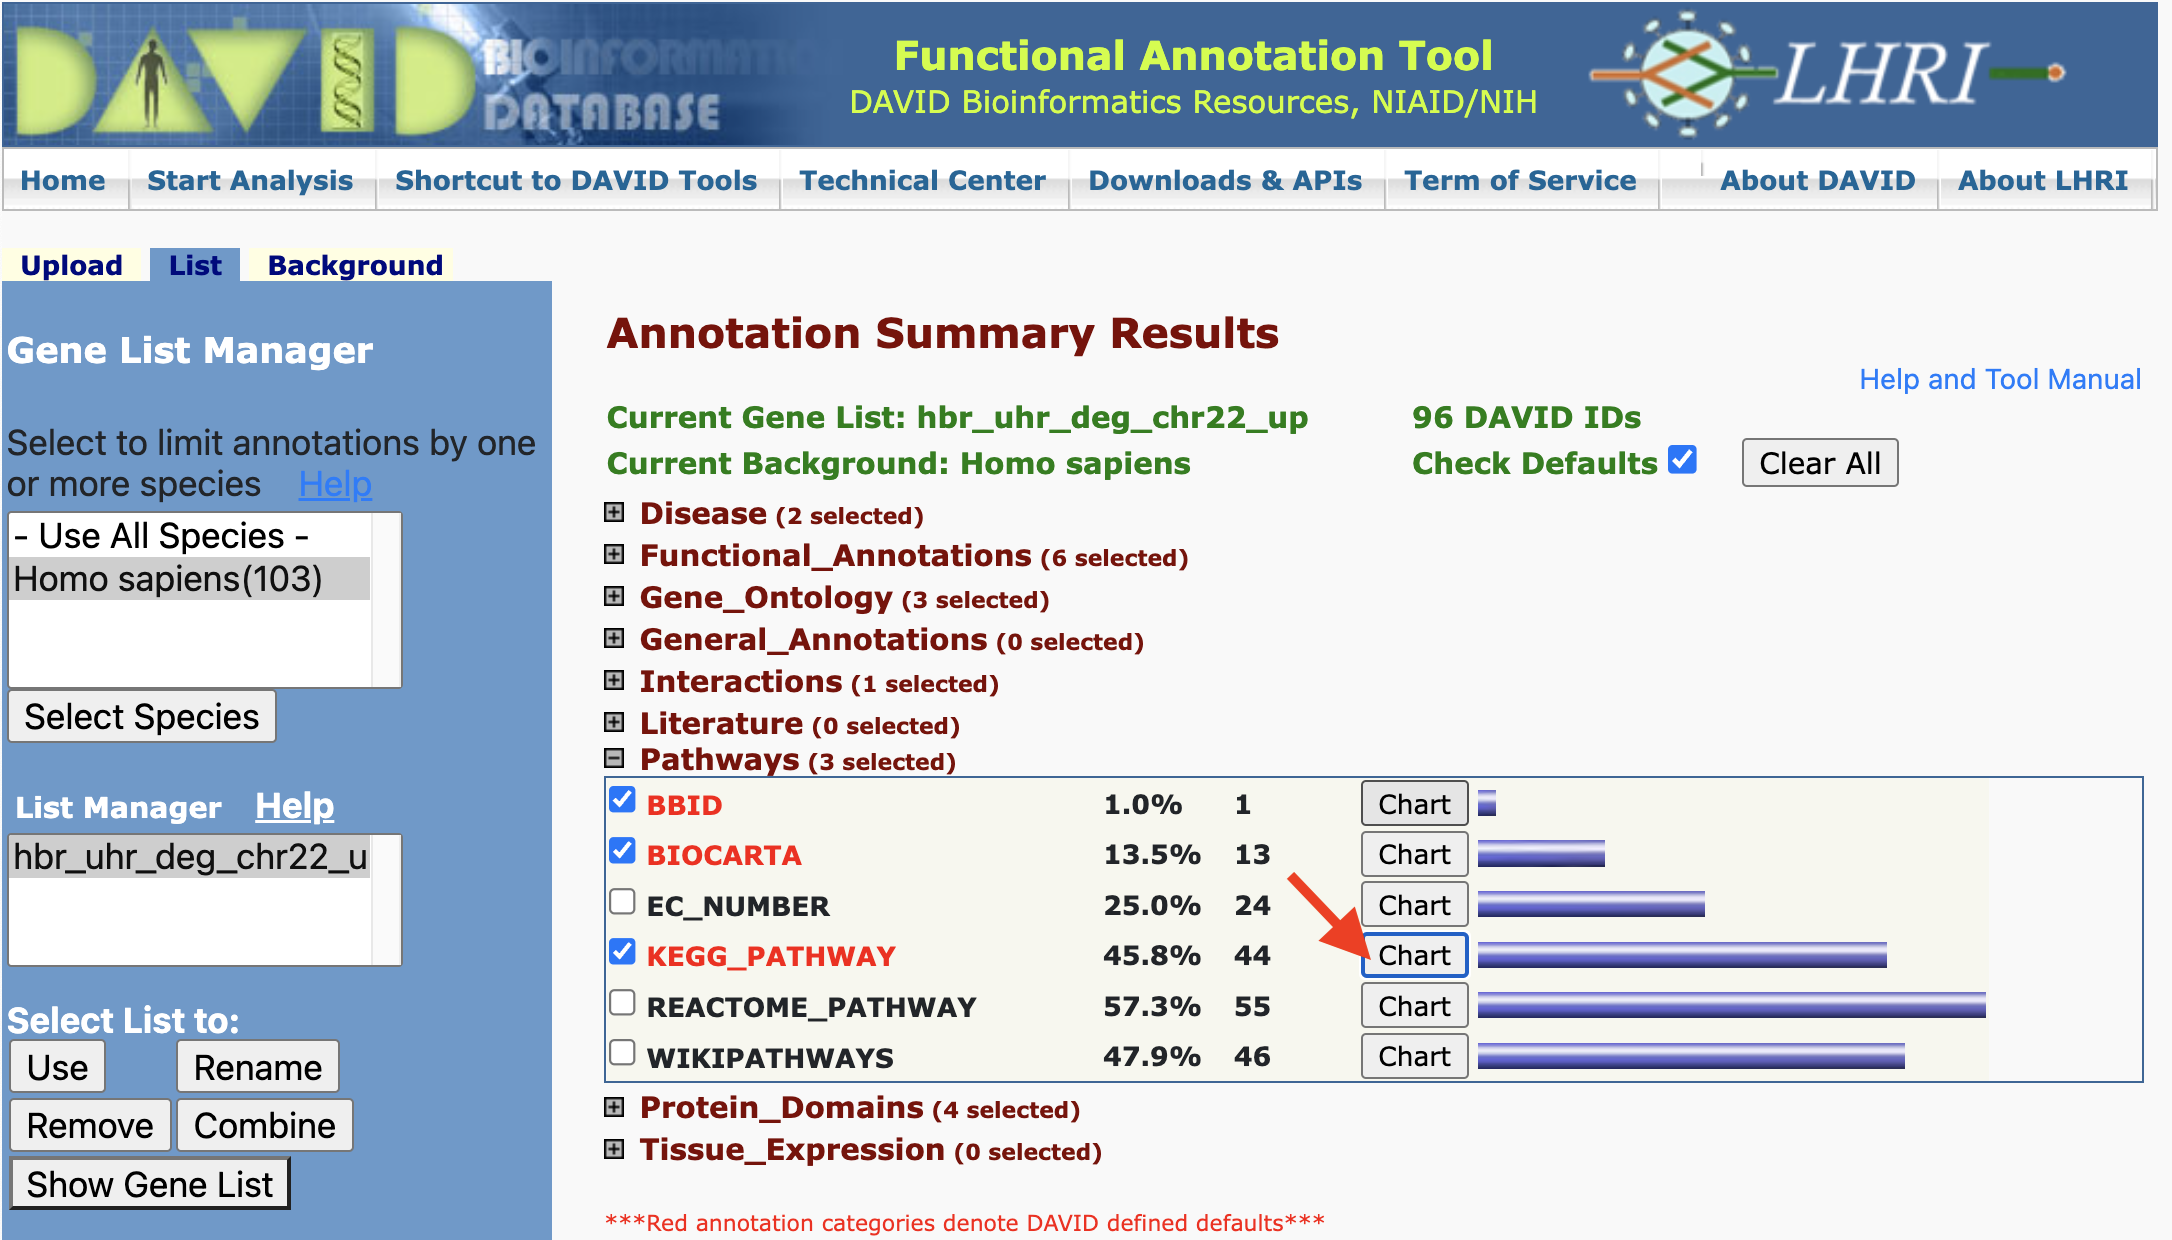
Clicking on the chart view for KEGG pathways we can see what pathways within this database our input genes participate in. The column labeled RT denotes related terms (ie. related pathways). Under the Genes column, we can click on the blue bar to view the genes that map to a pathway. The count column tells us how many genes in our list participate in a particlar pathway.

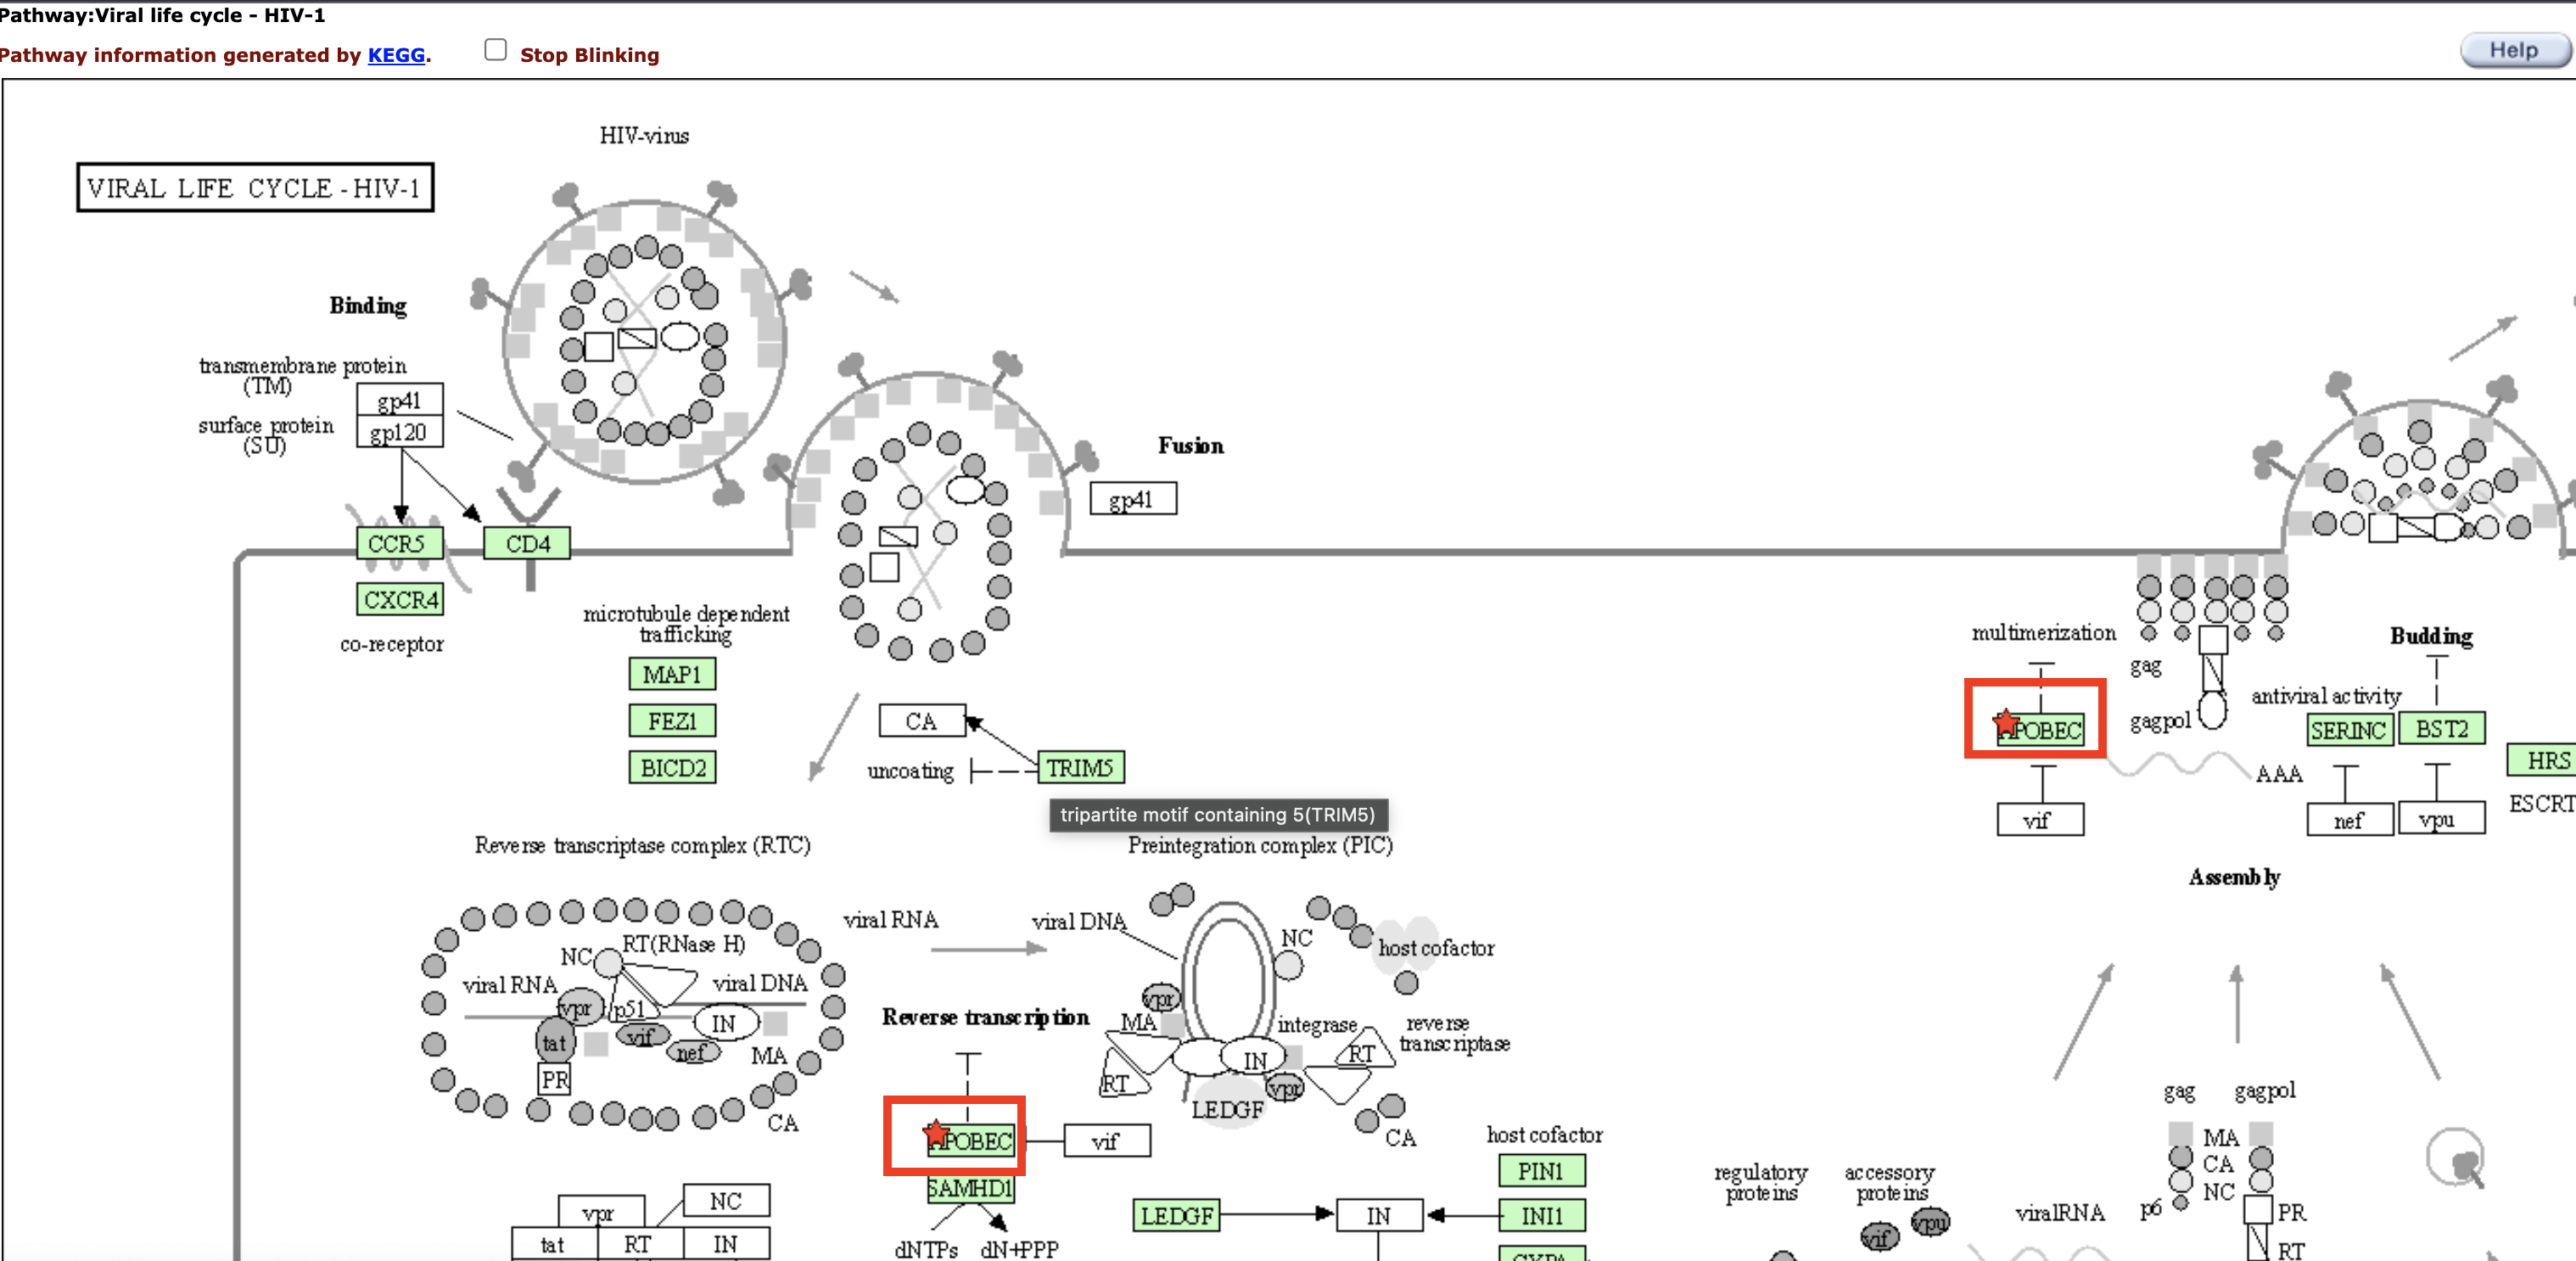
Clicking on a pathway under the Term column in Figure 21 takes us to the pathway record in KEGG or which ever database we are viewing. The input gene that participate in a pathway are labeled with a blinking red star.
Functional Annotation Chart
Chart Report is an annotation term focused view which lists annotation terms and their associated genes under study. -- DAVID help documents
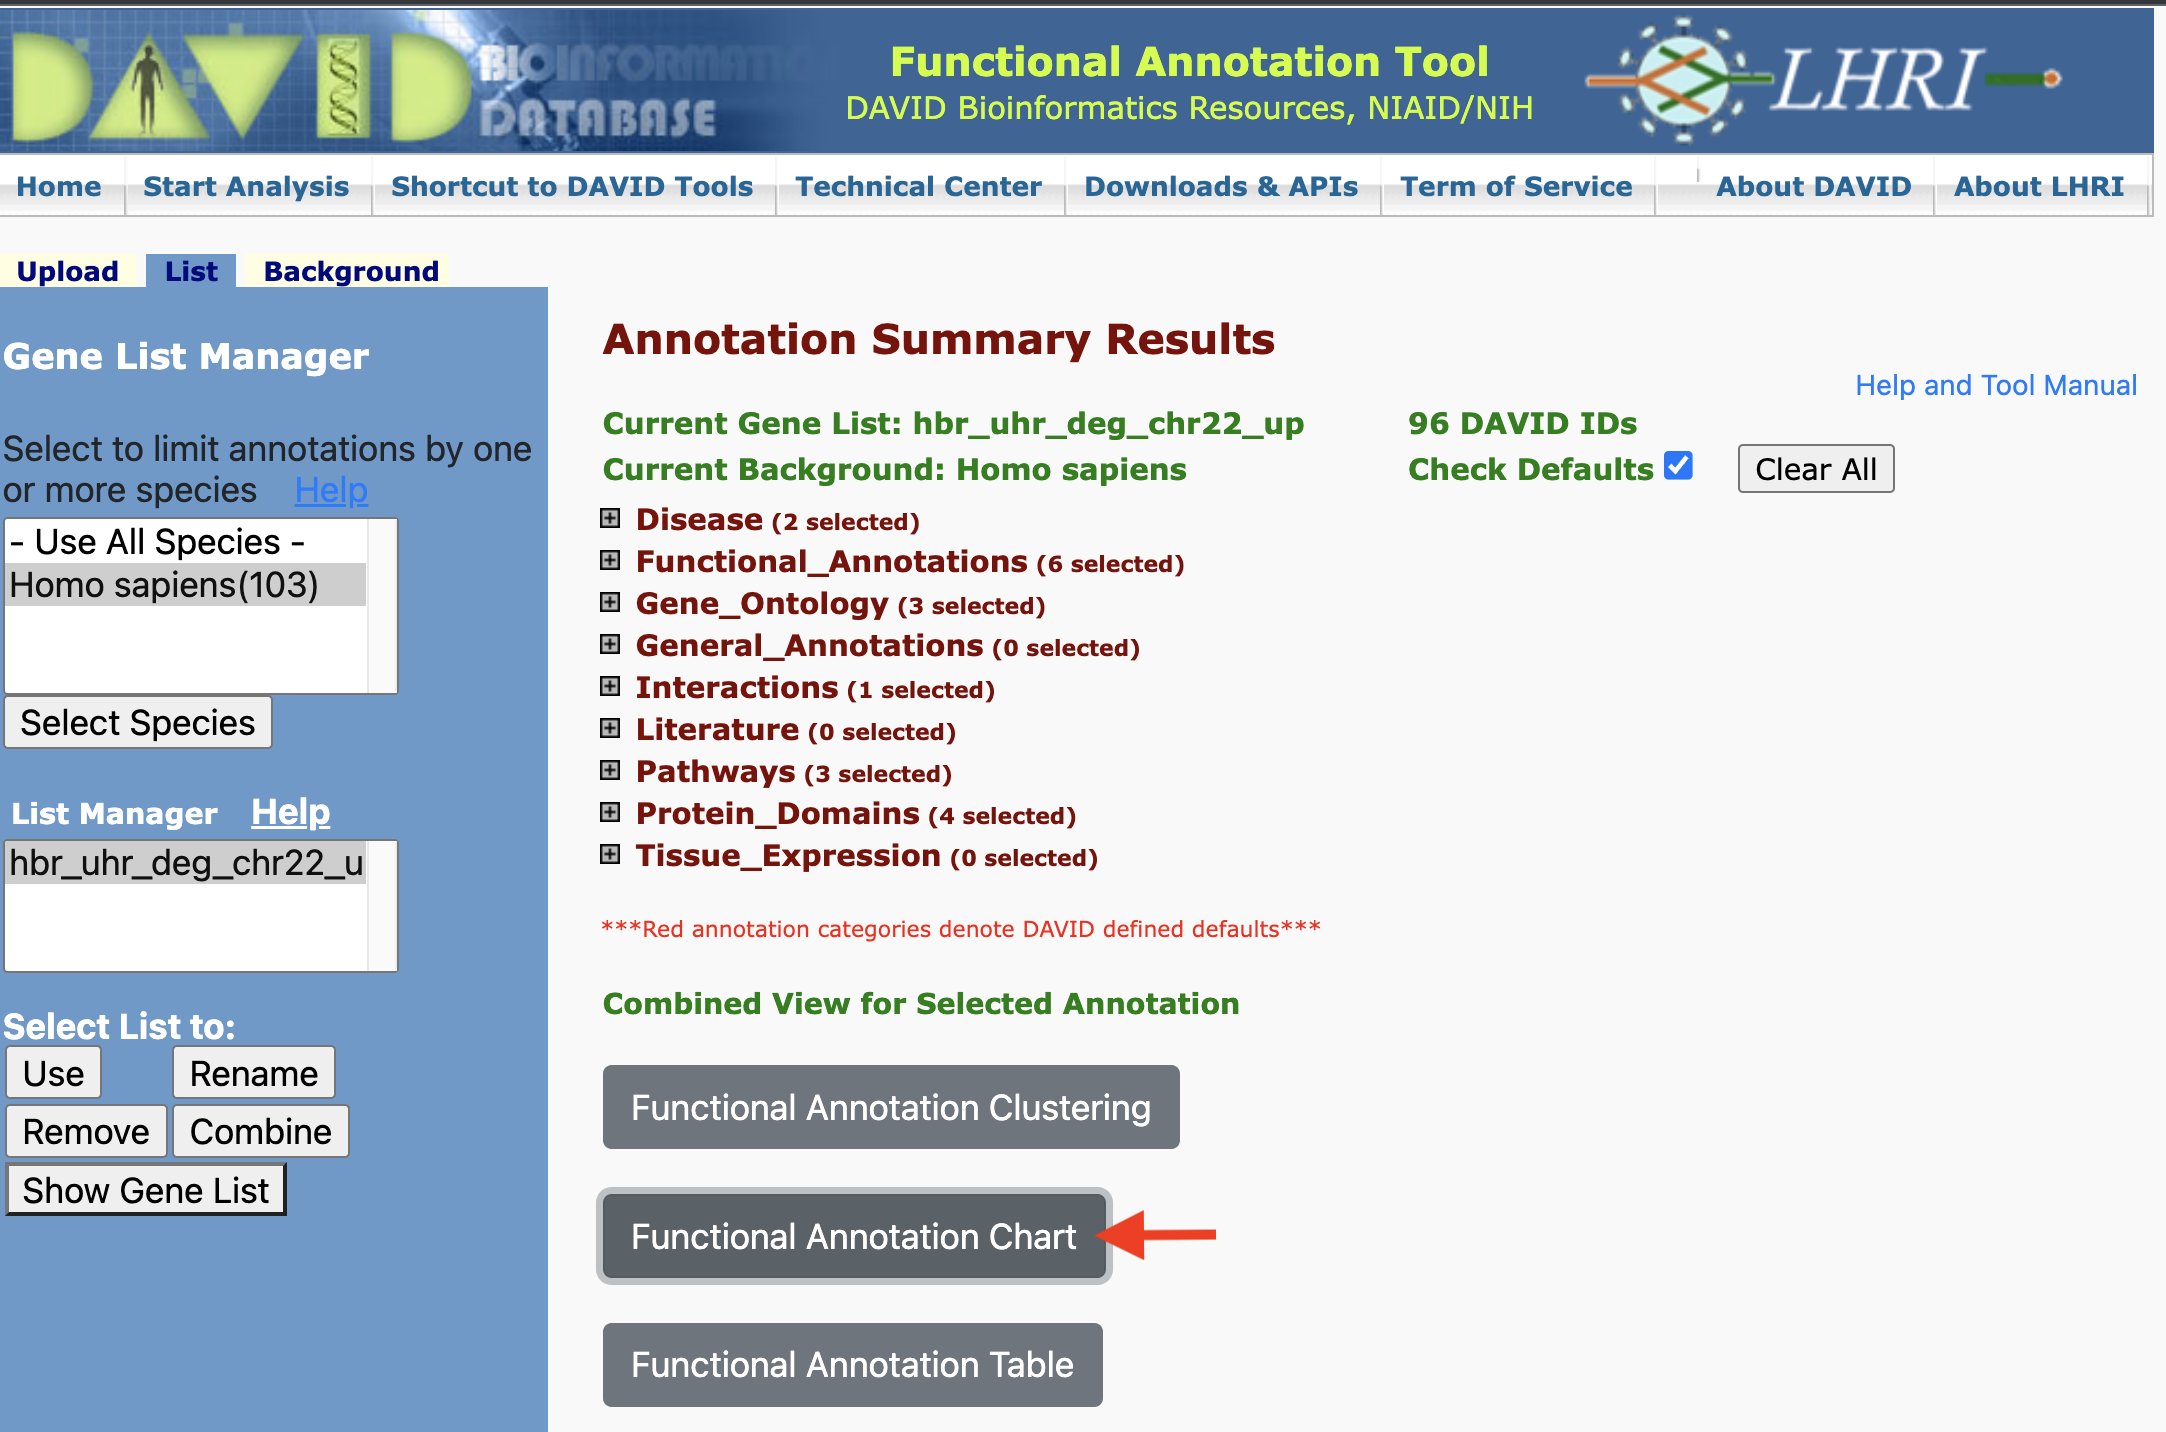
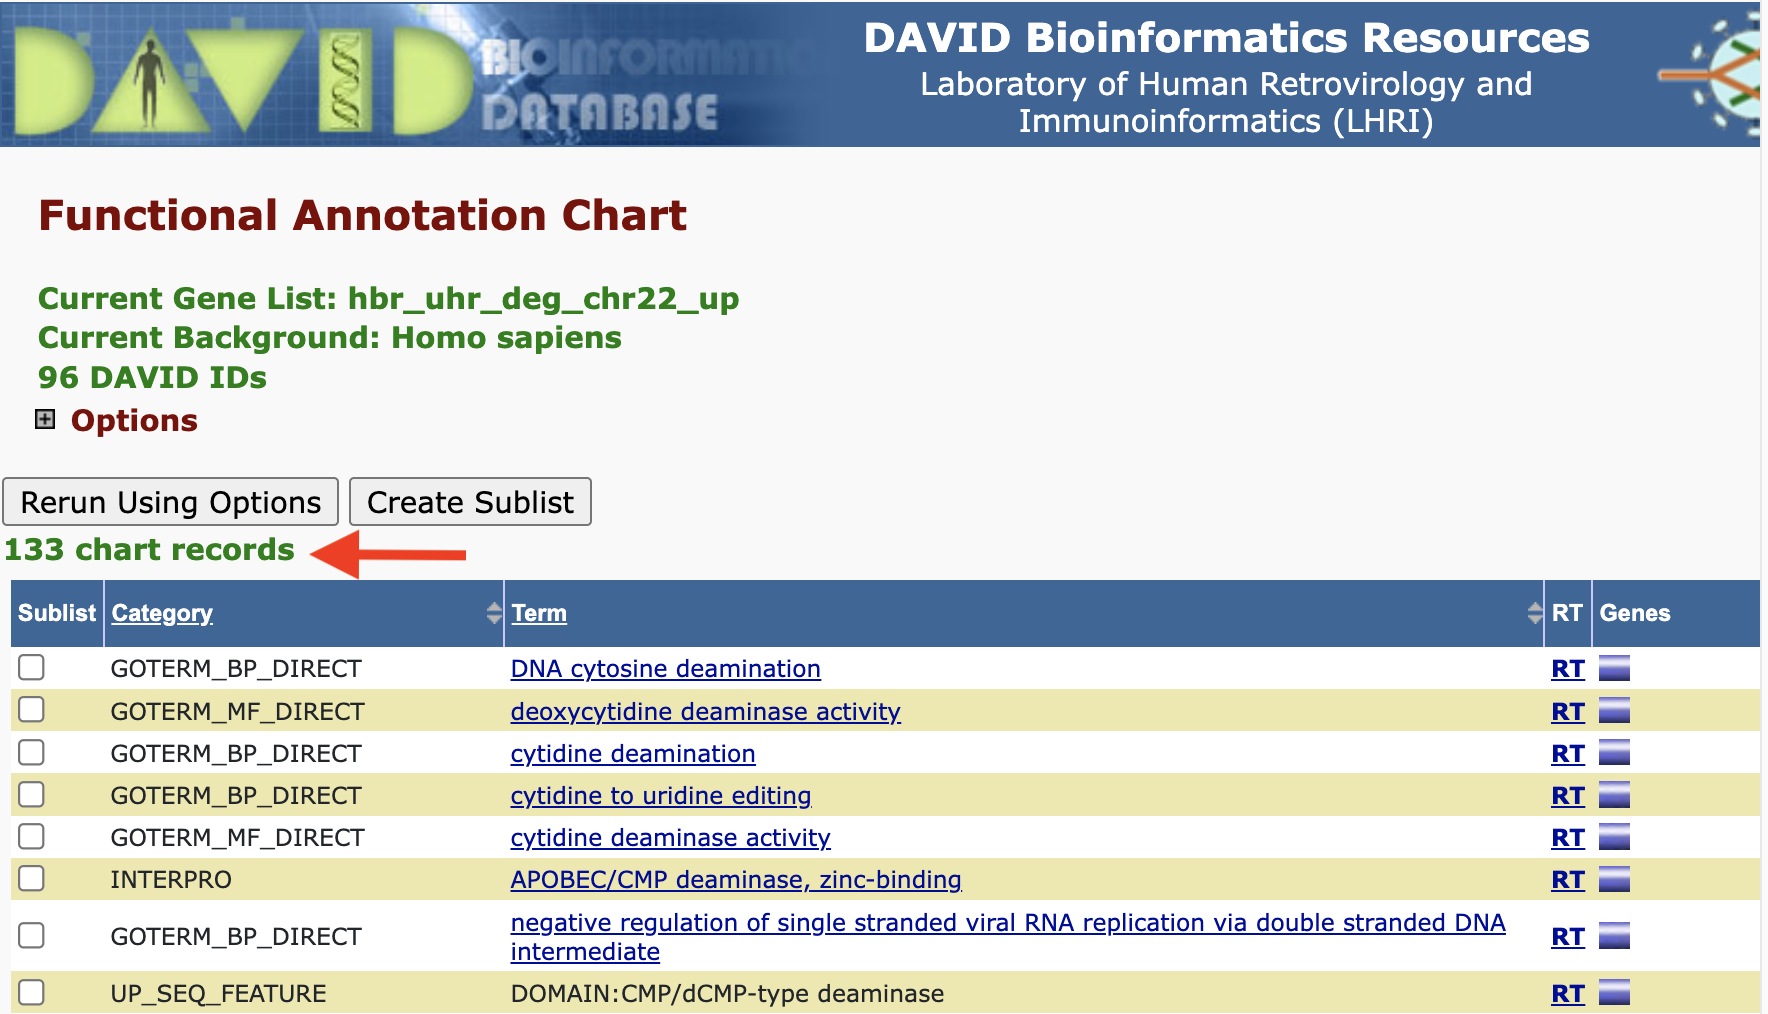
Clicking on the Functional Annotation Chart button, we are taken to the page that lists all of the functional annotations that are input genes map onto. Note that for our gene list (hbr_uhr_deg_chr22_up), we get 133 chart records as a default.
Adding/removing records from the Functional Annotation Chart: But remember that there are boxes that we can check if we expanded on the annotation categories. If we checked the boxes corresponding to DISGENET, GAD_DISEASE, and GAD_DISEASE_CLASS, and check the Functional Annotation Chart again, we see that we have a few additional annotation records. Thus, what we see in the Functional Annotation Chart is customizable.
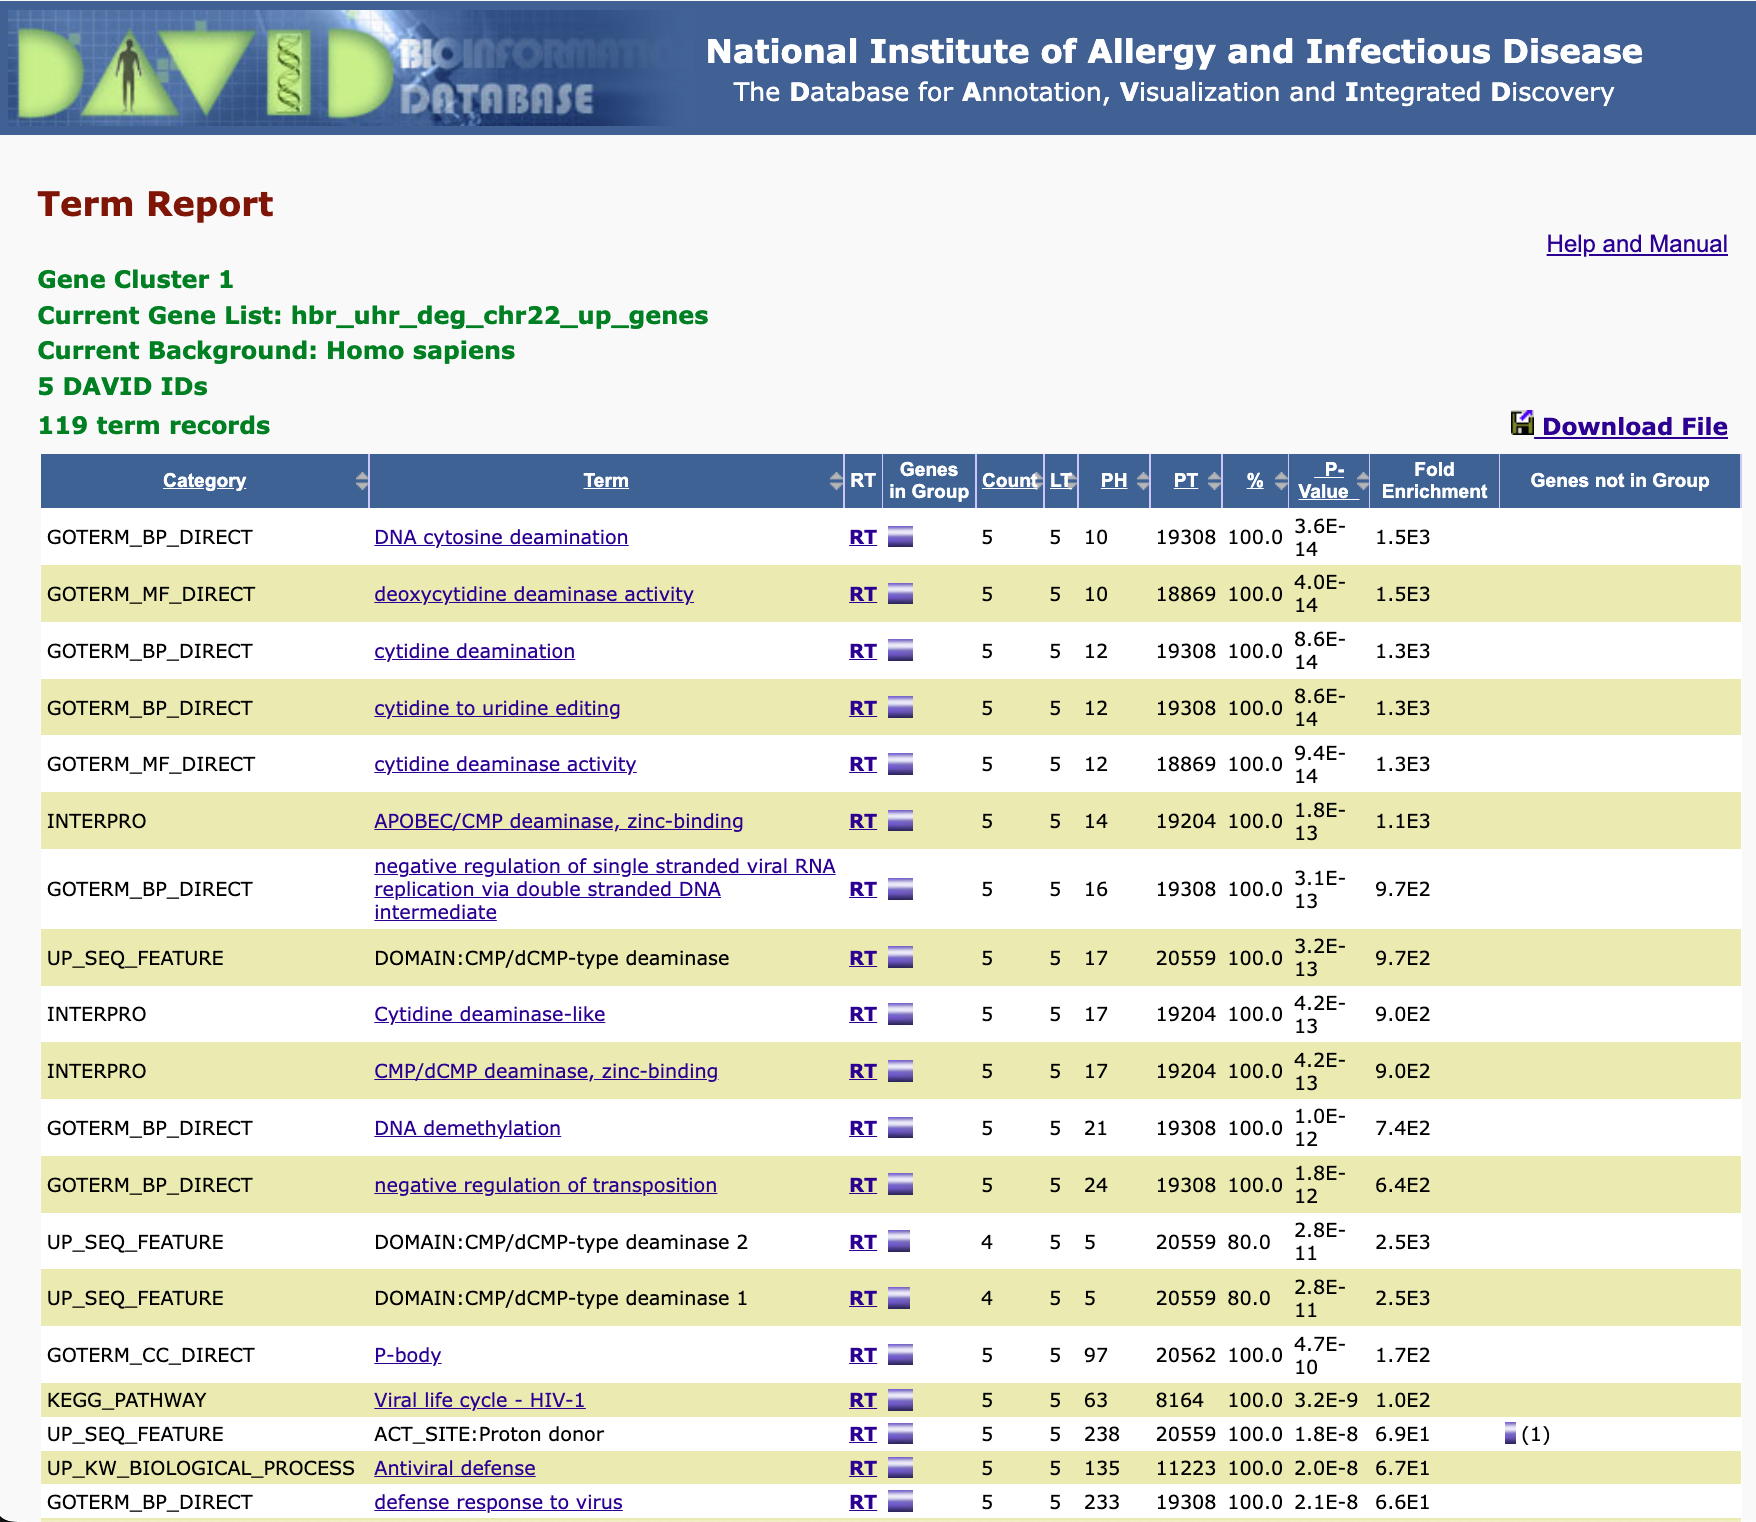
Functional Annotation Clustering
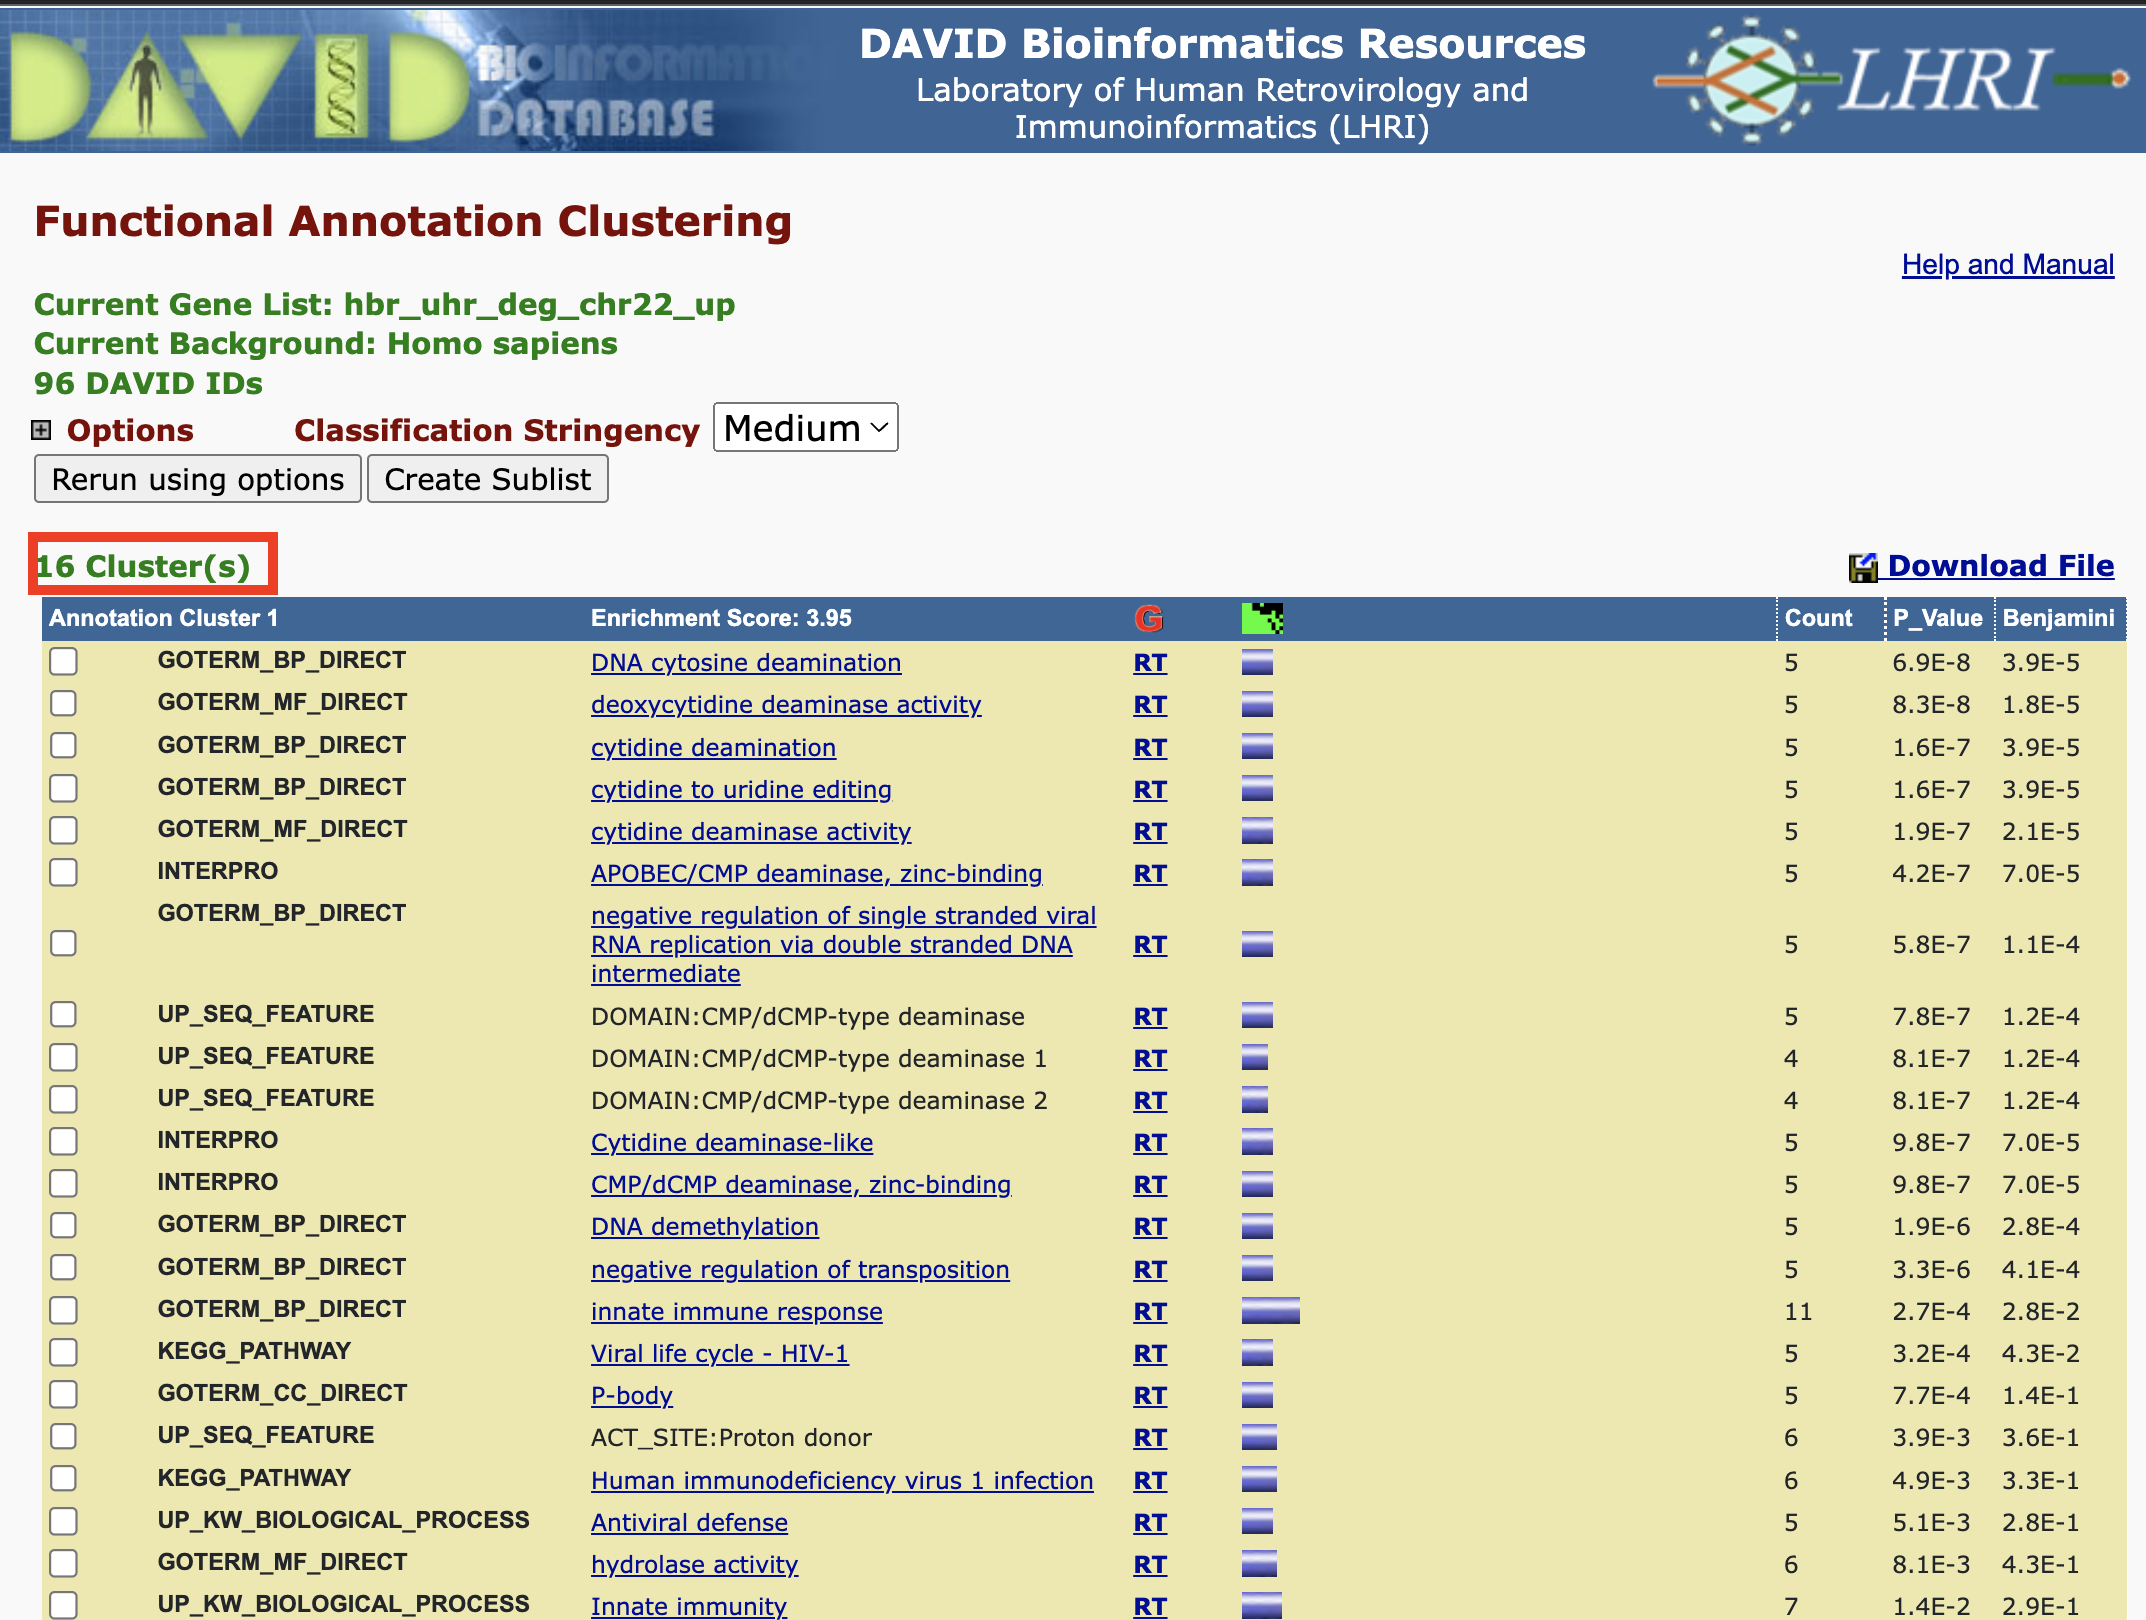
Functional annotation clustering works to cluster annotations that share similar genes. If we click on Functional Annotation Clustering in the Annotation Summary Results page then we can see the functional annotation clusters that our input genes map to.
We can fine tune how DAVID clusters the annotations using the parameters below.
- "Clustering Stringency (lowest → highest): A high-level single control to establish a set of detailed parameters involved in functional classification algorithms. In general, the higher stringency setting generates less functional groups with more tightly associated genes in each group, so that more genes will be unclustered. The default setting is Medium, which gives balanced results for most cases based on our studies. Customization allows you to control Advanced options." -- DAVID functional classification documentations
- "Similarity Term Overlap (any value ≥ 0; default = 4): The minimum number of annotation terms overlapped between two genes in order to be qualified for kappa calculation. This parameter is to maintain necessary statistical power to make the kappa value more meaningful. The higher the value, the more meaningful the result is." -- DAVID functional classification documentations
- "Similarity Threshold (any value between 0 to 1; default = 0.35): The minimum kappa value to be considered significant. A higher setting will lead to more genes going unclustered, which leads to a higher quality functional classification result with fewer groups and fewer gene members. Kappa value of 0.3 starts giving meaningful biology based on our genome-wide distribution study. Anything below 0.3 has a good chance to be noise." -- DAVID functional classification documentations
- "Initial Group Members (any value ≥ 2; default = 4): The minimum gene number in a seeding group, which affects the minimum size of each functional group in the final cluster. In general, the lower value attempts to include more genes in functional groups, and may generate a lot of small size groups." -- DAVID functional classification documentations
- "Final Group Members (any value ≥ 2; default = 4): The minimum gene number in one final group after a 'cleanup' procedure. In general, the lower value attempts to include more genes in functional groups and may generate a lot of small size groups. It cofunctions with previous parameters to control the minimum size of functional groups. If you are interested in functional groups containing only 2 or 3 genes, you need to set it to a very low value. Otherwise, the small group will not be displayed and the genes will go unclustered." -- DAVID functional classification documentations
- "Multi-linkage Threshold (any value between 0% to 100%; default = 50%): This parameter controls how seeding groups merge with each other, i.e. two groups sharing the same gene members over the percentage will become one group. A higher percentage, in general, gives sharper separation (i.e. it generates more final functional groups with more tightly associated genes in each group). In addition, changing the parameter does not cause additional genes to go unclustered." -- DAVID functional classification documentations
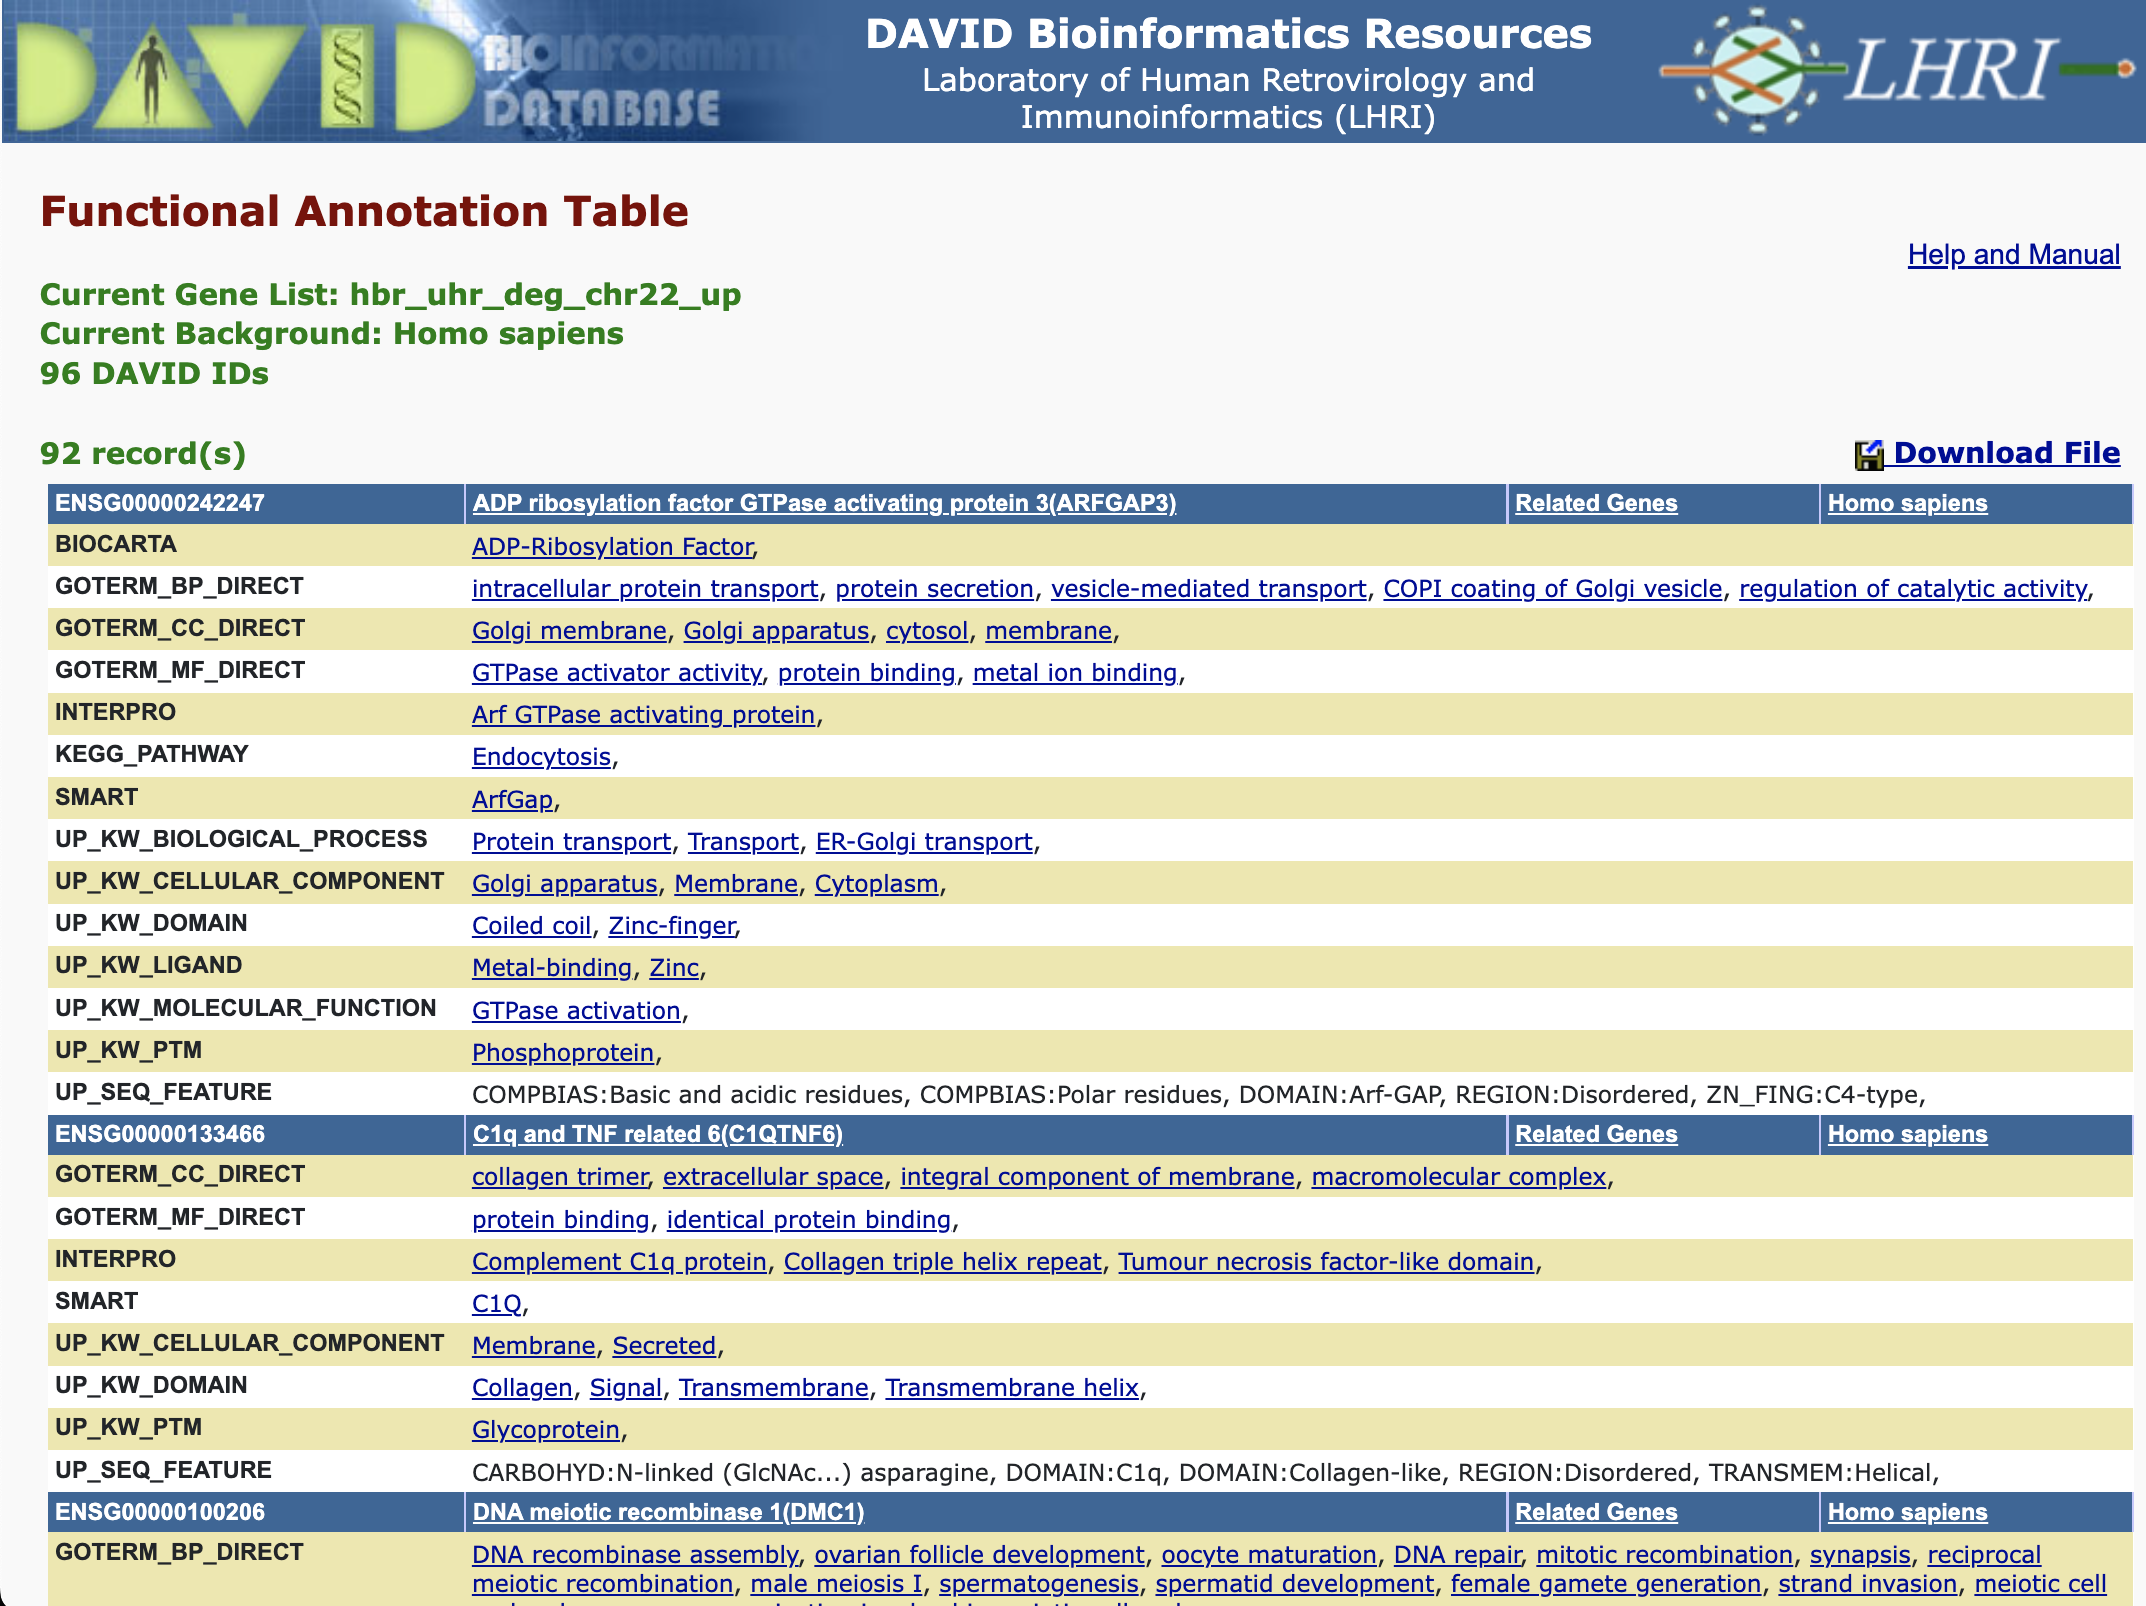
Functional Annotation Table
Provides a gene-centric view which lists the genes and their associated annotation terms... -- DAVID help documents
Gene Functional Classification Result
DAVID can also generate gene clusters where those gene that cluster together share common annotations.
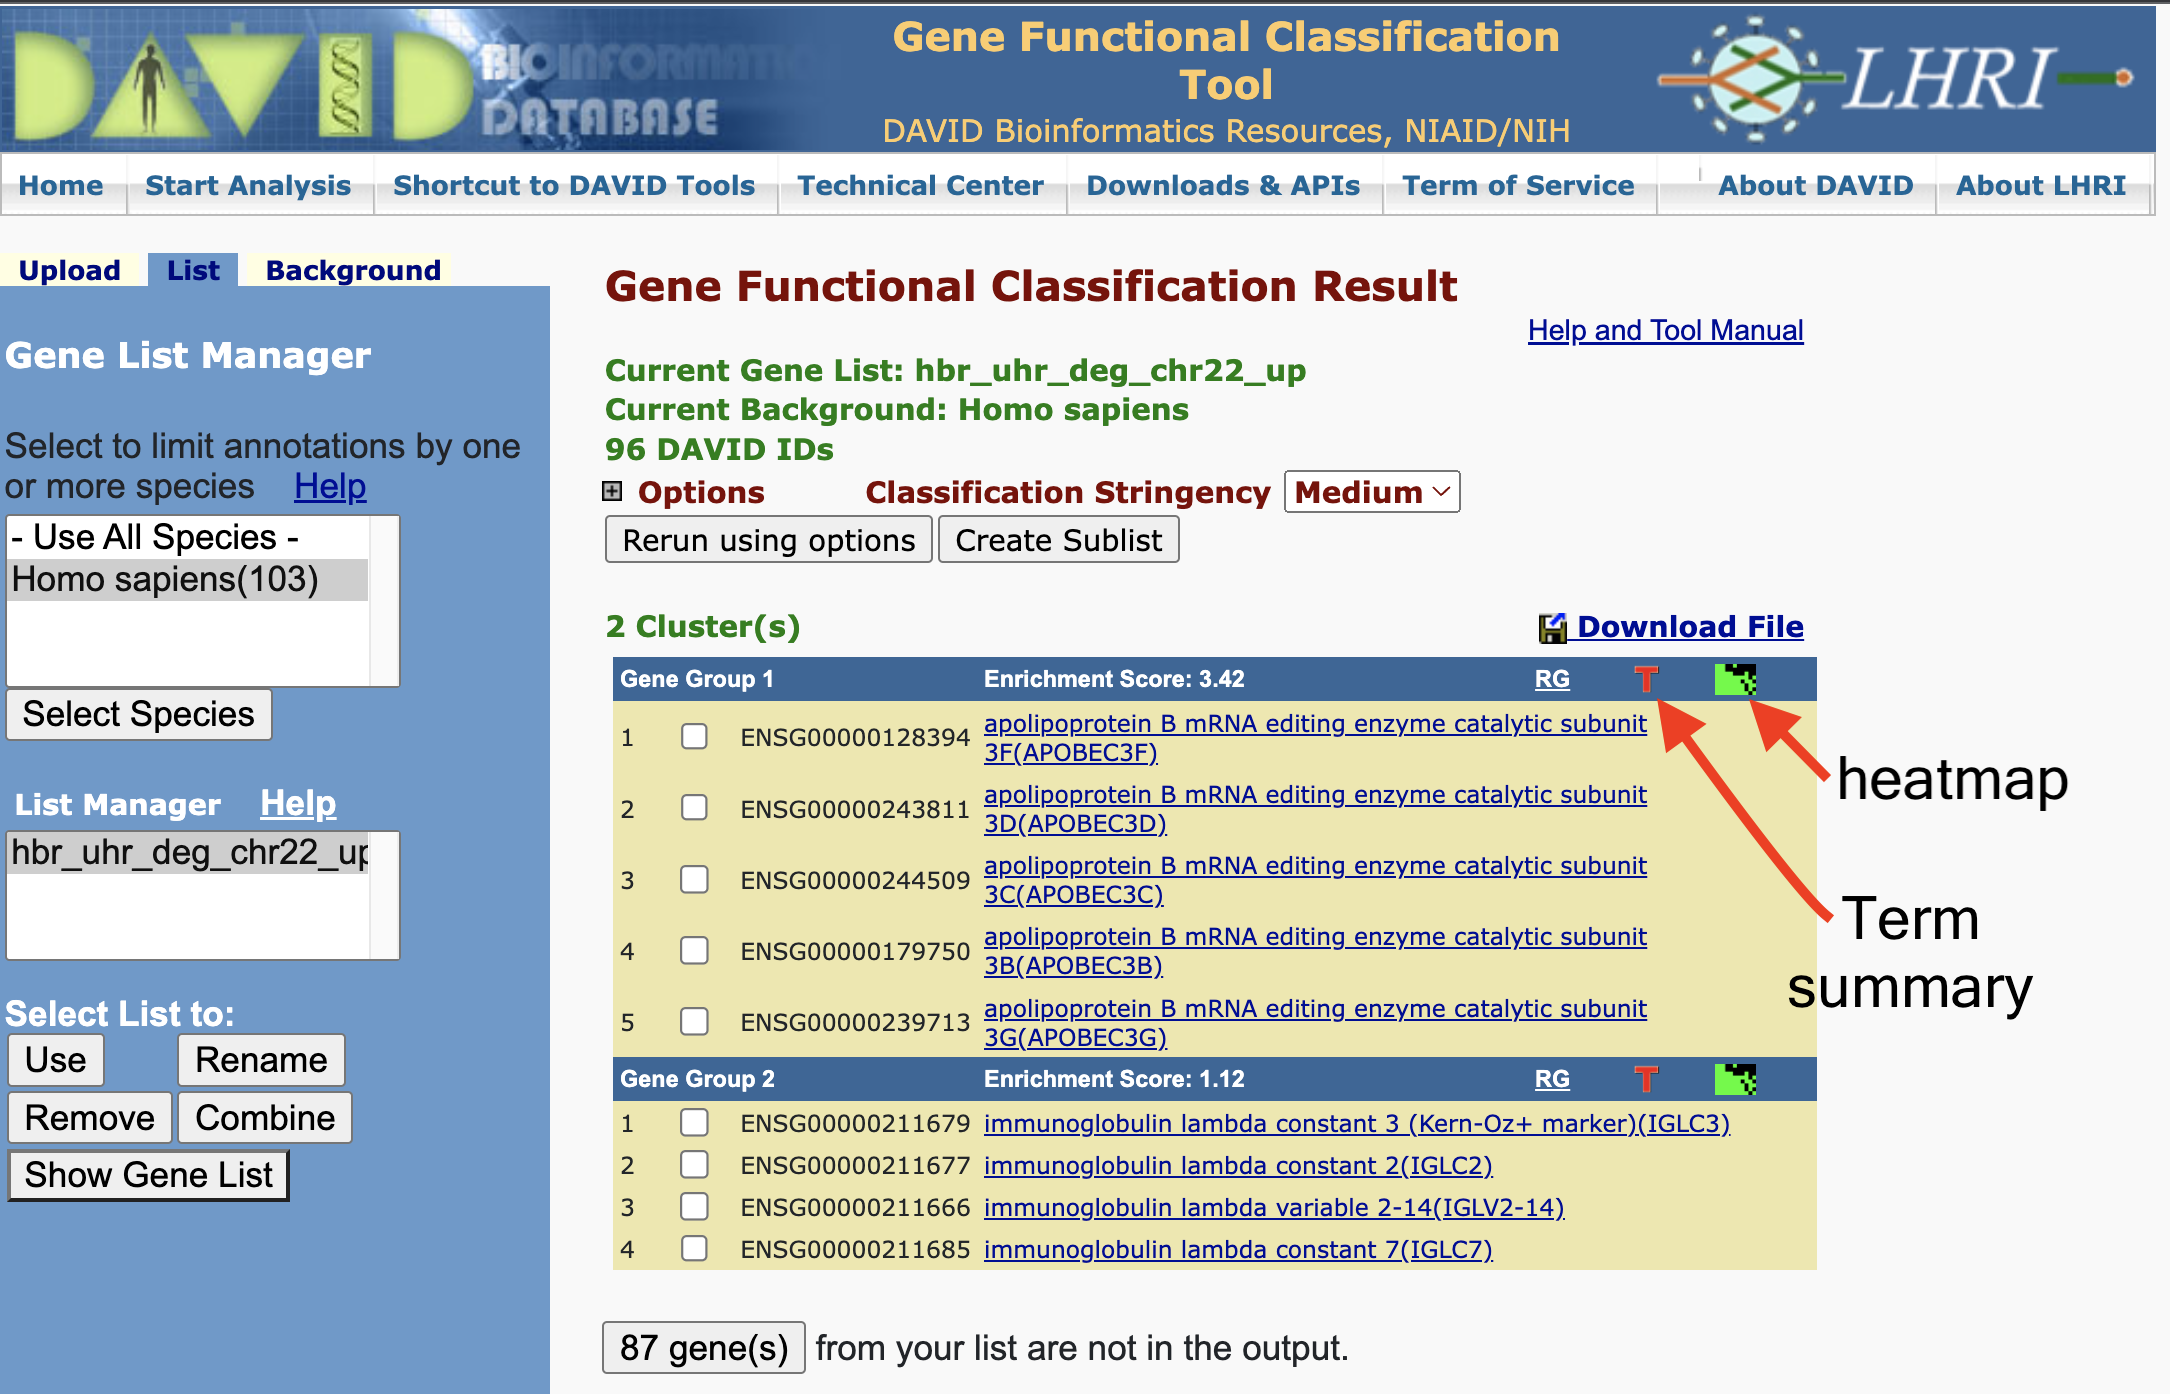
We can view the cluster information as a heatmap where green represents an association between the gene and an annotation. The black represents no reported association between the gene and an annotation. On the bottom horizontal axis, we have annotation name. The right vertical axis, we have the gene names.

We can obtain a table view of the gene clustering results.