Course Wrap-up
This lesson concludes the Bioinformatics for Beginners course series. Please email us any time at ncibtep@nih.gov for help with your bioinformatics questions or concerns.
Lesson Objectives
- Short course overview.
- Review BTEP and course resources.
- Learn how to login and access the Biostars module.
- Discuss upcoming BTEP courses
- Q & A
RNA-Seq overview
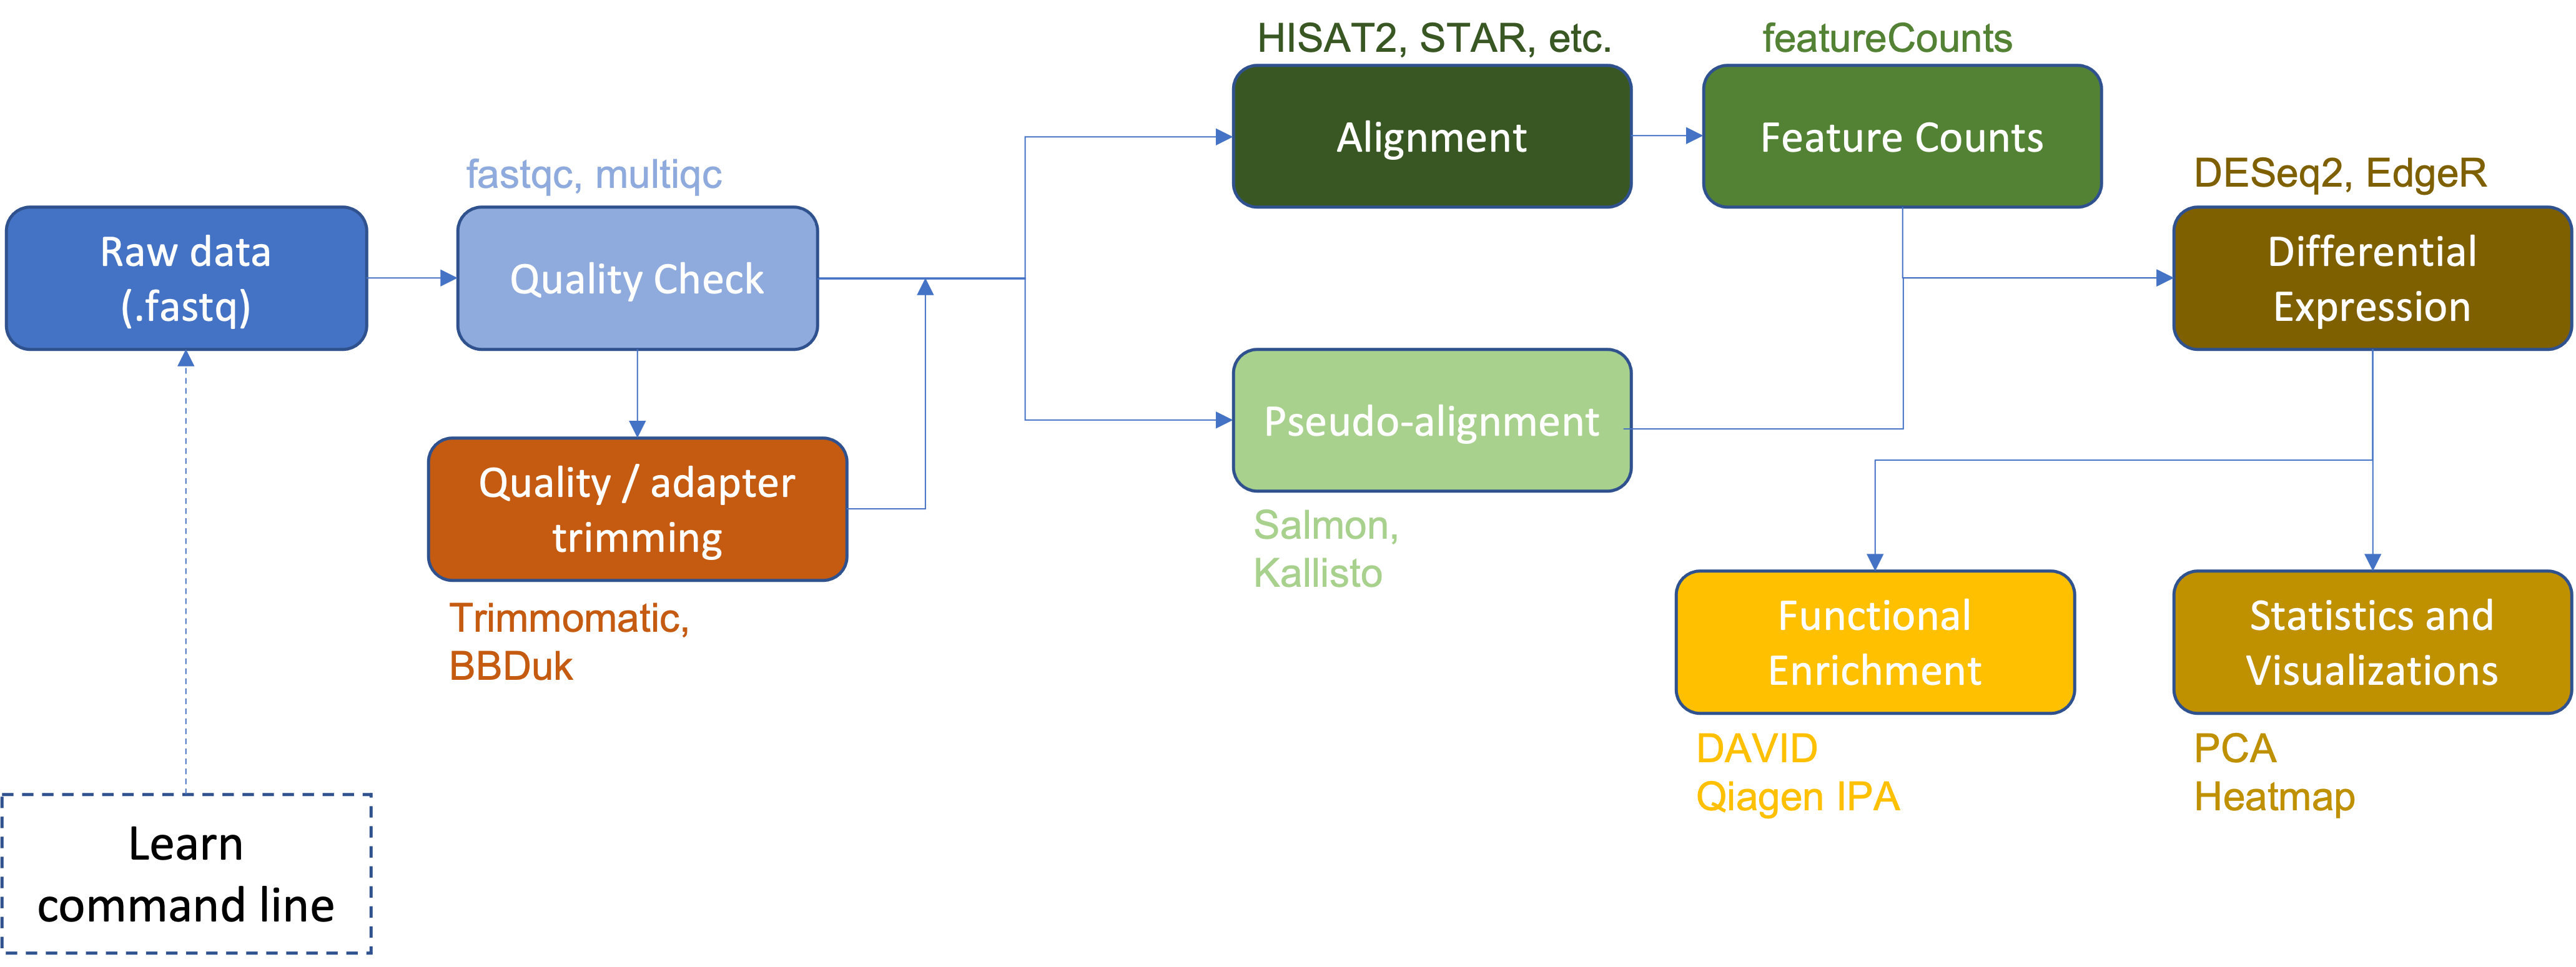
Thus far we have:
- Learned how to interact with our computer via command line.
- Downloaded raw RNA-Seq data (.fastq files).
- Examined raw data quality using
fastqcandmultiqc. - Performed adapter and quality trimming using
Trimmomatic. - Aligned the raw sequences to a reference genome (human chromosome 22 from the GRCh38 version of the human reference genome) using
HISAT2. - Viewed and compared alignments using IGV.
- Generated a gene count matrix using
featureCounts. - Performed differential expression analysis (
DESeq2,EdgeR). - Generated a heatmap of differentially expressed genes.
- Performed functional enrichment using
DAVIDandQiagen IPA.
Review of resources
BTEP Resources pages
BTEP seeks to inform and empower researchers, so that you can ultimately tackle some data analyses on your own. We offer a number of resources to accomplish this goal. Take a look at our resources documentation to get an idea of the many bioinformatics resources available to help you reach your analysis and training objectives.
Course documentation and resources
The documentation you are currently reading will be accessible in the future from the BTEP website.
For this course, there are additional resources worthy of note under the Additional Resource tab, including Further Readings and Tutorials, instructions for Logging into Biowulf, instructions for Accessing the Biostar Handbook, and instructions on Using the Biostars Module for Biowulf.
The Biostar Handbook
As a reminder, when you registered for the course, you also gained a 6 month subscription to the Biostar Handbook Collection. This is a fantastic resource covering a range of bioinformatics topics, not just RNA-Seq. At the minimum, consider downloading the book volumes, available as pdfs, before your subscription disappears.
Biostars on Biowulf
For your convenience, we have created a module on Biowulf that includes many of the same programs in the bioinfo environment from The Biostar Handbook. Instructions for using this module can be found at Additional Resources. Let's briefly review some key points about Biowulf and then take a look at using the Biostars module.
Getting a Biowulf account
The first step to working on Biowulf is getting a Biowulf account. If you intend to analzye your own data, most of you will need a Biowulf account some time in the future.
All NIH employees in the NIH Enterprise Directory (NED) are eligible for a Biowulf account. There is a charge of $35 per month associated with each account, which is pretty nominal. The instructions for obtaining an account are here.
Accessing Biowulf
Once you have your Biowulf account, you can connect remotely to Biowulf using a secure shell (SSH) protocol. If you have a macbook, you will need to open the terminal application. If you are using Windows 10 or >, you can use ssh from the powershell or command prompt. If this fails, consider installing PuTTY and using PuTTY.
The login node will be used to submit jobs to run on the compute nodes that make up Biowulf or to request an interactive job on a compute node. It can also be used for editing / compiling code, file management on a small scale, and file transfer on a small scale.
ssh username@biowulf.nih.gov
“username” = NIH/Biowulf login username.
If this is your first time logging into Biowulf, you will see a warning statement with a yes/no choice. Type “yes”. Type in your password at the prompt. NOTE: The cursor will not move as you type your password!
Where can I find training materials on Biowulf?
Two introductory lessons on Biowulf were presented in this course series. You can access those here and here. The first contains an introduction to Biowulf including information regarding storage space and the module system. The second provides an introduction to job submission on Biowulf using swarm and sbatch.
For more information and more detailed training documentation, see hpc.nih.gov/training/. Also, the hpc user guides are important resources. Most of your initial questions can be answered simply by referring to and reading the user guides.
What software is available on Biowulf?
Hundreds of scientific programs, databases, and packages are maintained on the NIH HPC (Biowulf). These are mostly accessible as modules.
To see a list of available software in modules use
module avail
module avail [appname|string|regex]
module –d
To load a module
module load appname
module load appname/version
To see loaded modules
module list
To unload modules
module unload appname
module purge #(unload all modules)
Note: you may also create and use your own modules.
For a list of available software, see hpc.nih.gov/apps/. For more information about working with modules, see hpc.nih.gov/apps/modules.html.
Using the Biostars Module
As mentioned above, instructions for using the Biostar module on Biowulf can be found in the course documents. The Biostars module loads the software used in this course series. A list of the software included in the module can be found in the course documentation. Most of the tools / programs in this list can be loaded as independent modules.
Let's see how we can use the Biostars module to work with course materials.
First, as we have already logged into Biowulf, we need to get an interactive session.
-
Use
sinteractiveto work on an interactive node. This will result in 4GB of memory and 2 CPUs.Note: If you are planning to use the
sratoolkitto download data from the SRA, you will need to allocate local scratch space (sinteractive --gres=lscratch:30).sinteractiveallows us access to a Biowulf computational mode in an interactive fashion rather than relying on job submission scripts viasbatch. -
Once we have an interactive node, we need to run the
run_biostars.shscript.This will do the following:source /data/classes/BTEP/apps/biostars/1.0/run_biostars.sh- Runs a set of commands to setup the terminal environment.
- Creates a data directory environmental variable (
$DATA) where you can gain access to course data and an environmental variable ($CODE) where you can find specific scripts associated with the course, for example, the R wrapper scripts. - Runs
module use /data/classes/BTEP/apps/modules - Runs
module load biostars
Note: If you want to use the biostars module for other purposes or you want to submit jobs via sbatch, skip Step 2. You can load the module with the following:
 1. `module use /data/classes/BTEP/apps/modules`
 2. `module load biostars`
 3. `module help biostars`
Let's check out $DATA and $CODE.
ls -l $DATA
ls -l $CODE
Upcoming BTEP classes
-
Introduction to R
- January 23rd (M,W 1-2 pm)
-
Unix and Biowulf
- January 24th (T,Th 1-2pm)
-
Introduction to Bioinformatics Resources
- January 12th (Th 1-2 pm)